Related
9 Best Beaches In Australia That Will Make It The Trip Of Your Life!
BY sagnika May 6, 2024
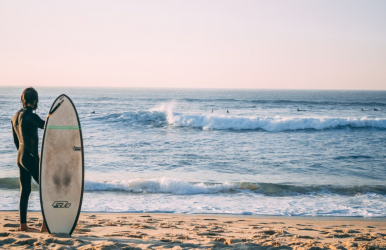
Are you a water person? Do you need to open your shoes and dip your feet in the water soon? Is your favourite destination always related to beaches? Well, then you must check out these nine beaches, some of the best in Australia. When you visit these beaches, you see pure white sand, crystal clear waters, and majestic boulders—it feels like a perfect postcard scene. It is high time that beaches were given their right value, with beautiful scenery and a peaceful environment. Also, you will find my ideas on some things to do in Australia when it comes to these beaches! Keep reading to know more. 9 Best Beaches In Australia That Will Make It The Trip Of Your Life! There are several beautiful beaches in Australia, including Whitehaven Beach, Bondi Beach, Noosa Beach, and others. I will discuss with you the significance of the white sands on these beaches and the crystal-clear waters; at times, the turquoise colour is apparent. Water passes through the sand, making it so fine! Along with the water, the impurities wash away, creating clean and soft sand. Let us delve deeper into how to have some of the best trips of your life when you plan on visiting these beaches. 1. Noosa Main Beach The Sunshine Coast of Queensland offers some beautiful beaches, including Noosa Main Beach! It is one of the most popular beaches in the area, especially because the view is postcard perfect. When you visit Noosa, you will know what I am talking about, especially when you witness the swaying palms, turquoise waters, and golden shore. Lifeguards patrol the area daily, and there are ample facilities. Hence, you will not only enjoy yourself on this beach, but you will also be safe. Furthermore, if you are visiting with families, it is a perfect place because the beach is right beside Hasting Street, where you can shop. The restaurant precinct is also there, so you can easily grab some food. Because the beach is north-facing and sheltered, the surf and climate are gentle all year round. 2. Bondi Beach Bondi Beach is always packed with tourists and is one of the most crowded beaches in Sydney and Australia! It is an iconic beach because, across the stretch of silky sand, you will experience spectacular scenery with the warm Aussie sunshine on your face. This is one of the coolest beaches in Sydney! Standing in front of perfect waves will take your breath away! If you want to enjoy this view, you should visit mid-week because the rush is a little relaxed. Check out Bondi Surf Seafoods, where you must try the fish and chips doused in lemon and wrapped in butcher's paper. Once you swim, get yourself fish and chips, sit on the beach, and eat it! Without this experience, your visit to Bondi Beach would be incomplete. Furthermore, you can also visit Bondi Icebergs to cool your body with a sunset drink. 3. Cottesloe Beach In Western Australia, Cottesloe Beach is perfect if you are into beachside dining! You can drive down from Perth to visit this aesthetically beautiful beach. Apart from visitors and tourists, it is also one of the locals' favorite spots. You can check out art exhibitions, which are sometimes organized on the beach! Apart from surfing and cycling trails, you can attend the annual Sculpture by the Sea. Several eateries provide a perfect environment for you and your fellow travelers when you are hungry. Restaurants such as Jade Court, which has been open for 35 years in Cottesloe, offer an unforgettable Chinese experience. Another significant eatery that people swear by is Indigo Oscar. It is known for its tropical-meets-Latin American dishes and vibe. You should try this place. 4. Cable Beach Located on Western Australia's northern border, Broome has this iconic beach: Cable Beach! Offering picture-perfect sunsets, you must walk across the soft white sand to enjoy the complete feel of it. The calm blue water creates a beautiful visual. You can soak up the golden glow of the place while enjoying a camel ride! There are camel rides available, which you can take to watch the beautiful sunset at the beach. Furthermore, you must read about some of these restaurants in Australia which will help you taste deliciousness! If you want to have a romantic experience with your partner after the beautiful sunset, you can go to Tuga Supper Club. The place has amazing food items, such as the lamb and mac and cheese rack and the dessert platter! The music adds to the relaxed ambiance. 5. Wineglass Bay The place is what we call a wild beauty, as Tasmania has to offer natural beauty in all its raw glory. Wineglass Bay is quite a notable beach in Tasmania, located in Freycinet National Park. The beach is a perfect curve covered with white sand, and the clear blue water borders it. You can take a stroll on the beach with your partner or enjoy yourself on the soft sand. A cozy cafe, Geographe Restaurant Espresso, will cater to your needs for breakfast, lunch, and dinner with a beautiful view. If you are a seafood lover, I have just the place called Freycinet Marie Farm. You can either stop there and plan on eating right there, or you can buy all the ingredients and take them back home to cook. If you want to enjoy the sunset with a glass of wine, Richardsons Bistro offers everything from lunch to dinner and snacks! 6. Burleigh Heads The Gold Coast is popular for its beaches; that is where we have the Burleigh Heads! It will take over an hour for you to drive to Burleigh, a blending beauty of sunshine and surfing; there is a collaboration of culture and vibe. If you are into the sun and surfing, this is it for you! Furthermore, the place is a mix of chic city life and bohemian vibes. There are several dining and eatery joints with oceanfront views and towering pine trees. The Little Plate is one such restaurant where you can have delicious seafood such as Hiramasa Kingfish and Scallops. You cannot miss starters like Crispy Fried Prawn Dumplings and Peranakan Nonya Chicken. You will also have an amazing shopping experience because many shops surround the beach. 7. Lucky Bay One of the cutest places to hang out, Lucky Bay has kangaroos laid back chilling around the dazzling white sand! If you love wildlife, this place will be heaven for you. Located in the southwest corner of Western Australia, the beach is a combination of white sand in a crescent shape and turquoise water! In Cape Le Grand National Park, the view is to die for! When you travel there, you see kangaroos sunbathing in the white sand and the completely calm of the people around the beach. You can also check out beautiful views of the Recherche Archipelago. One place you must go to for food is The Deck Bar & Cafe! You will experience a blend of good wine, good company, and good food when you go there. If you are going towards Moonta and the Port Hughes, you might as well go here. You will see that the price of the food is standard and quite affordable. Several food options include schnitzels, fish and chips, salt and pepper squid, and burgers!] Another beautiful place is the Coffee Barn Gelateria, which is always packed with people! 8. Mindil Beach This place is much more than just a beach because there are several beach festivities that make the overall experience perfect. It is in Darwin's Northern Territory of Australia, where you will get the complete local experience. This is also one of the best places to live in Australia! There is always something happening at this beach, be it runs and marathons, festivals, or markets. The Beach Sunset Market has several food stalls offering sizzling food. You can have delicious food while watching the beautiful sunsets at the beach. All kinds of food stalls are available, including fruit and juice, seafood, Thai, Chinese, ice cream and sorbet, Sri Lankan, Bangladesh, Mexican, Indian, Turkish, and several others. Even the names of the food stalls are fun, such as Cheeky Cheeky Churros, Magic Cauldron, Petra's Raw Cakes, Sunset Slushie, Fat Kebabs, FireBowls, Frozen Penguins, and several others. 9. Whitehaven Beach If you love marine life, you must visit Whitehaven Beach, as it offers spectacular views. The stunning Whitsunday Islands are quite close to this beach, and you can enjoy the view with the turquoise water swirling together! You can take a variety of cruises when you are on this beach! For accommodation, you can stay on Hamilton Island, which is about 30 minutes by boat. Finishing Off... To sum up, it is quite interesting to see that these beaches in Australia can offer some of the best experiences of life. You can make memories by clicking beautiful pictures, selfies, and portraits to remember these times. You can also visit new places for eating and shopping, thus creating the perfect experience of a lifetime. In my opinion, it is an important way to relax or perform water activities while on the beach with your partners, family, or friends. Comment on which beach is best in Australia according to you and why. Learn More About: 6 Tips For A Luxurious Trip To Australia Do You Know The Best Time To Visit Australia? Read All About It! Top 10 Best Beaches In Florida: Should Know When You Are Planning To Florida