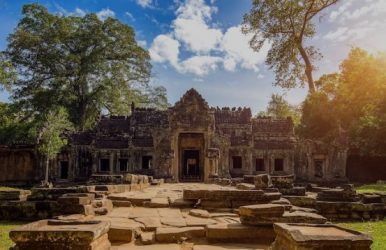
Related
Why Is Kawasan Falls Known For? (Description, Location, Activities, Timing, And More)
BY Sibashree Aug 22, 2025
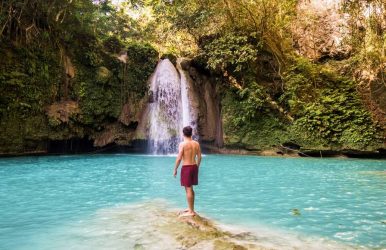
Thanks to Kawasan Falls and its associated canoeing activities, the Government of Badian in the Philippines is expecting a 50% tourism boom. Earl Endab, the Badian Tourism Officer, has confirmed this in a conversation with The Freeman. However, Kawasan Falls, the multi-tiered waterfall in Badlan, has always been the prime attraction of Cebu in the Philippines, and it played an important role in the Balan tourism industry, contributing P500 in 2024. Now, what makes Kawasan Falls so special? Turquoise blue water, refreshing pools, and lush green tropical surroundings have made Kawasan Falls the ideal place for relaxing and swimming. In this Tour and Travel Blog, I will discuss the following key areas about Kawasan Falls. Table of contentsWhat Is Kawasan Falls Description? Know The Key Features Of The Waterfalls What Is The Kawasan Falls Location?How To Reach Kawasan Falls From Cebu City? 1. How To Reach Kawasan Falls From Cebu City By Bus?2. How To Reach Kawasan Falls From Cebu By A Private Car?3. Take A Shared Van Ride From Cebu To Kawasan Falls Why Visit Kawasan Falls In Cebu? What is Kawasan Falls Known For?1. Canyoneering Adventure2. Swimming In The Natural Pools3. Bamboo Rafting4. Light Hiking To The Upper LevelsA Breakdown Of Kawasan Falls LevelsWhat Is The Perfect Kawasan Falls Itinerary? What Is The Best Time To Visit Kawasan Falls? What Are The Best Instagrammable Spots At Kawasan Falls?Kawasan Falls: Frequently Asked Questions (FAQs) What Is Kawasan Falls Description? Know The Key Features Of The Waterfalls Around 3 to 4 hours away from Cebu City, Kawasan Falls is at the foot of the Mantalongon Mountain Range. Due to the high amount of limestone deposits, the water of Kawasan Falls is deep turquoise in color. The height of Kawasan Falls is 40 feet. Furthermore, as the multi-tiered waterfall falls down, the volcanic rock formations make a pool with a depth of 11 meters. You can take a bamboo raft and reach under the falling water for a delightful “Waterfall Massage.” These waterfalls, as part of the Kawasan Falls, get their water from the Kabukalan Spring. Then, the water passes toward the Tanon Strait and Matutinao River through the Kawasan Gorge. Moreover, Kawasan Falls are important for the overall ecotourism landscape of the Philippines. It offers the perfect blend of a unique ecosystem, adventure activities, and scenic beauty. Here are the key features of Kawasan Falls. Key Features of Kawasan FallsDetailsMain FallsThe first tier consists of a 40-meter-high waterfall that cascades down the Kawasan Gorge and forms a deep pool. Swimming and bamboo rafting are popular activities here. Upper TiersYou can hike up the main waterfall, and there you will find many small waterfalls and different hiking spots. Canyoneering AdventureTake an adventurous canyoneering tour from Alegria to Badian. The activities on the way include:Cliff-jumpingTrekkingSwimming in the Matutinao RiverLush Green SurroundingsEnjoy an immersive experience here thanks to the lush green tropical surroundings filled with the delightful chirpings of birds. Easy AccessibilityYou can take a drive from Cebu City and reach Kawasan Falls within 3-4 hours. Then, you can take a walk of around 10-15 minutes along the river to reach the waterfall. Hours OpenEarly Morning to Late AfternoonKawasan Falls Entrance FeePHP 45 What Is The Kawasan Falls Location? Province: Cebu, Central Visayas, Philippines Town: Badian Barangay: Matutinao Located in South Cebu, the Kawasan Falls are nestled within the Barangay Matutinao Mountains. The nearest municipality to here is Moalboal. It only takes 30-40 minutes to reach Kawasan Falls from Moalboal. Moalboal itself is known for the most vibrant marine life, with turtle sightings and a sardine run. Moreover, Panagsama Beach here is a popular destination for scuba diving and snorkeling. How To Reach Kawasan Falls From Cebu City? The distance between Cebu City and Kawasan Falls is close to 107 km. You can either take a bus or a private car to travel the distance. You can even opt for a shared van ride to reach Kawasan Falls. 1. How To Reach Kawasan Falls From Cebu City By Bus? You will easily find buses run by Ceres, the largest bus company in the Phillipines. Take the bus bound for Bato via Barili. After a 2-2.5 hours of ride in the bus, you will have to get off at Matutinao Church or the Sto. Tomas De Villanueva Parish. From there, you will have to take a walk for 15-20 minutes to reach the waterfall. 2. How To Reach Kawasan Falls From Cebu By A Private Car? When you book a private car, you will get transportation assistance along with guided activities. The journey by car takes around three to four hours. The journey will cost 200 PHP per person. You can even take a motorcycle ride, available for 50 PHP per person. 3. Take A Shared Van Ride From Cebu To Kawasan Falls You can take public vans for 120 PHP or shared vans from the GT Express Terminal in Cebu. Shared vans are available till Moalboal. From Moalboal, you can take any southbound bus to reach the gates of the Kawasan Falls. Why Visit Kawasan Falls In Cebu? What is Kawasan Falls Known For? Kawasan Falls is famous for its deep turquoise waters, pools, and it is a hotspot of canyoneering adventure and activities such as: Sliding down rocks Hiking Swimming Cliff jumping Due to the thrills and challenges of the canyoneering route, it is also known as the natural obstacle course. Moreover, as you take the left side of the waterfall and walk through the path briefly, you will come across many small springs. Also, Mainit Hot Springs, at the stop of Malabuyoc (to be found on the route from Oslob to Kawasan Falls), is a popular nearby attraction. Also, Kawasan Falls has always been crucial as an eco-tourism destination. Now, everyone talks about the canyoneering adventures, lush jungle settings, multi-tiered formations, etc. However, there is more to it. Ecotourism means balancing the tourist activities with environmental benefits by following sustainable practices. Furthermore, ecotourism can boost local conservation efforts by creating employment opportunities and helping local commercial establishments. Top Things To Do At Kawasan Falls: Kawasan Falls Activities From enjoying a relaxed picnic to having the most adventurous canyoneering activities, Kawasan Falls offers you the most eclectic experience. Here are the things to do at Kawasan Falls. 1. Canyoneering Adventure View this post on Instagram A post shared by camille (@camilleguiden) Tour And Travel Blog Tips Guided tours are a must for canyoneering adventures. 2. Swimming In The Natural Pools Cool down in the main basin of the first waterfall level. It is perfect for casual swimmers and families. Here, you will get life vests available for rent. 3. Bamboo Rafting View this post on Instagram A post shared by Pao Ponce (@opao.ph) Are you ready for the ultimate “Water Massage” experience? Rent a traditional bamboo raft and float directly to reach under the falls, and allow the mighty cascades of water to fall on you. 4. Light Hiking To The Upper Levels Once you are done with all the picnic fun and adventures at Kawasan Falls, you can go for a short hike for 10 to 15 minutes and spot the second and third waterfalls. These places are ideal if you are looking for a less crowded and quieter experience. 5. Picnicking Tables and cottages are available for rent. Bring your own food or grab some local eats nearby. A Breakdown Of Kawasan Falls Levels LevelHeightActivitiesTour and Travel Blog CommentsKawasan Falls Level 140 Meters• Swimming• RaftingIt is crowded, especially on weekends. Level 220 Meters• Swimming• RelaxationThis is quieter.Level 310 Meters• Hiking• Spending Tranquil MomentsThis offers the most immersive experience. What Is The Perfect Kawasan Falls Itinerary? Kawasan Falls is one of the few places that offer a spontaneous travel experience. Nevertheless, your itinerary for a perfect day at Kawasan Falls will look like this. Kawasan Falls ActivitiesTimeThings to DoDepart from Cebu City4:30 AM• Arrive Early• Avoid TrafficStop for Breakfast at Carcar or Barili6:30 AM• Try Local Delicacies Such as Puto and Lechon. Arrive at Badian/Register8 AM• Register and Meet Your Guide. Start Canyoneering Adventure8:30 AM• Follow the Safety Briefing• Get Ready with the GearCliff Jumping, Sliding, and Trekking9 AM to 12 PM• Finally, Jump into Kawasan Falls. Lunch12:30 PM• You can choose a Tour Where Meals are included. Swimming or Bamboo Rafting1:30 PM• Relax at Kawasan Falls Level 1. Hike to the 2nd and 3rd Level2:30 PM• Enjoy an Immersive Experience at a Less Crowded Place. Freshen Up3:30 PM• Freshen Up at Basic Showers and Changing Areas. Leave from Kawasan Falls for Moalboal Beach4 PM• Enjoy the Local Marine World and Spot Marine Animals. Arrive in Cebu City from Moalboal Beach7:30-8 PM• Expect heavy traffic. What Is The Best Time To Visit Kawasan Falls? The dry season from December to May is the best time to visit Kawasan Falls. Moderate temperatures and clear skies make these months ideal for swimming and canyoneering. On the other hand, the wet season from June to November impacts water safety. Also, early morning is the best time of the day for visiting Kawasan Falls. If you visit the waterfalls before 8 AM, you will enjoy better lighting, fewer crowds, and great photography opportunities. Budget And Expenses Of Visiting Kawasan Falls The budget and expenses of visiting Kawasan Falls will depend on the mode of transport, the food you have, the group strength, etc. Nevertheless, roughly your budget for visiting Kawasan Falls will look like this. ItemEstimated Cost Per PersonBus Fare (Round Trip)₱ 300-400Entry Fee₱ 45Canyoneering Tour (Including Gear and Guide)₱ 2000Lunch and Snacks₱ 200-300Locker and Cottage Rental₱ 100-300Total Estimated Cost ₱2645-3045 Where To Stay Near Kawasan Falls? Badian is the closest to Kawasan Halls. This place has many basic hotels and homestays. However, Moalboat, at a distance of 30 minutes, has the more luxurious beaches. Also, Alegria will be the right place to find an accommodation if you are going on a canyoneering adventure. What Are The Best Instagrammable Spots At Kawasan Falls? View this post on Instagram A post shared by Guide to the Philippines (@guidetothephilippines) The top of the bamboo raft below the first fall is the best Instagrammable spot at Kawasan Falls. Some other Instagrammable spots here are: Mid-jump during canyoneering Poolside at the second level Jungle trail bridges leading to the falls Drone shot above all three levels (with permission) Conservation And Responsible Tourism At Kawasan Waterfalls Cebu is projected to produce the highest amount of solid waste in 2025 in the Philippines. Plastic bottles, scattered sachets, and plastic bags constitute the highest amount of waste produced in the region. A rise in the number of foreign tourist footfall here has led to the mounting wastage. In this context, ecotourism can be a great alternative to mass tourism. Kawasan Falls is a part of the 248 protected areas of the country. Due to over-tourism, the site was temporarily closed in 2022 for rehabilitation. Since reopening, visitor caps and strict regulations have been enforced. Always follow "Leave No Trace" principles when you visit Kawsan Falls. Don’t pick plants or disturb wildlife. Avoid loud music. Bring your own trash back. Stay on marked paths. Travel Tips For Visiting Kawasan Falls Wear aqua shoes or trekking sandals as the trails can be slippery. Use waterproof bags/cases to protect your electronics. Follow local guides’ instructions as a safety-first approach. Pack out your trash and respect nature. Kawasan Falls: Frequently Asked Questions (FAQs) Here are the frequently asked questions and answers about Kawasan Falls. 1. Can Kids Visit Kawasan Falls? Yes. Kids can visit the first-level pool of the Kawasan Falls. However, canyoneering is only recommended for ages 12 and above. 2. How Long Does The Canyoneering Tour Take? On average, the tour lasts 3 to 5 hours, depending on your pace and the weather. The tour starts from the Matutinao River. 3. What To Wear For Visiting Kawasan Falls? You must wear quick-dry clothes and water shoes or sandals with a good grip. Furthermore, you will need a rash guard for sun and rock protection. Wear swimwear underneath if swimming is on the itinerary list. 4. What Is The Weight Limit For Ziplining At Kawasan Falls? The weight limit for ziplining at Kawasan Falls is 100 kg. If you exceed this mark, you will have to trek to the starting point.