Luang Prabang Night Market Tips: What To Buy At Luang Prabang Night Market?
BY
Sibashree
Nov 6, 2025
On 15th August, 2025, Bounleua Sinxayvoravong, the Deputy Governor of Luang Prabang, announced that Luang Prabang had around 2.15 million visitors in the first seven months of the year.
So, the number of visitors increased to 983,483 or around 83.8 percent YoY. Thus, the city has already earned a revenue of LAK 1,108 billion or USD 52.76 million, which is 92.2 percent of the set target for the year.
Along with the temples and waterfalls of Luang Prabang, the Luang Prabang Night Market is one of the main attractions prompting this tourism boom.
As I was reading the news on the Laotian Times, published in August, I was quickly transported to my time in Luang Prabang in 2022. I vividly remembered what Mai, a Hmong Textile Weaver, told me.
She said, “I learned to weave when I was 12 from my mother. Each scarf tells a story of our village and ancestors. Tourists who ask about the patterns make me happy—they care about our culture.”
She also added that her expertise was in hand-dyed indigo fabrics and detailed embroidery. Also, often she worked for long hours at the stall weaved on-site to show visitors the craft in action. She even mentioned that she did not mind working hard to support the education of her daughter.
However, Mai is alone. Beaming with more than 250 vendors, most of whom are women, the Night Market of Luang Prabang has such heartwarming stories scattered everywhere.
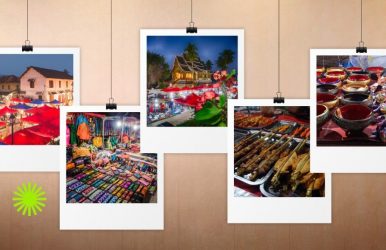
In this Tour and Travel Blog, I will share the stories of Mai, Chansy, Khamla, and Nou, the vendors I talked to at the Luang Prabang Night Market. I will also discuss the Luang Prabang Night Market tips about what to buy, what to eat, and more.
What Makes Luang Prabang Market Special?
The Night Market at Sisavangvong Road welcomed me with the scent of grilled meats and the hum of bargaining. Also, the market was decked out with colorful lanterns.
Furthermore, the area was bustling with more than 250 stalls set up side by side. However, despite the presence of so many vendors and buyers, the Night Market was peaceful and respectful. I was amazed to see how they did it!
Another thing that struck me was that most of the stalls sold local, handmade items. I found the vendors very passionate about preserving their traditions and building their livelihood based on them.
I also learned that many vendors here are from the Hmong group.
History Of the Night Market: From Candlelight To Culture
Usually, the origin of the Luang Prabang Night Market is said to be in the 1990s. However, it has a strong connection with the Vietnam War.
After the Vietnam War, the displaced Hmong community started making and selling handicrafts for a livelihood. Over time, it evolved into a nightly cultural showcase, attracting travelers from around the world.
Finally, in the 1990s, a modest “Candle Market” was set up, and local artisans mostly sold textiles and candles here.
Today, the Night Market is much beyond a commercial hub filled with vendors and buyers. It is a place of economic empowerment, especially for women. Moreover, it is an important element in the recognition of Luang Prabang as a UNESCO World Heritage Site.
Luang Prabang Night Market Tips: What To Buy?
Deciding what to buy is the biggest challenge at the Luang Prabang Night Market. Here is a curated list of items that are the main attractions in the market.
Handicrafts • Handmade and naturally-dyed scarves and tapestries• Sustainable and stylish bamboo straws and eco-bags• Silver jewelry with tribal motifs and intricate designsUnique Finds • Recycled bomb metal crafts made from war scrap metal• Lao Lao whisky bottles infused with snakes or scorpions• Hand-painted masks and bookmarksTextiles• Lightweight and colorful elephant pants• Tapa cloth made from Mulberry silk
Where To Buy Souvenirs & Artisan Crafts At the Luang Prabang Night Market?
The main Night Market, stretching from the Tourism Office to the Royal Palace Museum, is the epicenter of the shopping experience. The main market stretch on the Sisavangvong Road has many stalls where artisans actively weave and carve.
1. Silver Jewelry Shop At Night Market
Don’t miss these stalls, and here the products sold are the most authentic. At one such stall, I met Chansy, a Lao Silver Jewelry Artisan, who was engrossed in making bracelets.
I liked something at her stall and I asked her if she uses a machine or not! She said,
“Silver work is delicate, but it connects me to my grandmother. Every bracelet is handmade. No machines. Sometimes visitors don’t realize the hours of work behind it.”
Chansy also had earrings and rings in her stall, and she added that coping with the demands of customers who do not want to wait and pay the right money was a challenge for her.
2. Eco-Friendly Bamboo & Recycled Crafts
"I use bamboo and recycled materials because I want our children to have a clean future. It’s hard work, but I feel proud when someone buys my bags or straws knowing they are helping the environment." - Khamla, A Local Artisan and Vendor at the Luang Prabang Night Market.
Today, when Luang Prabang wins so many accolades in sustainable tourism, including the “Green Destinations Silver Certification,” it is these craftsmen and people of Luang Prabang who play a vital role.
I spent the most time at Khamla’s stall. Customers were standing in a queue in front of her shop to buy handmade soaps, eco-bags, and bamboo straws.
She was exchanging pleasantries with everyone, and she was sharing tips about using sustainable items, turning each sale into a small lesson in environmental care.
3. Paintings And Bookmarks
I met another amazing woman vendor at a painting store at the Luang Prabang Night Market. Her name was Nou, and indeed, a great storyteller she was.
Nou focuses on storytelling through art. She said, “I started painting to earn extra money, but I fell in love with it. Each mask reflects a spirit or animal from our stories. Sometimes tourists just take photos without asking—it feels like sharing our culture.”
When I visited her stall, she was working on a hand-painted bookmark inspired by Lao folklore. She said the only challenge she found was conveying the folk stories and their cultural significance to the younger generation and foreign visitors.
4. Recycled Bomb Metal Cutlery And Ornaments
I visited the store selling cutlery and ornaments made of bomb metal. It is a reminder that Laos is the most heavily bombed country in the world in terms of per capita assessment. Furthermore, it has experienced major crises, including the Vietnam War and colonization.
If you loved visiting the UXO Luang Prabang Center, you must also explore a stall selling recycled bomb metal cutlery and ornaments for a full-circle experience.
5. Indigo-Dyed Fabric
I have mostly seen women vendors at the stalls of indigo-dyed fabric in the Luang Prabang Night Market. Also, these women are from hill tribes, and they are really passionate about preserving their heritage.
You will get beautiful and sustainable cotton scarves at these stalls, and the tribal-style wraps and bags are quite stylish.
6. Artisan Alley Beside Indigo Café
This lane is quieter, and some of the items here are cheaper than the stalls at the main stretch of the Night Market. It may be so as fewer tourists visit here.
I collected some miniature masks and wood-carved souvenirs from here.
7. Specialty Artisan Shops Nearby
You will find some especially artisan and boutique shops near the Night Market. These are not technically a part of the Night Market, but they also have brilliant handicrafts and local artisan products.
Artisan ShopsSpecialtyAddressGarden of EdenHandmade Artisan Jewelry06000, Ban Phan Louang(phan louang Village),opposite dyen sabai restaurant, Luang Prabang, LaosNaga Creations Art JewelryLao art and jewelrySisavangvong Road, Luang Prabang 06000, LaosKhinThong Lao SilkGarments and luxury silk scarves1, 2 Sathouyaithao Rd, Ban 06000, Laos
Where To Eat: Street Food & Local Restaurants At Luang Prabang Night Market
The Night Market is a must-visit if you are on a Luang Prabang food tour. Don’t forget to try the following items at the market food stalls.
Grilled chicken skewers
Sticky rice with mango
Coconut pancakes
Papaya salad with chili & lime
Furthermore, if you are a vegetarian or vegan, you can visit the Buffet Alley near the Luang Prabang Night Market. Here, you will find diverse options at affordable prices.
You will get spring rolls, noodles, and curries here. The cost for the same will be around 15,000 LAK.
Restaurants Near The Luang Prabang Night Market
Once you are done exploring the street food at the Luang Prabang Night Market, you can visit any of the restaurants nearby.
RestaurantsSpecialtyAddressBlue LagoonUpscale Lao-European fusionW9GW+G5G, Naka, LaosCoconut GardenLocal Dishes with a Modern TwistSisavong Road Luang Prabang, 06000, LaosIndigo CaféRooftop views and cocktailsSisavangvong Road, Laos
Luang Prabang Night Market Insider Tips
Check out the table below for the best time to visit the Night Market, bargaining tips, and safety tips.
The Best Time to Visit the Luang Prabang Night Market• Visit between 5 PM and 7 PM for fewer crowds and better lighting for photos.• Visit after 9 PM to get the best deals from the vendors. Bargaining Tips• Start 20–30% below the asking price• Be polite and smileSafety Tips• Keep cash in a money belt.• Watch your step as there can be uneven pavement and cables.
Plan a visit to the Night Market after a hike to Mount Phousi. Thus, you will have an amazing sunset to market experience.
Ethical Shopping: Supporting Local Women & Sustainable Crafts
Choose handmade products to support local artisans whose livelihoods depend on the heritage art or craft they are pursuing.
Talk to the vendors and try to figure out the story behind their art and craft.
Support stalls run by cooperatives and avoid buying mass-produced products from China or Thailand.
Avoid buying ivory trinkets and any products made from endangered animals.
Is The Luang Prabang Night Market Accesible For Seniors Or Visitors With Special Needs?
No, I did not find the Luang Prabang Night Market to be an accessible place for the people concerned. In many cases, the pavements are uneven, and there are cables scattered here and there.
Also, the wheelchair facilities are limited in the market, and maneuvering them can be a challenge, considering the market space remains crowded.
Furthermore, there are very few in the Night Market. So, you can bring a foldable stool if you need to sit and rest while exploring the market.
Seasonal Highlights & Festival Nights
The Luang Prabang Night Market gets specially decked up during festivals such as the Lunar New Year, Pi Mai Lao (Lao New Year), and Naga Fireball Festival.
Lanterns, dragon dances, the display of special crafts, and live music performances bring the market alive.
How To Be A Responsible Shopper At Luang Prabang Night Market?
See, I come from a place where many markets are developed around the art and craft of indigenous people. So, the Luang Prabang Night Market, with most vendors from the hills or the Hmong community, felt familiar.
Also, if you must understand that these people are preserving the cultural heritage and some art forms that go back centuries, furthermore, their livelihood depends on selling these crafts.
So, you have to be respectful toward them when bargaining. Gently ask whether they agree with the price you offered. If not, move to the next stall. Collecting handicrafts from the local artisans is a process of cultural exchange.
Moreover, carry a reusable and eco-friendly bag for carrying the essential items procured at the Luang Prabang Night Market. Thus, you will be able to avoid the use of plastic bags and leaving waste at the market.
Luang Prabang Night Market: A Checklist To Avoid Scams
My local guide accompanied me through the Night Market like a shadow. So, I did not have to worry about the scams and frauds. However, he kept me alert about the possible scams.
1. Fake “Handicraft Certificates”
Many vendors display false certificates claiming a product's authenticity. There have been many instances where a vendor has labelled a mass-produced synthetic product as rich silk.
So, ask vendors about the product's origin and look for signs of actual handcrafting.
2. Overpricing For Tourists
Many vendors often charge inflated prices for souvenirs and food. Some also sell Chinese or Thai products as local handicrafts.
Get a local guide or explore the stalls and compare the prices before buying a particular handicraft product.
3. Fake Charity Collectors
Individuals may approach tourists claiming to collect donations for local schools or temples. These are often unverified and unaffiliated with any real organization.
So, only donate through registered NGOs, official channels, or you can get in touch with the temple authorities.
4. Gemstone & Jewelry Scams
If you are buying jewelry with precious stones, choose the boutique shops or the reputed sellers, who will provide you with a certificate of authenticity.
5. ATM Dispensing Issues
ATMs here dispense large notes, or you may also find local ATMs occupied or running out of cash. Also, when you carry large notes, the vendors may refuse to give you change.
So, always carry cash and small coins when exploring and buying something from the Night Market.
6. Low-Quality Food & Hygiene Concerns
Not every food stall at the market is safe. Also, you cannot try every seafood you come across. Many travelers complain about upset stomach or allergic reactions. Also, the local rice whisky, infused with snake or scorpion, contains many highly toxic elements.
The best thing is to eat at the stalls where locals visit.
The Luang Prabang Night Market Of Your Dreams!
The Luang Prabang Night Market is much more than a shopping experience. Exploring the market is like knowing the true soul of the country.
Every corner of the market tells a story. The local crafts and art present local traditions in the most interactive way. On the other hand, vendors who make a living from them have stories about how they want to keep the tradition alive while supporting their families.
In addition, the women vendors are the soul of these Night Markets, and they are the boss ladies, nurturing their art and skills, earning bread for the family, and spreading awareness about the heritage and sustainable practices.
So, follow the Luang Prabang Night Market tips as I have shared here, and read the stories of local vendors I have met to have the right heads up before the market visit.
Luang Prabang Night Market Tips: Frequently Asked Questions (FAQs)
Here are the frequently asked questions and answers about the Luang Prabang Market tips.
1. Is The Luang Prabang Market Open Every Day? Yes, the Luang Prabang Night Market is open every day. The market remains open from 5 PM to 11 PM. 5 PM to 7 PM is the best time to avoid the crowd, enjoy the lights, and take photos. On the other hand, 9-11 PM is the ideal time to get the best discounts. 2. Can I Use Credit Cards At The Luang Prabang Night Market? No, you cannot use credit cards at the Luang Prabang Night Market. There are ATMs near the market.However, ATMs often only accept big notes, and scams are common when exchanging them for change. So, be prepared and carry small notes when visiting the Luang Prabang Night Market. 3. Is Luang Prabang Night Market Safe For Solo Travelers? Yes, the Luang Prabang Night Market is safe for solo travelers and women. The market remains well-lit, and most of the vendors are women. Furthermore, the crime rate in Luang Prabang is pretty low. However, the market area remains crowded, and that can always lead to petty crimes. So, carry your essentials in a money belt and dress modestly to avoid garnering attention unnecessarily. 4. Are Prices Fixed At The Luang Prabang Night Market? No, prices are not fixed at the Luang Prabang Night Market. In fact, bargaining is customary at the Night Market. If you want the best prices, visit the market after 9 PM. The vendors then offer cheap prices as they are in a hurry to close the shops. 5. Can I Take Photos At The Luang Prabang Night Market? Yes, you can take photos at the Luang Prabang Night Market. However, you have to ask and seek permission before taking the photos. As Nou, a stallowner, was saying, “They click our pictures without our permission and post them everywhere. We would be happy to be in their photos, as we know it is like representing our culture. But we also don’t want stereotypes.”


 Related