


 Related

Rocky Mountain National Park Trails: A Complete Hiking Guide
BY Sibashree Nov 11, 2024
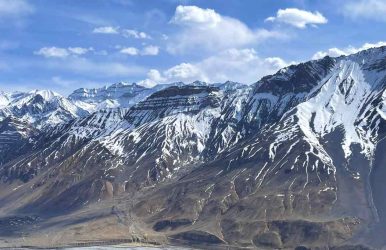
It’s already fall, and the Rocky Mountain National Park Trails are adorned with the Aspen leaves’ glistening gold. Also, the dark green of the pine trees in the backdrop complements the dark red and orange of Alpine shrubs. Hiking through the park trails is the best way to explore the beauty of the USA National Park to the fullest. Further, the hiking trails come with varying difficulty levels. Some are also great for enjoying a walk with your furry friends. Moreover, the trails are varied in their destinations. Some trails in the park will take you to beautiful waterfalls, and some will end at breathtaking summits and immersive lakes. Do you also want to hike and experience the park at its best? Here is a brief overview. Hiking Through The Rocky Mountain National Park Trails: A Rocky Mountain National Park Guide Rocky Mountain National Park has over 350 miles of hiking trails. Further, you will find a delightful activity in the park irrespective of your abilities. However, you will need proper traction devices and a Rocky Mountain National Park map to remain safe during hiking. Moreover, you will need proper footwear with a treaded sole as the routes can be snowy and slippery. With proper safety measures, it’s time for you to hit the waterfalls, summit, and lake trails. Best Rocky Mountain National Park Trails To Waterfalls Rocky Mountain National Park is home to 31 waterfalls. Do you want to witness water cascading through rocky terrains? Hit any of the following trails in the park. 1. Granite Falls Trail Trail Head: Green Mountain Trailhead parking area Trail Distance: 5.2 miles one-way Difficulty Level: Moderate You will pass through lush green meadows while hiking to Granite Falls Trail. However, the terrain is marshy here, and you must be careful as you explore the path. Further, lodgepole pine, aspen, Engelmann spruce, and subalpine fir greet you throughout the trail. The elevation gain is 1,046 feet in the trail, and you must proceed carefully. 2. Chasm Falls Trail Trail Head: Old Fall River Road or Winter Closure Gate Trail Distance: 2 Miles (Round Trip) Difficulty Level: Moderate The Chasm Falls Trail will take you to a cascading beauty. With an elevation of just 640 feet, this trail is moderate to hike. Further, if the hiking trail from Old Fall River Road is closed, you can take the trail from Winter Closure Gate. Then, you will have to walk or bike for 2.2 Miles. 3. Adam Falls Trail Trail Head: East Inlet Trail Distance: 0.6 Miles round trip Difficulty Level: Easy With an elevation of just 79 feet, the Adam Falls Trail is one of the easiest ones in the park. Adam Falls is small but excels in its quaint beauty. If you want to be more adventurous, you can walk past the waterfall. A beautiful glacier valley will emerge before your eyes, and you will love the exuberance of wildflowers. 4. Cascade Falls Trail Trail Head: North Inlet Trail Distance: 3.4 Miles one-way Difficulty Level: Moderate to Strenuous (Expect changes in the difficulty level throughout the route) You will love the gurgling sound of the North Inlet stream water, and as it thrashes the pure granite stone, it’s a beauty to behold. This waterfall is 100 feet tall and forms a cascade, as the name rightly suggests. You will meet the most adorable marmots As you continue your hike and pass through the open meadow. They are frequent to the winding river through the lodgepole pine forest. Further, you can stop here to fish river trout and brown trout. Best Rocky Mountain National Park Trails To Lakes Great National Park has 156 lakes. Some of these lakes have dense trout populations. Further, areas near these lakes are great for spotting wildlife. So, let’s know about the lake hiking trails that lead us to these beautiful lakes. 1. Bear Lake Trail Trail Head: Bear Lake Trail Distance: 0.7 Mile Difficulty Level: Easy With mountains of the Continental Divide in the backdrop, Bear Lake Trail is one of the best locations in the park for watching the sunset. You will love the beauty of Hallett Peak, Continental Divide, and an Alpine lake here. Bear Lake is the epicenter of many hiking trails. You can start your hike to Alberta Falls, Flattop Mountain, Emerald Lake, and more from here. 2. Sprague Lake Loop Trail Trail Head: Estes Park Trail Distance: 0.7 Miles round trip Difficulty Level: Easy Sprague Lake Loop Trail is the most accessible trail in the park. Wheelchairs are allowed here. So, patients with disabilities can also explore this trail. You can stop at the benches and many lookouts throughout the trail to reflect on the beauty of nature. Further, you can see the mountain peaks along the Continental Divide. Moreover, Sprague Lake is an amazing destination for spotting wildlife. 3. Mills Lake Trail Trail Head: Glacier Gorge Trail Distance - 5 Miles round trip Difficulty Level: Moderate to Strenuous With a 700-foot elevation, the Mills Lake trail will take you through a gorge carved by glaciers, streambeds, and waterfalls. The beautiful Mills Lake gets its name from Enos Mills, the founder of the Rocky Mountain National Park. Further, if you want to continue your hiking pursuit, you can walk to Black Lake, and that will be an additional 1.7-mile hike. 4. Gem Lake Trail Trail Head: Lumpy Ridge Trailhead Trail Distance: 3.4 Miles round trip Difficulty Level: Moderate to Strenuous The expansive field of granite domes houses the Gem Lake. It is indeed a hidden gem and one of the biggest attractions in the area, along with Lumpy Ridge. Gem Lake is shallow, and it has water of melted snow and rainfall. 5. Dream Lake Trail Trail Head: Bear Lake Trail Distance: 2.2 miles round trip Difficulty Level: Moderate to Strenuous You must go for a steady ascent from Bear Lake to reach Dream Lake. The trail comes with an elevation change of 830 feet. Don’t miss the following highlights of this hiking route. Nymph Lake Aspen Groves Ponderosa Pine The Nymph Lake looks most beautiful in summer, with pond lilies in full bloom. Further, you can use Dream Lake as the base and trek to the amazing Emerald Lake or Lake Haiyaha. Best Rocky Mountain National Park Trails To Summits Despite the elevation gain of around 1000-3000 feet, the hiking trails to summits are very popular among visitors. The wonderful vistas from the mountain tops make the effort worth it. 1. Deer Mountain Trail Trail Head: Deer Ridge Jct Trail Distance: 3.1 miles one-way Difficulty Level: Moderate to Strenuous The Deer Mountain comes with an elevation of 10,006 feet. Further, as you hike and reach the summit, you will enjoy the most beautiful view of Upper Beaver Meadows, Longs Peak, Estes Park, and Moraine Park. Be careful about the weather forecast before you start your journey on the trail. 2. Flattop Mountain Trail Trail Head: Bear Lake Trailhead Trail Distance: 8.8 miles round trip Difficulty Level: Moderate to Strenuous The trail from Bear Lake is the best way to reach Flattop Mountain, and this route is one of the trickiest ones in the park. However, if you cannot access the trail from Bear Lake, you can try the route to Flattop via Tonahutu Trail. Further, as you reach the Flattop Mountain summit, you will enjoy the beauty of Hallet Peak, Dream Lake, and Tyndall Glacier. 3. Chasm Lake And Longs Peak Trail Trail Head: Old Fall River Road or Winter Closure Gate Trail Distance: 4.2 miles one-way Difficulty Level: Strenuous Chasm Lake, just beneath the Longs Peak, offers a spectacular view. You will come across Tundra meadows and Alpine tundra through the trail. Further, animals like pikas and marmots are common here. As you reach the Chasm Junction and find an outhouse, you can hike along a wall to see Columbine Falls and Peacock Pool Gorge. After this point, the terrain becomes rocky, and you will need cairns to reach Cirque, the lake's location. Mistakes You Must Avoid When Hiking Through Trails Of Rocky Mountain National Park Making a rushed trip to the Rocky Mountain National Park is the biggest mistake you can make. You can face severe issues like dehydration and acute mountain sickness here if you don’t allow your body to acclimatize or work on your physical and mental endurance. So, carry enough water or hydrating solutions and start your training under proper guidance at least one month before your Rocky Mountain hike. Further, don’t think that you will always make it to the trails in your usual track pants or leggings. You have to wear hiking clothes as on many days, you will have no escape from the afternoon rain. Rocky Mountains National Park At A Glance Location: Colorado, USA Established: 26 January 1915 Highest Point: Longs Peak Area: 415 Square Miles How to Reach: Take a drive or shuttle from the Denver International Airport. Also read Why Include Whale Watching In Your LA Itinerary. Traveling On A Budget: Tips For Affordable Adventures. From Cocktails To Kickflips: Must-Try Activities In San Diego.