Related
10 Things To Do In Bogota – You Must Know Before Going
BY Subham Saha Jan 12, 2021
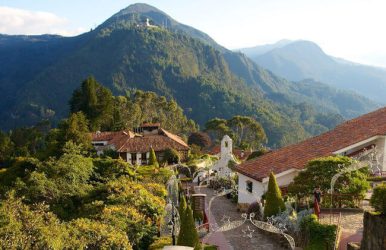
Whenever we are taking the name of Bogota in Colombia, what comes first into your mind? A beautiful dreamlike country with full of colors and the magnificent tropical landscape or beautiful Spanish-speaking people, I think almost everything. You will amaze to see all these things just within a single City. If we are telling you that more astonishing things to do in Bogota are the most desired outcome of visiting the place. The city is full of vibrant colors and small scattered towns. If you want to taste the real flavor of Colombia, then there are no other options than Bogota. Bogota is a well-balanced city in Colombia, where you can see 400 hundred years old historical churches, along with modern high rise buildings. Bogota is the combination of these best two. For these reasons, the capital of Colombia just scores 10 out of 10, and it has become every traveler's most desired destination. You will see the old and new two different flavors but mixed up and serve you the best traveling experiences. The stunning colorful pebbled path and the colorful houses with the painted walls always give you the thrill of the old and historical flavor. The century-old plazas and the new boutiques are the great combinations of old and the new. 10 Most Popular Destination In Bogota As Bogota is famous among history-loving travelers and excavators, Colombia provides us with the clearest, natural, and a beautiful tropical environment full of modern pubs and cafeterias. So here is the list of the most popular destinations among all age travelers to get the perfect flavor of Colombia and Bogota. And you will get the full idea about things to do in Bogota Colombia. 1. Bolivar Square Bolivar Square has a rich pre-Columbian history. This is the Oldest and the ancient square of Bogota. Bolivar Square is the all-time attention point of Bogota. As the oldest cathedral is in here and the Christmas and the other celebrations and the festivals are always taking place here. Previously it was used as the bull market and for the public circus, but now almost every program occurs here. This is the main downtown in the whole city. If you are traveling at Christmas, you will see how the full square is just flowing with thousand lights. This feeling will be heavenly when you can see the beautiful candlelights under the approx 400 years old building structures. Bolivar Square is surrounded by some very important buildings like the Sacred Museum, Archbishop's Palace, Caracas Cathedral, City Hall, Chapel of Santa Rosa de Lima, the Yellow House and the Main Theater, and the building of the Government of the Capital District. The most important structure in the Bolivar square is Simón Bolívar, which is in the center of the square. This statue was first inaugurated in 1874. Apart from Square, more things to do in Bogota are just mentioned below. 2. Museo Botero The Borato Musume or Museo Botero is one of the popular destinations among tourists. This museum is one of the oldest and the most important art that affects the Museum of Latin American history. This museum is the best collection of art effects as almost 1,000 people are visiting here. One month 2000 art students are visiting here to gain knowledge about the place and the art effects. This museum is very near to the popular Gold Museum of Bogotá and the Luis Ángel Arango Library. This museum is the full treasure island for any art enthusiast and the art students. They provide almost 208 types of artworks, a safe house of collections. Among them, 123 artworks are of Fernando Botero. You can see other famous artist artworks like Salvador Dali, Joan Miró, Balthus, Georges Braque, Marc Chagall, and Pablo Picasso. 3. Gold Museum Are you not fond of the yellow Noble metal, the shiny, glittery gold? Bogota’s Gold Museum is one of the world’s largest collections of pre-Colombian gold pieces. This museum has almost 55,000 pieces of archeologically excavated gold. Among them, 6,000 are on public display. Without visiting the gold Museum things to do in Bogota is quite an incomplete list. The first floor of the museum consists of one entrance and restaurants. The real gold collections are starting on the second floor. You can see the different cultural gold, which is dated almost pre Spanish colonies arrival. If you want to feel the real Old Colombia, this museum is the best option for you. The Gold Museum is the most visited museum in Bogota; almost every 500,000 tourists are visiting here. 4. Monserrate Monserrate is the 10,000 feet high mountain that dominates the whole of Bogota city. Beside the hill, there is one oldest 17th Century church named El Señor Caído, which is almost 10,341 ft above sea level. This mountain was always counted as the secret place for the people from the pre-Colombian time, but after the Spanish colonial arrival, these are just becoming the home of all God’s heaven on earth. Hiking, cycling, and climbing are the two main things to do in Bogota. There are two ways to climb the peaks of these hills one is by hiking routes another one consists of cable car roots. The hiking path is not very long, only 2.5 Km. The travelers and the pilgrims are always taking the walking trails. This mountain is just behind Bolivar Square. You can see the sunrise and the setting from Bolivar Square. 5. Salt Cathedral of Zipaquirá The salt cathedral of Zipaquirá is built under the Roman Catholic Church. It was a 200miter salt mine and almost 600 miter underground from the halite mountain. Now it has become a very well-known tourist destination. The cathedral is the most notable Colombian structure of history. The halite rocks are fully curved with Jesus’s birth, life, and death. This cathedral is also weighted for its archaeological value. If we are telling you the salt mine age, you may be amused by the date. This halite mine was exploited at the time before Colombian history, and the Zipaquirá has one of the oldest human civilizations. This Cathedral is just 49 km far from Bogota’s main city. 6. Laguna de Guatavita The lake Guatavita is just a perfect spot for chilling down beside the natural tropical lake. This lake is surrounded by small green hills and beautiful trees. The circular lake is almost 19.8 hectares and only 57 km from the Bogota main city. There is a hot water spring near the lake. These lakes also have a very old archeological value as the lake is the secreted ground among the local Muisca people. The gold is everywhere in Bogota; few gold items are found from the bottom of the lake. The gold museum to Lake Guatavita, everywhere you will get to see the beauty of the old and the new. The pre-Columbian cultural people are involved in the sacred cultural duties, which are gold disposal rituals. Maybe you can find gold from the bottom of the lake, but the bright golden color sun rays reflect on the lakes’ clearwater, just giving you the gold achieving feelings. 7. Tejo If you are in Colombia but do not have the time to play Tejo. Then your Colombia tour is just incomplete without playing these traditional throwing games. Without Tejo, things to do in Bogota are quite colorless. Many scientists and the archaeologist say these new forms of playing Tejos are the ancestors of the century-old pre-Colombian throwing games. At the present time, the target is designed with gunpowder; whenever any participant shoots the target at that time, the gunpowder explosion just alarms the crowd who are watching the game. 8. Zona G Are you a Gourmet food lover? So there is the best choice of things to do in Bogota but with the delicious food, the list is incomplete. Zona G is the best destination for you to take the authentic Colombian Gourmet food taste. This is the best dining destination for all travelers and the locals. The whole area is crowded with multiple types of food serving restaurants. The Chinese, French, Italian are the main cushion restaurants which are just offering their service here. The whole area is the biggest food plaza, which consists of multiple dining options. 9. Museo Nacional de Colombia If you are asking about the most archeologically valued Museum, then Colombia's National Museum is the best things to do in Bogota. It has 20,000 pieces of art effects. This is the oldest Museum in Colombia, built-in 1823. The 10,000 art effects are from the Afro Colombian period. The museum fortress itself has very high archaeological value. The structure is just built with stone walls, and this was the old fortress. This huge building serves as the prison till 1946. After 1975 this building was adopted as the national Musume. Not only art effects but also you will enjoy the historical paintings. 10. Bicycle Tour Bogota is a perfect place for bicycle tours. The small walking trails and the bicycle path are just covering the whole of Bogota city. If you want to feel the thrill, then just book for the bicycle riding tours. So this is one of the best things to do in Bogota. The local plazas and the local areas are just best for taking the ride. Bogota has a wide range of bicycle trails, and they offer such a good traveling plan for bicycle renters. While riding the bicycle, you can enjoy the beautiful small villages and each house’s painted walls, and the colorful cobbled path is the best view you will get to enjoy. Conclusion If you want to explore the whole city entirely, then you must travel to the city by bicycle or on foot. The hill's narrow roads are just perfect for bicycle riding or walking tours. The flavor of the small city is just so attractive. If you once go to Bogota, you will feel the warmth and the hospitality of the locals. If you can not find the proper walking way, then communicate with local people and they will guide you towards your destinations. Visit Bogota and feel the real heritage of Colombia. You can also visit Medellin which is just 260 miles away from Bogota. And enjoy the best amazing things to do in Medellin Colombia in the same way.