


 Related
Essential Car Checks Before a Long Journey: Road Trip Ready
BY Sibashree Jun 5, 2024
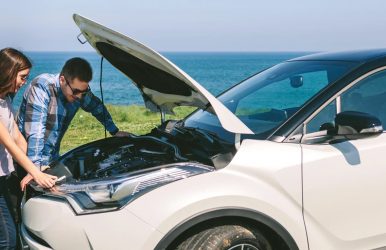
Are you planning to go on a long road trip? Then, you might want to start by checking the vehicle you are planning to travel in. Having the right vehicle can travel long distances and can make your road journey so much easier. Before you start your road trip, you must first check if your vehicle is in best of condition. You must check that your tyres have adequate pressure. At the same time, you must look for the point to check the essential components of your vehicle. This can help you manage the long, tiresome road journey with ease. This prevents your car from breaking down and causing delays in your journey. You also lose money when your car breaks down mid-way on your road trip due to repairs. Simple car checks with a microfibre towel and other cleaning supplies can make a world of difference. When you have taken adequate preparation and care for your vehicle before your long road trip, you ensure safety. You want to reach your destination on time and safely, especially if you are travelling with your loved ones. his article provides the key inspections to perform on your vehicle before any long-distance trip. These key inspections during car checks before a long journey include examining fluid levels and assessing tyre condition. The inspections also include tread depth, and conducting general maintenance checks for a smooth road trip experience. Inspect and Maintain Fluids Here is how you inspect and maintain fluid changes before embarking on your long journey. These car checks before a long journey ensure you have a worry-free road trip. Check Engine Oil Level and Quality You can start by checking your engine oil level and quality before embarking on your long journey. Try to locate the dipstick and remove it while the engine is cool. Then, wipe the dipstick with a rag or cloth before reinserting it. After a minute, again, pull out the dipstick to check the oil level. Your dipstick should have an oil level between the minimum and maximum marks for a quality ride. If the oil level is below the minimum, then you will need to top up the recommended oil type. You will need to follow the vehicle's manual to top up with the recommended oil type and quantity. Also, inspect the oil's color and consistency of your car and look for golden to light brown color. These colors indicate your oil is fresh. As your engine oil gets older, it gets darker, signifying degraded oil quality that needs changing. Consider an oil change service to ensure your engine lubrication and performance is smooth during your trip. Check Coolant/Radiator Fluid Level and Condition One key car check before a long journey is to check the level and condition of the cooler and radiator fluid. The trip may be quite long, and you will have to spend maximum time in your vehicle. In that case, you must ensure the coolant and radiators are working properly. See that they are in perfect condition. Your coolant or antifreeze are the essential components in your car that control the temperature of your engine. It helps your car function properly during freezing temperatures. You can check your coolant when your car engine is cool. Just check the fluid level against the minimum and maximum markings, similar to an engine oil check. You can top up with a premixed coolant solution if you are traveling to a colder region. Just follow the manufacturer's recommended coolant type and mixture ratio. Also, inspect the coolant's colour and clarity to ensure your coolant is fresh. Colours bright or light green, while being discoloured, rusty, or opaque, indicate degraded coolant. So, you will need to consider a coolant flush service to replace the old fluid. This ensures efficient heat transfer during your journey. Check Brake Fluid Level and Condition Among essential car checks before a long journey, maintaining the proper brake fluid level in your car is crucial. The proper conditions of the brake fluid levels ensure optimum performance of your brakes, which is essential in long journeys. Furthermore, you can check your vehicle's fluid levels to ensure the right condition. You could do this by locating the brake fluid reservoir. You can find this reservoir through the "BRAKE" symbol atop it. Then, you must look for the colour and clarity of the brake fluid. Do you think your car's brake fluid level is between the minimum and maximum markings? It is an indicator that your brake fluid is in proper condition. You need to change the fluids of your brake and change them if they have turned dark in color. Darker and opaque brake fluid indicates that the fluid is no longer in the best of conditions. It can hamper brake function. So replace degraded brake fluid with fresh brake fluid specific to your vehicle's needs. This ensures smooth brake function when you are on long road trips. Check the Power Steering Fluid Level and Condition The next car check before a long journey is checking the power steering fluid and its condition. This ensures that the power steering is in top condition and that any mishaps can be avoided while making the right turn and parking the vehicle. Also, take a close look at the condition of the car's steering. It is marked with a steering wheel symbol. Now, look at the fluid levels. It should be between the minimum and maximum markings. It's the right time to examine the colour of the fluid in the steering wheel. It helps you understand whether the steering wheel is in good condition. If the fluid's color is reddish or pinkish, it means the steering fluid is in good condition and suitable for longer distances. On the other hand, dark or opaque colour indicates contaminated fluids. It's time to change the fluids. You can also opt for a professional power fluid flush service to replace the old fluids and upgrade the functionality of the steering. Check Transmission Fluid Level and Condition You must check the transmission fluid level to see if your vehicle has automatic transmissions. At the same time, you must go through the vehicle's manual and then take the right reference from the vehicle's manual. This specific procedure of checking the transmission fluid level is effective. However, you generally need to keep your car engine running and the transmission in a particular gear. Then, you need to check the fluid level and condition of the transmission. Once you have identified the dipstick, look at the level of fluid between the minimum and maximum markings. At the same time, take a look at the colour and clarity. The colour of the transmission fluid, in optimum condition, should appear reddish or pinkish. On the other hand, dark fluid colours may point fingers at the degradation or contamination. If the fluid appears compromised, then you have to consider the decision to transmit fluid flush service to change the fluid immediately. Remember, the smooth gear shifting during your trip determines the safety and ease of the driver on longer routes. Top Up or Flush Fluids as Needed After inspecting all the critical fluid levels and conditions, top up any low fluids with the recommended types and quantities. Follow the specifications in your vehicle's owner's manual. If you see that the fluids' colours are contaminated, it's an indicator of replacement. Hence, consider using a flush service to replace the old fluid to get the best performance. Please remember that considering the health and condition of the fluids in the vehicle ensures the most optimal vehicle performance. At the same time, it is an indicator of the safety and longevity of your vehicle, especially during long journeys. By addressing issues related to fluids in your vehicle you can reduce the risk of component failures or breakdowns. In addition, it can help you enjoy a smooth and reliable driving experience. Check and Replace Tires Consider the points related to tyre conditions, as they are the most important component related to your vehicle's mobility. Inspect Tire Tread Depth and Condition Ensuring adequate tyre tread depth is the key to maintaining proper traction and safety on the road. It is helpful mainly on long routes. The minimum depth, which is a must for all cars in Europe in general and the UK in particular, is 1.6mm across three-quarters of the tyre. However, experts advise that tyres must be replaced when the tread depth reaches around 3mm. Conduct the 20p Test: First, insert a 20p coin into the main tread grooves of your tires. Can see the outer border of the coin? it indicates that the time to replace the tyre is approaching. Or you can say it has already reached the legal minimum tread depth. Secondly, check for Indicators of Tread Wear. Many tires have indicators of tread wear, such as raised bars or groove markings. However, the right approach signifies that the tire has reached the legal tread depth, and now it's time to replace it. Thirdly, use a Tread Depth Gauge: Invest in a tread depth gauge. It is a specialized tool that measures the depth of individual tread grooves with the utmost accuracy. These gauges provide the most precise readings. Mover, they helps understand the right time for the tyre to be replaced. In addition to tread depth, check your tyre properly for any signs of damage, like bulges, cuts, or uneven wear patterns. These issues can compromise the integrity of the tires and increase the risk of blowouts or other issues during your journey. Check Tire Air Pressure Properly inflated fuels enhance efficiency. Moreover, it enhances handling, stability, and, finally, overall safety. You must make an effort to check tire pressure on a regular basis. It is a must, especially when you are embarking on a long journey. Tire Pressure Check Steps1. First, go through the manual of the vehicle's owner or the sticker on the driver's door jamb. There, you will find the right recommendation on tyre pressure.2. Now, ake use of a tyre pressure gauge of the highest quality. It helps to measure the pressure of the tyre when they are cold (after at least 3-4 hours of non-driving).3. Press the gauge firmly by removing the valve stem caps from the valve stem. It can help you to obtain the most accurate reading.4. Adjust the pressure of the tyre, either by inflating it with an air compressor or deflating it with a metal pin on the valve stem.5. After you have made the required adjustments with air pressure, recheck the tire pressure to ensure it's within the recommended range.6. Finally, don't forget to have a look and then adjust the tyre's pressure as well. Please keep in mind that maintaining the tire pressure is one of the steps to enhance safety. Besides, it also contributes to better fuel efficiency and then extends the lifespan of your tyres. Rotate Tires if Due Tire rotation is one key maintenance practice that helps achieve even wear across all four tires. Tires wear differently depending on their positions. The front tires wear faster because they have to ensure the effect of the additional steering and braking forces. By rotating the tires at the recommended intervals (typically every 5,000 to 8,000 miles or as specified in your vehicle's owner's manual), you can distribute the tire wear more evenly. Ultimately, this helps attain the extended overall life of your tires and maintain optimal handling and stability. Replace Tires if Needed If your tires are excessively worn or have reached the legal minimum tread depth, it is a clear indication of replacement. This is a must before you start your long journey. Driving with bald or severely worn tires is detrimental and life-threatening. But also, if you are caught on the highways, it will result in hefty fines and potential license penalties. When replacing the old ones, you must consider investing in high-quality, reputable brands that offer superior performance and longer life. Additionally, you can replace all four tires one at a time, which ensures persistent handling and traction. With these guidelines, you can regularly inspect and maintain your tires, ensuring a safe and enjoyable journey. Also you can easily bring down the risk of breakdowns or accidents caused by tire-related issues. Perform General Maintenance Checks Here are some important points that you need to consider when we discuss the general maintenance checks. Let's review them all here. Check Brake Pads and Replace if Needed Take a thorough look at your vehicle's brakes, which are in the best of condition. It is one of the key points attached to a safe and secure journey. So you must take a look at the brake pads and replace them, if necessary when you start a new journey. Here's what you need to do: Park your car on a level surface and engage the parking brake. Also, look at the brake pads through the wheel. You must be able to see them pressing against the brake disc. Thoroughly check the thickness of the material that makes the brake pad. Most manufacturers recommend replacing the brake pads when the friction material is reduced to approximately 3mm or less. Look for any signs of uneven wear and examine the brake pads' cracks closely. It's better to get new brake pads if they appear to be excessively worn out or damaged. Additionally, be attentive to any warning signs that may indicate worn brake pads, such as: A high-pitched screeching or grinding noise when applying the brakes could indicate that the brake pad wear indicator is making contact with the brake disc. Increased brake pedal travel or a "spongy" feeling when pressing the brake pedal which could signify that the brake pads need replacement. However, you may notice any of these warning signs or if the brake pad material is worn down to the recommended replacement level. Hence, it it's crucial to have the brake pads replaced before embarking on your long journey. Inspect and Replace Air Filters (Engine and Cabin) Clean air filters are essential for optimal engine performance and cabin air quality. Before your trip, inspect and replace both the engine air filter and the cabin air filter if necessary. Engine Air Filter: Locate the engine air filter housing, typically a rectangular box near the engine compartment. Open the housing and remove the air filter. Hold the filter up to a light source and check for excessive dirt or clogging. If the filter appears excessively dirty or clogged, replace it with a new one. Cabin Air Filter: Consult your owner's manual to locate the cabin air filter, which is usually behind the glove compartment or under the dashboard. Remove the old cabin air filter and inspect it for dirt, debris, or discolouration. If the cabin air filter appears dirty or clogged, replace it with a new one. Replacing both the engine and cabin air filters can improve fuel efficiency, engine performance, and cabin air quality. Alongside, it also ensures a more comfortable and enjoyable journey. Check Lights (Headlights, Taillights, Turn Signals) One of the most essential components that determines your vehicle's safety is the lights. They are the ones who are responsible for providing peace of mind and the most comfortable journeys. So, before your trip, perform a thorough check of all exterior lights, including: Headlights: First, turn the vehicle light on. Then, take a walk around the vehicle. This technique ensures that the lights are working properly. Check for cracks in the lights. Also, look for moisture buildup or discoloration of the headlight lenses. Taillights: If you have a friend or an acquaintance, you could ask them to stand behind the vehicle. However, at this point, you could activate the brake pedal to check the lights' functioning properly. Also, check the reverse lights by engaging the reverse gear. Turn Signals: On the turn signals first. Then, take a walk around the vehicle. See if the front and rear turn signal lights are working properly. Is your vehicle's lights blinking rapidly? The bulbs might have burnt out. Other Lights: Have you thoroughly checked the license plate lights, side marker lights, and other exterior lights of your car? Replace the malfunctioning or burnt-out bulbs promptly. It ensures optimal visibility and ultimate compliance with legal requirements. Inspect Belts, Hoses and Replace if Needed Belts and hoses in your vehicle ensure the proper functioning of the cooling system and vehicle's engine. Hence, these components must be included in the inspection list. You must not compromise on safety and replace them if necessary. Belts: Pinpoint the serpentine belt(s) in your engine compartment. Look for a potential cracking, fraying, or excessive wearing of your belt. Apply moderate pressure to see the tension of the belt. Do it with your finger. The belt should deflect only a little, not much. Belts with wear and tear and improper tension must be replaced. Hoses: Inspect all coolant hoses, including the radiator hose, heater hoses, and any other visible hoses in the engine compartment. Look for signs of leakage, cracks, bulges, or any deterioration. Gently squeeze the hoses. It will enable you to check for any, internal degradation. Soft or spongy areas indicate the problem. Replace the worn-out hoses immediately. Replacing the hoses and worn belts can stop costly repairs and sudden breakdowns during your journey. Ultimately, you can enjoy a reliable driving experience. Conclusion You have to check the vehicle from every aspect, especially the once-involved long journey. This can be helpful in making an enjoyable trip. Check your vehicle brakes, tires, and lights. Also, give a look at the maintenance fluids and the critical components that determine the safety of the vehicle. If you are looking to make the long trip a memorable event, then you have to invest your time. Take a microscopic look at the aspects of the vehicle's conditions given above. The steps on the entire preparation on thorough checking of the vehicle can be tedious as it is time-consuming. But at the cost of it, you can ensure your vehicle is in the best of conditions before you embark on a long journey. With these guidelines and looking at the potential issues in advance, you can enjoy a trip free from worry. This is because you know that your vehicle is ready to tackle the miles ahead with confidence and reliability.