Related
This Is The Best Time To Visit The Seven Magic Mountains In Vegas!
BY sagnika Oct 19, 2023
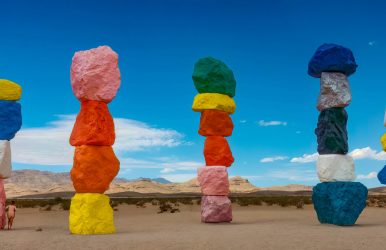
Do you know what the seven magic mountains are? Listening to the name brings excitement, especially for those who love traveling! When traveling interstate across Las Vegas, you catch a magical and interesting sight! Curiosity gets the better of you when there are colorful boulders kept one above another, thus creating an eye-catching spectacle. Yet humans have marked the place with their secretion of waste and garbage! So, instead of looking magical, it seems like a forceful creation of human afterthought! Many tours have been organized around it, and people go crazy with their cameras and photographs! Want to know more about this colorful beauty amid the desert? I was hoping you could read the article where I will discuss the artist, his inspiration, and his creation. You will also learn how to visit the seven magic mountains and the right time to go! There are some other factors necessary to know before you go, which we will discuss here in detail! What Are The Seven Magic Mountains? Image Source The 7 Magic Mountains is a large-scale public artwork by renowned Swiss artist Ugo Rondinone. The painting is 30 to 35 feet high and is located in a desert outside of Las Vegas, visible across the desert landscape when traveling on Interstate 15. The location where you can see the seven magic mountains gives off an otherworldly vibe! It is symbolically and physically representative of beauty and showcases the integrity of Las Vegas as a destination. When traveling across the highway, you will check out the mountain ranges, Jean Dry Lake in the background, and the desert! Overall, the seven magic mountains' symbolic representation is both artificial and natural! The place is swarming with tourists, especially because the highway is constantly ebbing with traffic between Las Vegas and Los Angeles. When you pass the site, you feel like you are crossing over to a portal where you will find the remnants of artificial and natural! Is It Man-Made Or Natural? sevenmagicmountains.com The public artwork is an artificial large-scale exhibition that features seven towers made of locally sourced boulders, which seem like dayglow totems! It is a creative and unique approach to creating a monument across the desert, which creates beautiful visuals! The Seven Magic Mountains is more like the representation of a destination like Las Vegas, integrating both the natural and the artificial elements. The art has been produced by the Nevada Museum of Art in Reno and the Art Production Fund in New York! It was located 10 miles south of the St. Rose Parkway in Henderson and Las Vegas Boulevard! It was in the 1960s when another art was created by Jean Tinquely and Michael Heizer, pretty close to the Jean Dry Lake. Seven magic mountains at night is one of the unique sights to encounter! Artist! news.artnet.com The creator of the Seven Magic Mountains is Ugo Rondinone from Switzerland, who lives and currently works in New York! He was born in 1964 and has become popular based on his expansive emotional range, channeling his creativity through art! By embracing fluid and diverse media and forms, the artist uses his profound insight and psychological expressivement to relay the relationship between nature and human beings! The artist highlights the human conditions through his work. The artist brings romanticism, the natural world, and existentialism together to encapsulate symbolization and representation. The profound instinct he uses to create the art underpins the purpose of the exhibitions. Producers! nevadaart.org The Nevada Museum of Art has been at the root of art in Nevada, and it is one of the producers of the Seven Magic Mountains. New audiences are efficiently reached through a partnership with the Art Production Fund located in New York. Contemporary art expands awareness among people! Many ambitious public art projects have inspired people regarding symbolization, understanding of social issues, practicality, and interpretation of human concerns and relationships. The AAM-accredited art museum in Nevada is the Nevada Museum of Art, where they are integrating grants, gifts, sponsorship, and membership. The Reno-based institution was founded in 1931 as a non-profit organization. They provide opportunities for artists to engage people on a wider range where their educational experiences and range of art are well recognized. There are Museum schools, original exhibitions and programming, and permanent collections. The center archives unique materials and has been created by over 1,000 artists who work across seven continents! Spreading awareness across people, the museum has sponsored a range of art and beauty. This Is The Best Time To Visit The Seven Magic Mountains In Vegas! Image Source If you want to visit the Seven Magic Mountains Las Vegas, you must see it as it is open for visitation. There is no need for reservation, nor are people cordoned off at a certain distance from the art! Even though there has been a proper reason why people were prevented from going closer to the art! People throwing garbage across the art installation place and painting graffiti on the boulders led to serious hampering of the art. It is informed that people have been requested to maintain social distancing and caution! People are asked to maintain healthy habits when visiting the art, considering it is a public place! When visiting the Seven Magic Mountains, there is no price for Seven Magic Mountains tickets as they are free for the public to see. The installation has been highlighted as interpretive signage has been used to prompt people to learn more about the art, the artist, the artwork, and the land on which the art has been installed! What We Need To Know? anothermag.com The best time to visit is any time of the year as long as there are flash flood events! It is well-known that there might be flash floods in the desert! To protect yourself from these sudden extreme weather conditions, you must check the weather forecast before visiting. A Guide-By-Cell is offered in Spanish and English so that the visitors can have a better and deeper engagement. They have also given a number, 702.381.5182, on which you can call and learn more about the art and the artists in South Nevada! You will not be getting any amenities at the artwork site, nor will you be able to access any restroom facilities. You need to know this because you cannot beat nature's call. Hence, it is important to consider that the nearest restroom you can access is five miles from the Jean site. From the artwork's location, the nearest businesses you will find are at the intersection of Las Vegas Boulevard and St. Rose Parkway! This location is almost 10 miles away from the area, so it may be difficult for you to access any public restrooms in the middle of the desert. You must carry water, especially because it is in the desert, so you cannot access it publicly. Nourishment necessary in the desert must be taken while you visit the seven magic mountains! How To Go There? squarespace-cdn.com If you are going from Las Vegas, you must follow the I-15 S to Sloan Road and exit 25. You then have to turn left or east to Las Vegas Boulevard. After turning, keep driving for 7 miles south on Las Vegas Boulevard! You can check out the artwork, which will be on your left! If you are traveling from Los Angeles, you will be driving north on I-15 Jean and take an exit on NV 12! Turning east or right on NV-161 to Las Vegas Boulevard would be best. You must then keep driving on Las Vegas Boulevard for approximately 5 miles! You can see the artwork on your right or the east when you are coming from Los Angeles. Also, You can park in an onsite parking lot, considering street parking is discouraged! There is no public transportation at the installation site, so you have to walk up there! Tours! squarespace-cdn.com The producers have been involved with the tours they create around the seven magical mountains. There are no tours separately, nor is there a guided tour! They have not encouraged any transportation from the ATV operators. Several organizations have tried to offer options to visit the Seven Magic Mountains, but I need to find out how authentic they are! Do not go for it if they are trying to collect entrance or parking fees! Accommodations! vvdailypress.com There is no accommodation available, nor is there overnight camping available! It is strictly prohibited, and the visitation hours are quite clear, extending from sunrise to sunset. The artist and the producers have also informed us that they do not take any extra responsibility for injuries or harm to the visitors while visiting the art! Other Things To Do Near The Seven Magic Mountains! simpleviewcms.com Apart from the art, you can check out other places near the Seven Magic Mountains! If you have planned a trip around the whole site, it is quite fun because you will acquire the beautiful experiences of a lifetime! Please read the article to know more about the places you can visit and what they are about! This will help you create an amazing itinerary and enjoy your heart out! Madame Tussauds Las Vegas venetianlasvegas.com You have to visit Madame Tussauds, considering it is one of a kind! The institution performs a survey to learn about the latest attractions or celebrities, thus selecting them based on their popularity. A wax figure takes around 6 to 8 months to be constructed; hence, after the survey, they finalize the theme or the individual and create the wax statue accordingly! Everything from clothing preference to facial expressions and hairstyle is researched! Sometimes, celebrities are requested to visit Tussaud's stylists for the correct measurements! Almost 200 photos and 150 measurements are taken to create the perfect look! They use an oil-based paint, which helps in giving a realistic skin complexion to the statue. For the statues, steel, and clay are also used apart from wax! There are celebrities across the world who have been directly involved in the statue-making process. So what can be more fun than checking out these life-sized dolls of your favorite celebrity and clicking some pictures? Shark Reef Aquarium At Mandalay Bay thrillophilia.com Take a taxi, shuttle, or car to visit the Shark Reef Aquarium at Mandalay Bay! You can also opt for the free Excalibur-Luxor-Mandalay Bay Tram and reach the aquarium while wandering around the tunnel, considered one of the largest exhibits! The shark exhibit is one of the largest, with a shipwreck surrounded by 4.9 million liters of water, thus creating a unique ecosystem for the sharks! There are also freshwater fish, saltwater fish, golden crocodiles, giant rays, and sea turtles. Some younger visitors love the touch pool, where they can have their collection of animals to touch! They will have certified divers who help them with the touching and create an opportunity to dive in the tanks, i.e., scuba diving! There are many passes in Las Vegas for multi-attraction sightseeing; the aquarium is included in the passes. Closer to Mandalay Bay Resort, the Shark Reef Aquarium is located near the South Convention Center's end of Las Vegas Boulevard. High Roller nbcnews.com Visiting Las Vegas and not going to the High Roller is a spoilsport! It is one of a one-of-a-kind experience with Happy Half Hour cabins at the High Roller Observation Wheel. You will have a bartender, an open bar, along with a 30-minute rotation of the wheel! There is a self-guided curriculum sheet along with a 30 to 40-minute lesson plan. You can discuss technology, science, math, geography, and architectural design. Keep The Travel Shoes On… The Seven Magic Mountains is an artificial art that bridges the gap between the synthetic and the natural! With the mountains and a lake as a backdrop, the art acts like a portal, making visitors realize the significance of the relationship between nature and human beings. In my opinion, the artist also tries to highlight how people can connect to nature; it is a sacred place! Hence, the boulders are an inspiration and a place to pay homage to the beauty of the desert and its significance in our lives. Comment below regarding your perspective on the art and how you interpret it! Read Also: Maldives’ Luminescent Secret: The Mesmerizing Sea Of Stars! The Stairway To Heaven Hawaii: Hiking Adventure’s Hidden Gem Walking On Sunshine: Exploring The Magic Of Vietnam’s Golden Hand Bridge!