


 Related
The Stairway To Heaven Hawaii: Hiking Adventure’s Hidden Gem
BY Abdul Aziz Oct 5, 2023
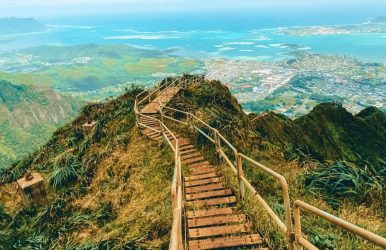
Going on a hike up the infamous Stairway to Heaven Hawaii on the island of Oahu calls for in-depth preparation on your part. It is one of the most dangerous hiking trails. It is also known as the Haiku Stairs. In this article, you will find information on the hike’s history, current status, alternate routes, incline, security, distance, best weather conditions, helpful gear, and a guide to get there. History Of The Stairway To Heaven Hawaii lifeonearth.com In 1942, contractors for the U.S. Navy began the construction of the Haiku Radio Station. It was a top-secret facility that transmitted radio signals to Navy ships that were operating in the Pacific. To get the right altitude for the antennae, they stretched them across the haiku valley, which is like a natural amphitheater. You might still see the remnants of the wooden ladder beside the new metal steps. The radio station was commissioned in 1943. A stronger transmitter that could relay powerful signals was necessary. This could not be done with the vacuum tube technology used at the time. So they chose to go with an Alexanderson alternator, which uses a huge device that can generate powerful yet low-frequency radio signals. It would need a large antenna. When the Naval Air Station Kaneohe Bay was transferred to the Marine Corps around the 1950s, the U.S. Coast Guard used the Haiku Radio Station site for an Omega Navigation System station. In the mid-1950s, the wooden stairs were replaced by sections of metal steps and ramps. The total number of stairs stood at 3,922. The Coast Guard did not stop hikers in the 1970s but had to stop after it featured in the Magnum P.I. movies, which increased the number of visitors. The station as well as the trail have both been closed to the public since 1987. Recent History In 2003, plans were made to reopen the stairs to the public, and the cost incurred to repair the stairs was $87,500. The public access being shut down, residents found themselves surrounded by unknown faces of hikers and tourists and litter all around. In early 2018, the City and County of Honolulu released a statement to not open the stairs to the public, showing liability concerns. Some hikers, however, continued to trespass, which only strengthened the local community’s resolve to keep the structure closed to the public. The Friends of Haiku Stairs, a volunteer group that aims to preserve the trail, pitched that there could be an alternative to a no-trespass, safe public access to the trail without taxpayer costs. The trail now is a disputed one with all its beauty and thrill. However, it has not stopped the locals, hikers, and travelers from stealing past the guards posted at the bottom of the stairs. This hike is a strong dose of adventure, climbing nearly 4,000 steps along an 18-inch wide staircase to reach an elevation of more than 2,000 ft. Incidents squarespace-cdn.com The hiking trail is not a site for any major injuries or accidental Stairway to Heaven Hawaii deaths on the stairs. There have only been minor incidences in the last decade. However, between 2021 and 2022, there have been more number of injuries and rescues of hikers trying to get to the top of the stairs. The rescues have mostly taken place for hikers going through the Moanalua Ridge, which is the longer and more difficult of the trails. Many hikers are rescued “near the Haiku Stairs” and not the Hawaii Stairway to Heaven itself. In 2014, 6 people were arrested, and 135 were quoted to have climbed the stairs. According to the City Prosecutor's Office, a criminal trespass in the second degree carries a $1000 fine. The Stairway To Heaven Hike Hawaii: My Experience The Stairway To Heaven hike on Oahu, Hawaii, is possibly the biggest attraction on the entire island. A grueling number of 3,922 stairs go up to the imposing mountain ridge. Most of the time, the incline is vertical, with only a handrail to save you from falling into the valley below. It sounds dramatic, but it is what it is. But it isn’t too dangerous if you are prepared for it. Distance: 2 miles or 3 km round trip Elevation Gain: 2,630 feet or 800m Duration: 2-3 hrs up, 1-2 hrs down We started out by being dropped off in the neighborhood at 2 am in the morning. It was a clear night with just a few light clouds hovering over the mountains. As soon as we got out of our car, a resident came rushing out of his front yard, yelling at us. Thus, startled by the old man, we hurried away to the “main entrance” to get our eyes fried with a beaming flashlight. The Trail We silently went off in the opposite direction toward an alternate entry point, keeping in mind that the old man quite possibly called the guard or the police to warn them about us. We were thrilled by the idea of being caught and afraid of being caught, actually. Walking through the neighborhood as quietly as possible, the barking of dogs totally blew our cover, making our presence known. We ran down the street to a small alley that led up to the hill. We had to cross over the barbed wire fence, which was close to a residential area. It is understandable why the residents are so annoyed with trespassers. From here, we had to steal past the knee-high undergrowth as quietly as we could go. We were nervous when approaching the guard, understanding that we had trespassed multiple sites that were strictly no-go. As we approached the red car of the guard, we found that no guard was around. We walked past it and towards the stairs. As we ascended the stairs, we finally felt relieved to think that the police or guards didn’t go after the trespassers on the stairs. On The Stairs change.org We felt much safer, and we could now enjoy our 3 a.m. hike along the Stairway to Heaven. In 2015, a storm damaged many parts of the stairs to the point where they could not support use. It is not dangerous per se, but it makes your ascension more thrilling. A few of the steps were loose, and we had to keep that in mind while treading on each of them. We did not have headlamps. We followed the full moon up the narrow and damp stairway. I managed to keep looking back to see the highway, which kept getting smaller as we went higher in order to reach platform one. Grasping the slippery railing tightly, we made our way to the second platform, where an abandoned cabin lay with old machinery inside. It looked straight out of a post-apocalyptic movie. Another two hours went by, and we almost reached the summit. The final section of the hike consists of boards instead of stairs, which make it a catwalk at 2000 ft. in the air on top of a sharp ridge. At The Top squarespace-cdn.com At the summit, we found an old cabin with huge antennae on top. We moved around the space on top among the clouds. We then returned to the bunker to wait for the spectacular sunset this place always has. Putting on a fresh pair of dry shirts and jackets made the experience much more comfortable while at the summit. The sky became a pale blue and then shades of purple. With that, the sun came tearing through the haze. It shone yellow and gold over the Haiku Hawaii Valley. Many others witnessed the sunrise along with us, who began their descent once the spectacle of the sunrise was over. One of the trails downward is the Moanalua trial, which is a 6-mile route, but you can miss out on the views. It also helps you avoid the guards if that is your main issue, but it is 3 to 4 times longer than other routes. The hike down was a treat for photographers. We were in no rush, so we got down at our own pace, taking in the views and shots for our socials. It feels amazing to have ascended in the dark and then descending in broad daylight. It took less than 2 hours to reach the bottom. We saw the guard’s red car where it was in the morning, but this time, we took the risk and did not avoid it. The Guard Below .journeyera.com Meeting guard, he joked, saying, “I’ve called the cops, they must not have come,” as he began laughing to himself. His sense of humor eased our anxiety. He gave us the look of get-out-of-here-before-you-get-caught, and we crept away on queue. The situation has become much more serious in the recent past, so the guards may not be as friendly as they were. Be careful if you go in 2023. At the final gate, we saw no signs of police or angry residents. We were free! We could not believe we had just hiked the Stairway to Heaven Hawaii! This is truly a place for one and all. It looks like the real version of Jurassic Park. It is dreamy as well as eerie. You can totally attempt this hike if you visit Oahu. Try to have someone who has visited before guide you through this hike if you visit here for the first time. Alternate Route thatadventurelife.com The alternate route is the Moanalua Trail. The route is 9.3 miles in length. It gets you all muddy and is not the easier option, either. It can help you avoid the guards at the beginning of the trail. But it is not hassle-free. It all depends on when you go and how well-prepared you are for any kind of situation. Things To Pack For The Stairway To Heaven Oahu Hawaii Hike Going unprepared for the hike is one of the biggest mistakes you will make. You must have the basics and stay prepared for bad weather. Here is a list of essentials you must consider among everything else. Arcteryx BETA AR Rain Jacket: This is the rain jacket of your dreams. They are super light. They will fold into the tiniest ball and save you from the harshest storm. Salomon X Ultra 3 Mid GTX Hiking Boots: For better ankle support on that 400-step long hike, waterproofing and toughened exterior are necessary for your boots. These Solomons can easily be your best buddy. Black Diamond Head Torch: In case you return incredibly late from your hike and it gets dark, a headlamp will help you as nothing else will. Keep this one handy for sure. Darn Tough Socks: These will be the most comfortable hiking socks you will own. They don’t wear out easily, either. They have a lifetime warranty. You simply send them with any sign of wear and tear, and they will replace it without further questions. Frequently Asked Questions (FAQs): Here are some common questions people ask about this hike, take a peek: 1. How Did The Stairway Come About? The stairs were originally built in 1942 by the U.S. Navy as a top-secret facility to transmit radio signals to ships that were sailing in the Pacific Ocean. The stairs went public, deeming it fit until 1987, when it became dangerous due to disrepair. Residents of Oahu have fond memories of hiking up the stairway to heaven legally a long time ago.The city of Honolulu reportedly spent almost a million dollars in renovating the stairs and considered re-opening the stairs to the public in 2002. Resident complaints and safety concerns halted the re-opening, and the stairs have stayed closed ever since. 2. What Are Some Of The Other Places To Visit In Oahu? You could take a helicopter flight tour without the doors. The view from above will blow you away. A shark cage tour can ensure you don’t talk about thrilling adventures for another year or so. It will give the adrenaline rush like no other. Ecofriendly dolphin and snorkel tours are also available. Wrapping Up The Stairway to Heaven Hawaii trail is dangerous when seen from below. It is only when you undertake the hike (with proper planning and preparedness, of course) that you understand it is not as daunting as it looked. All you need is a thirst for thrill and sharp wit that comes in handy when you go face to face with adversity. There is also the added fear of strict laws around the hike, which will keep you on your toes. Let us know if you visit this amazing trail. And if you have questions or thoughts to share, please leave a comment below. We would love to hear from you! Read Also: Portals To The Unknown: Exploring Natural Gravity Vortex! The Perfect Getaway: Discovering The Closest Beach To Disney World! Walking On Sunshine: Exploring The Magic Of Vietnam’s Golden Hand Bridge!