


 Related
I Had No Idea When To Visit Mauritius Till I Went There THIS Time!
BY Abdul Aziz Oct 27, 2023
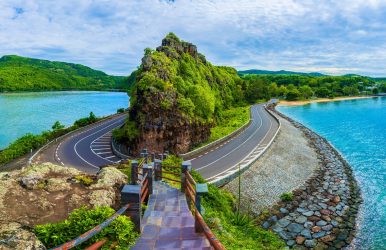
Mauritius! I had the amazing experience of going to this island country recently, and let me tell you, it was an experience of a lifetime. Initially, I was confused about which time to plan it out for. The temperatures and weather in Mauritius are at odds with the rest of the world because of its position in the middle of the ocean. But, when I got there, lucky as I was, I had arrived just before peak season. I got to know about their culture, their food, and most importantly, the best time to visit Mauritius. Here I will describe to you what Mauritius has to offer in each of the months of the year. If you want to know about Mauritanian weather the year around, make sure to stick it out to the end. Plan your trip then on, accordingly. The Best Time To Visit Mauritius Image Source: images.news18.com Mauritius is known for its sunny beaches and beautiful nature treasures. I am here to give you a season-by-season breakdown of the island. Keep reading! January To March Image Source: www.lexpressproperty.com In Mauritius, January is considered one of the hottest and wettest months of the year. Despite the high rainfall, the island is still quite busy due to the influx of tourists from the Christmas period. You can expect heavy rainfall during late afternoons, and there is a possibility of torrential storms during this month. Similarly, February is also quite hot, humid, and rainy in Mauritius. However, the rain usually doesn't last long and clears up after a few hours. Though not perfect for a beach vacation, February has fewer crowds than January. It is important to note that there is still a chance of cyclones during this month. March marks the Holi Festival, also known as the 'Festival of Colours' on the island. This annual celebration is held in honor of Lord Krishna, a Hindu deity. During the festivities, people line up on the streets and cover themselves with vibrantly-colored powder, creating a jovial atmosphere. Despite being a humid month, March sees less rainfall than January and February. April To June Image Source: media1.thrillophilia.com The month of April is a hot and humid season, making it an ideal time for sun-seekers. However, the Easter holidays make the island quite busy. If you prefer a quieter beach vacation, it's better to plan your trip outside of this period. April is also the beginning of the best time of the year to indulge in surfing or snorkeling in the crystal-clear waters. May is officially the start of winter in Mauritius, but the temperature remains comfortable, and the humidity drops. This month is popular among tourists as there are reasonable travel specials on Mauritius accommodations. The evenings can get chilly, so it is recommended to pack some warmer clothes. June is a cooler month in Mauritius compared to the humid weather at the beginning of the year. If you prefer hot weather, then June may feel much cooler. The trade winds start to increase, and like in May, the evenings can become a little colder. It's the perfect time for kite surfers. July To September Image source: www.eventsmauritius.mu July is also considered a cooler month in Mauritius. If you want to enjoy the best possible weather during this period, it's recommended to visit the North of the Island. Despite the lower temperatures, July is still a popular time of the year due to school holidays in the Northern Hemisphere. I visited Mauritius in August. In Mauritius, August is a month with mild temperatures and no rainfall, making it perfect for sunny days without the scorching heat. I would recommend you stay on the west or north coast during August as these areas provide more shelter from the wind. This month marks the Ganesh Chaturthi Festival, a festival honoring the God Ganesh, and you can see statues of the Elephant God all around the island during the celebration. September is considered the unofficial beginning of peak season in Mauritius. At this time, the strong trade winds start to die down, and the temperatures rise, ushering in the summer months and longer days of sunshine. Despite this, September still offers some quiet beaches, good deals on flights, exciting tours in Mauritius, and discounts on accommodations. October To December Image Source: www.mauvillas.com October is the driest month of the year in Mauritius, and it tends to be a busy time at the most popular destinations on the island. This month is also significant as it is the time for the Hindu festival of Diwali, also known as the Festival of Lights. During this festive period, candles and lamps light up the island in a soft glow, making it a beautiful sight to behold. November is characterized by a significant increase in humidity and temperature. The month offers more sunshine, but it's also associated with an increase in rainfall. It's a perfect time for scuba diving enthusiasts who want to catch a glimpse of the seasonal turtles, particularly the Green turtle and the Hawksbill turtle, which are commonly spotted during this period. In December, the last month of the year, Mauritius experiences a surge in global activities, and the island is no exception. Humidity levels rise, and heavy rainfall is expected, mostly in the afternoons. The sea temperature is warmer, making it ideal for water sports such as windsurfing, kayaking, and scuba diving. However, it is advisable to plan your beach holiday well in advance to avoid the high demand during the festive season. Things To Do When Visiting Mauritius Image Source: planetofhotels.com Mauritius is absolutely gorgeous most of the time, and visiting it is a must, whether solo or with family. Here are some things you can try once you decide to try this island country for your next trip: Snorkeling At Blue Bay Marine Park Image Source: static2.tripoto.com If you're interested in witnessing the beautiful marine life of Mauritius, snorkeling is an excellent way to do so. By snorkeling at Blue Bay Marine Park, you'll have the opportunity to closely observe the amazing underwater world of Mauritius that has been hidden for centuries. This excursion will transport you to a different world, allowing you to explore something that is beyond your imagination. Cave Sea Kayaking At Albion Caves Image Source: images.squarespace-cdn.com Kayaking in Mauritius offers a unique and adventurous experience. One such experience is kayaking across the cave sea, providing you with an exclusive opportunity to witness the beauty of the caves. If you are fascinated by caves and enjoy exploring their hidden stories and interesting designs, then you should definitely try a kayaking tour at Albion Caves. Walks With Lions At Casela Park Image Source: toursmauritius.mu Have you ever considered taking a walk with the king of the jungle? If so, Casela Park in Mauritius offers an opportunity to experience the wild side of the jungle by taking a thrilling walk with lions. This excursion in Mauritius promises to give you an adrenaline rush and an unforgettable experience that you may have never imagined! Wrapping Up If you are planning to visit Mauritius and want to know more I hope this article helped. My Experience of Mauritius and knowledge of it will help you select your trip timing better. If you have thoughts to share or questions to ask, please leave a comment below. I would love to hear from you! Read Also: This Is The Best Time To Visit Iceland & These Are The Things You Should Do! This Is The Best Time To Visit The Seven Magic Mountains In Vegas! THIS Is When You Should Visit Maldives!