Related

Best Places To Travel On The East Coast During The Fall: Slow Down And Witness The Changing Colors Of Nature
BY Sibashree Sep 22, 2025
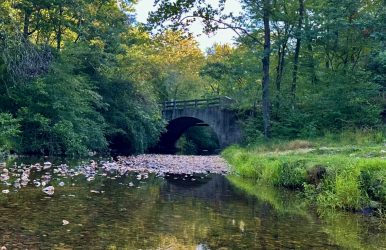
The East Coast doesn’t just “shift” in the fall—it transforms individuals in the Atlantic Ocean at the center of the fullness. Travel here isn’t passive, and it’s a rebellion against autopilot living. It’s a gateway where human craft collides with nature’s raw rhythm. Human creative designs stand side by side with fiery foliage and air that invites you to slow down and breathe fully. However, do you know about the best places to visit on the East Coast, USA, during the fall? In this Tour and Travel Blog, we will talk about them. What Are The Best Places To Visit On The East Coast, USA, In The Fall Season? Witness The Changing Colors Of Nature The fall season travel on the East Coast isn’t about chasing leaves—it’s about building experiences with intent. You don’t stumble into renewal, connection, or investment; you engineer them. The Fed may cut rates, seasons may turn, but only those who listen, plan, and refuse shortcuts walk away with journeys that last. Because real travel—like real progress—isn’t improvised. It’s built, stone by stone, until nothing is left unturned. 1. Virginia Wine Country: Harvest And Partake Drive west from Ashburn and the world recalibrates. Rolling hills, golden vines, tasting rooms that don’t sell drinks but sell perspective. Fall here isn’t wine tourism—it’s strategy in liquid form. Couples: Don’t settle for random pours; seasonal releases are precision tools, crafted for this exact weather. Groups: Skip the chaos of DIY planning. Private tours give you headspace to connect instead of juggling logistics. Professionals: Vineyards double as off-grid war rooms, where productivity slips seamlessly into ritual relaxation. Ashburn locals call it harvest season. Travelers who know better call it optimally leveraging Fall Activities—because what you sip, where you stay, and the travel experts you trust will decide whether the season feels like just another getaway or a transformative reset. 2. Asheville & The Blue Ridge: Nature With Teeth Asheville doesn’t whisper fall—it screams it from mountaintops. The Blue Ridge Parkway is a moving mural, but here’s the catch: the scenery isn’t the prize, timing is. Adventurers: Guides don’t just point you uphill; they calibrate trails to your limits so triumph doesn’t turn to injury. Families: A cabin isn’t a splurge, it’s survival—space, fireplaces, and kitchens keep beauty from collapsing under stress. Wellness-seekers: Spas and local markets aren’t indulgences; they’re corrective measures against city-life burnout. Too late, and the leaves are dead. Too early, and you’ve missed the crescendo. Asheville punishes the unplanned. That’s why locals, with their ruthless timing, are the real gatekeepers of fall magic. 3. Charleston & The Lowcountry: Charm Without Illusion Charleston doesn’t bend for the season—it holds steady, heat gone but atmosphere intact. Streets, markets, and coastlines become a backdrop not for tourism but immersion. The danger? Treating it like a checklist. Food lovers: Menus sharpen around harvest—oysters, farm vegetables, flavors that only exist right now. History buffs: Private tours strip away noise, revealing architecture and legacy as living narratives. Entrepreneurs: Boutique inns double as work sanctuaries, proving ambition and escape can coexist. Charleston isn’t about monuments. It’s about rhythm—one only locals can translate. Without that translation, you’re just walking the streets. With it, you’re living history. 4. New England Towns: The Ruthless Gold Standard New England in fall is the prototype, the gold standard—and the trap. Too many choices, too much noise. Without precision, you’ll miss the point. Families: Expert-curated farms balance hayrides, cider, and play without collapsing into chaos. Retirees: Timing is everything; peak foliage waits for no one. Planners earn their keep here. Investors: Seasonal markets are brutal if you misread them. Trips double as reconnaissance when Realtors sync local data with your ambitions. New England isn’t just pretty—it’s tradition with teeth. The challenge is carving a blueprint that extracts meaning instead of drowning in options. 5. Maine: The Apple Orchards And The Crimson Colors With the crisp and cool air filling the air, Maine becomes a coastal abode in the fall season. The apple orchards here get busy in the fall as it is the harvest season, and you can see a lot of festivities. With nature getting ablaze with the shades of crimson, orange, and yellow, Maine welcomes you to attend the following fall festivals. » Fryeburg Fair It is the largest annual agricultural festival in Maine. It starts from the last Sunday of September and continues till the first Saturday in October. Earlier, the festival was known as “Maine's Blue Ribbon Classic.” » Damariscotta Pumpkinfest Damariscotta Pumpkinfest is another popular fall festivity in Maine. It takes place in October, and local artists take part in this festival and decorate giant pumpkins. Furthermore, Acadia National Park is the main attraction in Maine in the fall season. Spanning an area of 47000 acres, this park is home to the beautiful Cadillac Mountain. It also allows you to take part in various outdoor activities such as: Cross-Country Skiing Snowshoeing Kayaking Canoeing Camping Hiking Moreover, if you want to have the best fall delicacies of Maine, you can explore the eateries in Kittery. It’s time to gorge on the best lobster, clam fries, Needham candies, and whoopee pies. 6. Massachusetts: Offering A Small Town Vibe With A Cozy Farm Experience Salem is the epicenter of all fall activities and festivities in Massachusetts. The Salem's Haunted Happenings festival is the most unique cultural experience here. Furthermore, if you want some moments of solitude, you can explore the hardwood forests of Maine. These forests, filled with sugar maple and other trees, are brilliant locations to witness the changing colors of the autumn season, from yellow to bright orange and then crimson red. Also, autumn is the cranberry harvest season, and you can be a part of the frenzy and festivities around it if you visit Plymouth County, filled with cranberry bogs. Moreover, for the most serene experience, you can plan a visit to the valleys of the Berkshires. Overall, the East Coast of the USA is beautiful in the fall season! Come, soak in the colors and connect to nature. Also, have a good time with great food and drinks.