


Zanzibar Unplugged: Best Time To Visit Zanzibar Zesty Escape
BY Abdul Aziz Oct 27, 2023
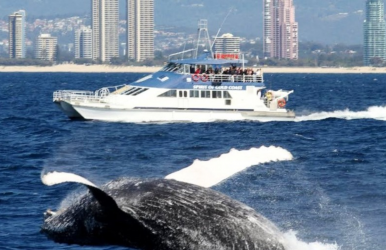
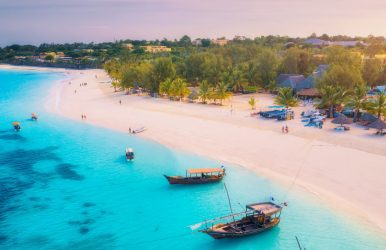
Zanzibar is known for being sloppy when wet and extremely hot in the summer. The protracted rains bring heavy torrential downpours every day, causing high humidity and silty seas to occur between March and early May. With its dry and sunny peak season from June through October on the beach (and in Tanzania's game reserves if you're on a safari first), most vacations to Zanzibar outside of these periods will be nice. While November and December offer Zanzibar's shorter spells of rain, these typically are isolated showers that won't cause holiday washouts. January to March are likewise dry and hot but a lot quieter. The year-round average temperature is roughly 30°C. Due to the warm waters, minimal wind, and high visibility, the months between March and November are typically regarded as the best for diving and snorkeling. September through December is the prime time to see whale sharks, reef sharks, and manta rays. If you want to know more details on when is the best time to visit Zanzibar, this article will help you navigate those questions. Best Time To Visit Zanzibar Image Source: gumlet.assettype.com Strictly speaking, the dry seasons of December to February and June to October are the best times to visit the Zanzibar islands. But in general, the beaches on the southern and western parts of the islands are more protected from wind during these months. On the other hand, the wind typically comes from the southwest from June to October. This makes the northern and eastern coasts ideal for holidaying. But in the end, these islands remain at the whim of the ocean, and their weather can be erratic throughout the year. Even in the “dry” seasons, afternoon showers do occur, but they usually last only a few minutes and are refreshingly cool. It is not an entirely bad idea to travel to Zanzibar during the rainy season when the number of tourists declines, and you will likely find affordable trips and lodging (among those that are still open). The sunsets are known to be stunning. The rain, although severe, is not generally consistent, and delicious pineapples come into season! You might find it tricky to navigate the roads and buses, but things eventually settle. Wet and dry seasons are Zanzibar's prominent climates, which are influenced by the movements of the Indian Ocean’s rainy season. From November/December to February/March, the northeast monsoon winds, or kaskazi (in local parlance), blow. And from June to September/October, the southwest monsoon winds, also called kusi, blow. There is a brief rainy season (the vuli) in November in addition to the main rains (the masika), which last between mid-March to the end of May. Weather Image Source: www.holidaysplease.co.uk Although it can be reduced by the winds and sea breeze, humidity is relatively high throughout the year. The average daily temperature on Zanzibar Island is roughly 26°C (80°F) from June to October and around 28°C from December to February. However, during the latter period, humidity levels are frequently greater, making temperatures feel hotter. Pemba has a milder climate with a little more rainfall than Zanzibar Island. The islands are crowded with tourists from outside and expats from Nairobi and Dar es Salaam during major holidays like Christmas and Easter. You can expect crowded flights and increased hotel prices. On the other hand, life moves more slowly as many restaurants and shops close during the Islamic fasting month of Ramadan. The annual Zanzibar International Marathon takes place in the first few days of November. This can be a good incentive for sports enthusiasts, making it the best time to visit Zanzibar. Festivals Image Source: www.gallerytours.net The majority of Tanzania's public holidays are observed on the islands as well. On these days, companies and offices are typically closed, while some tour operators are still open. Some of the public holidays with set dates observed on the island are: 1 January – New Year 12 January – Mapinduzi ‘Revolution’ Day 7 April – Sheikh Abeid Amani Karume Day 26 April – Union Day: Zanzibar and Tanganyika 1 May – Workers’ Day 7 July – Saba Saba (Seven Seven) 8 August – Peasants’ and Farmers’ Day 14 October – Nyerere Day 9 December – Independence Day 25 December – Christmas Day 26 December – Boxing Day The Muslim holidays of Idd il Fitri, which marks the conclusion of Ramadan, and Idd il Maulidi (also known as Maulidi ya Mfunguo Sita), which commemorates Muhammad's birth, are widely observed and serve as public holidays. These festivals fall 11 or 12 days early each year and have dates that are determined by the lunar calendar. If you are planning to visit Zanzibar in 2024 and want to be a part of their Ramadan, it is set to start on 10 March through 8 April. Places To Visit Image Source: zanzibardestination.co.tz Zanzibar is one of those rare treasures you keep to yourself, as a secret, as a deeply significant memory, and as the most joyful days spent. Now that you know the best time to visit Zanzibar, if you want to know a few places you can check out while visiting, here are a few: Slave Trade Image Source: pbs.twimg.com The Slave Museum is a must-see for anybody interested in learning about Zanzibar's sordid past. The last active slave market in the world was shut down in 1873. You will pass by rooms where slaves were housed before being sold as you move around the museum. To work on plantations, hoards of Africans were first transferred to this island. Slave traffickers utilized the port at Zanzibar as their center of operations to transport slaves to countries including Egypt, Arabia, Persia, and the Ottoman Empire. Sunset Dhow Show Image Source: www.tanzaniatourism.com If you miss taking a Sunset Dhow Cruise on the translucent, emerald seas of the Indian Ocean, your journey to Zanzibar will remain incomplete. The busy bustle of a busy town gradually disappears as the sunset cruise departs the coast that gets replaced finally by the musicians' melancholy ballad of lost love and found romances or a tune played on a taraab, violin, or oud. The crew will provide you with crackers and your preferred brand of beer or soda. Sip on your drink while you bask in the exotic vibe on the cruise. Mnemba Atoll Image Source: www.andbeyond.com Explore the fascinating marine life at Zanzibar, which is host to more than 400 species of fish, turtles, nudibranchs, and many rare forms of coral, while scuba diving at Mnemba Atoll. If you are lucky, you might see reef sharks, manta rays, and whale sharks. Mnemba Atoll is one of Zanzibar's top locations for water sports while being a conservation area and marine reserve. Mid-February through mid-May, as well as mid-October to mid-December, are the best times to go scuba diving in Mnemba Atoll since the sea is quiet, and there is high visibility to enjoy the experience even better. Darajani Market Image Source: upload.wikimedia.org A market is a location where we meet new folks, socialize, and engage in addition to trading and selling items. One such location in Zanzibar is the Darajani Market, which serves as the town's main market. You can find merchants selling everything from Chinese toys and other trinkets to indigenous Zanzibar spices, kofias (Zanzibari hats), and dates while you take a stroll around the streets. You will have an amazing experience wandering the market's winding streets. Wrapping Up The best time for either a rustic vacation or participation in Zanzibar activities is during the months of June and October. These are the months of spring in Africa when the weather is mild and delightful. You can also visit this island paradise in the tropics during December and February. Zanzibar experiences hot, dry weather while it is winter in other countries. Are you planning a visit and want to know when the best time to visit Zanzibar is? Or have you been to Zanzibar recently? Did you like the island? How was your experience? If you have thoughts to share or questions to ask, please leave a comment below. We would love to hear from you! Read Also: This Is The Best Time To Visit Iceland & These Are The Things You Should Do! This Is The Best Time To Visit The Seven Magic Mountains In Vegas! THIS Is When You Should Visit Maldives!