

How Is It Possible For Ski Jumpers To Stay In The Air Long And How To They Train For That?

May 18, 2026

Last Updated on: Jul 13, 2026

Adventure

Suppose we jump high in the air. We can stay in the air for around half a second.

Michael Jordan could even stay off the ground for only one second. 

Now, at many events at the Winter Olympics, we see athletes showing strength and athleticism in the air. 

However, ski jumping beats them all in terms of jumping high in the air and staying afloat for so long. 

Here, you need to understand the physics of sports, and for many of us, the ski jump is a mesmerizing event in the Winter Games, showcasing sports physics in action. 

The athlete who travels the farthest and shows the best style while flying and landing becomes the winner of the event. 

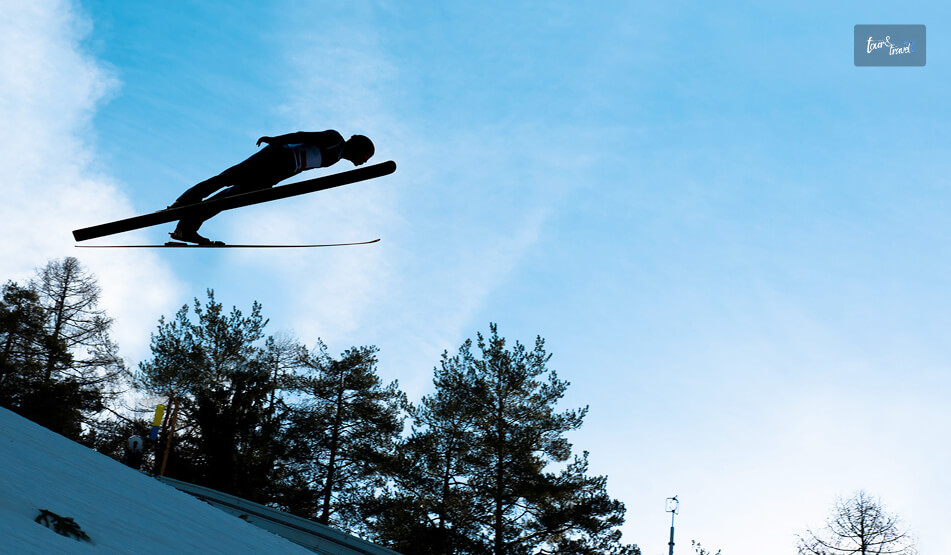
Ski jumpers can fight gravity, and they can turn their bodies and skis into a wing to stay in the air for 5 to 7 seconds. 

Within that span, they can travel almost the length of a football field while staying in the air. 

But how is it possible for ski jumpers to stay in the air so long and how do they train for that? 

Let’s delve into the details. 

How To Fly? 

How To Fly

The answer to how is it possible for ski jumpers to stay in the air so long and how do they train for that lies in three important concepts of sports physics. 

These are drag, lift, and gravity. 

Gravity is the power that pulls any object in flight down. Gravity is a force that works on everybody, and ski jumpers cannot avoid it. 

However, ski jumpers, as they move, interact with the air. Now, this interaction further produces lift. 

Lift refers to an upward force projected by the air for an upward movement of an object. 

In this scenario, if the force of gravity and the force to lift balance each other, an object can fly or glide. 

However, producing lift is only possible when the object is moving. Moving objects collide with air particles and push them aside. 

Pushing air downward creates an equal, upward reaction known as lift. Here it follows Newton’s third law, “For every action, there is an equal and opposite reaction.

You can increase lift by boosting your speed, expanding your surface area, or optimizing your angle of attack (the object’s tilt against the airflow). 

If this angle is too flat, you generate no lift; if it is too steep, the object stalls.             

The Car Window Example 

If the concept feels complicated, you can experience the same by just sticking your hand out of a moving car window. 

If you keep your hand perfectly flat, it will yield no movement. 

However, if you tilt your palm slightly upward, it will force the incoming wind downward, and thus your hand will be pushed up immediately. 

It is a clear example of lift. 

The same particle collisions that generate lift also create drag.

Drag is a resistive force that slows objects down. 

As an object loses speed, its lift drops, cutting the flight short. Because of this, ski jumpers use highly precise body positions to maximize their lift while minimizing speed-killing drag.

A Brief History Of The V-Style 

The history of ski jumping goes back to the 1800s. Norwegian skiers first started competing for distance on snowy slopes.

However, for most of the sport’s history, jumpers kept their skis pressed tightly together, parallel to each other, all the way through the flight.

The 1980s brought a major change to these practices. 

A Swedish jumper named Jan Boklöv began spreading his skis apart mid-air, forming the V-shape you now see in every competition.

He drew criticism from experts and judges who considered it a “bad style” because it looked unconventional. 

However, Boklöv’s V-style increased his jump distances by as much as 10%, simply by giving his body and skis more surface area to catch the air.

Then, ignoring the style was impossible. 

Within a few years, every serious competitor had switched to the V-style, and judges stopped penalizing it.

Even today, it remains a standard technique, and it is the same aerodynamic principle that more surface area means more lift.

How To Fly On Skis? 

How To Fly On Skis

We need to observe the skiers to understand how is it possible for ski jumpers to stay in the air so long and how do they train for that.

You will see a skier starting on a high slope, and then they move downhill. They generate speed by skiing in this way. 

They also reduce drag by squatting and steer very carefully to minimize the friction between the ramp and skis. 

So, when they reach the end, the speed will be close to 60 miles or 96 kms per hour. 

Once airborne, ski jumpers use aerodynamics to fight gravity and extend their flight. 

While they cannot generate enough lift to stay in the air indefinitely, maximizing this upward force slows their descent and carries them further down the hill.

To achieve the longest flight possible, athletes lean forward until their bodies and skis are nearly parallel to the snow. 

By spreading their skis into a V-shape just outside their body’s silhouette, they gain two major aerodynamic advantages.

The spread position creates a larger surface area to catch the wind and generate lift. So they get an expanded surface area. 

They also get an optimal angle of attack. The forward tilt places them at the perfect angle relative to the airflow to maximize upward pressure.

As the jumper glides forward, drag continuously pushes back against them, draining their forward momentum. 

Because lift relies entirely on speed, this deceleration causes the upward force to fade away. As drag robs the athlete of their speed, gravity takes complete control, pulling them faster and faster toward the landing zone.

The Takeoff: The Hardest Half-Second

Out of everything a ski jumper does, takeoff is the most difficult skill to master. It happens in under half a second. 

Furthermore, when the jumper reaches the end of the ramp, known as the “table,” they must explosively extend their legs and spring forward and slightly upward.

They will do it all while still moving at nearly 60 miles per hour.

However, if they jump too early, they will lose speed and distance. Once again, jumping too late can cause losing control of their body position in the air, which can be dangerous.

In addition, the takeoff also sets the jumper’s angle of attack for the entire flight. 

Because there’s no way to make major corrections once airborne, a fraction-of-a-second error in the takeoff can throw off the aerodynamic position for the whole jump. 

This is why ski jumpers spend years drilling this single movement until it becomes automatic.

How Ski Jumpers Actually Train?

Physics explains the reason why ski jumpers fly so far. However, the training behind it is equally crucial. 

Training AreaWhat It InvolvesWhy It Matters
Strength and Explosive PowerSquats, box jumps, and plyometric drillsBuilds the fast-twitch power needed for the powerful, split-second leg extension at takeoff
Summer Training on Artificial TracksYear-round practice on in-run tracks covered with porcelain or plastic bristles instead of snowLet athletes drill their approach, takeoff, and body position even outside the winter months
Wind Tunnel SessionsFine-tuning arm position, back angle, and ski spread with coachesFlight position is highly sensitive to drag and lift, so small posture adjustments can shave off drag
Video and Biomechanical AnalysisFrame-by-frame review of the in-run, takeoff, flight, and landing from multiple camera anglesHelps compare an athlete’s actual form against ideal aerodynamic positions
Mental PreparationVisualization techniques and gradual exposure, starting on smaller hills and building up to normal and large hillsBuilds the psychological conditioning needed to launch off a mountainside ramp at speed

How Do Judges Score A Jump?

The judges will not just assess the ski jump based on the distance covered. So, the question of who becomes the winner depends on the distance and the style. 

Scoring ComponentHow It WorksPurpose
Distance Points– Measured against the K-point (a reference point on the hill). 
– Landing exactly on it earns a fixed score, with points added or subtracted for every meter beyond or short of it.
Rewards how far the athlete actually travels
Style PointsFive judges score the flight and landing, including body position in the air and control of the landing in the “telemark” position (one foot in front of the other, knees bent). 
Each judge scores up to 20 points; the highest and lowest scores are dropped, and the middle three are added to the distance score.
Rewards technique and control, not just distance.
Gate and Wind CompensationOfficials apply point adjustments in real time based on wind conditions, since headwinds increase lift and tailwinds reduce it.Prevents a gust of wind from unfairly helping or hurting a competitor’s final score.

Normal Hill Vs. Large Hill Vs. Ski Flying

Not all ski jumps are the same size, and the hill itself determines how far a “long” jump actually is.

Hill TypeK-Point (Target Landing Distance)Notes
Normal HillUp to 109 metersSmaller competition hill
Large Hill110–184 metersUsed for most Olympic ski jumping events
Ski Flying Hill185 meters or moreIt is a separate discipline where athletes can stay airborne longer, sometimes covering well over 200 meters.

The larger the hill, the faster the in-run speed and the longer the flight.

That is why ski flying produces the most extreme examples of the physics described earlier: maximum lift, sustained over the longest possible time.

Record-Breaking Flights

The current men’s ski flying world record stands at 254.5 meters. Domen Prevc completed it in Planica, Slovenia, on 30 March 2025. (Source: Guinness World Records). 

Among women’s ski flying, Nika Prevc holds the record. She completed the jump of 236 meters in Vikersund, Norway, on 14 March 2025.

These extreme distances are a direct demonstration of the lift-versus-drag balance.

The longer an athlete can hold an efficient aerodynamic position without losing speed to drag, the farther gravity has to work to finally pull them down.

How Is It Possible For Ski Jumpers To Stay In The Air Long? The Rules Follow The Physics

So, you can see there is pure physics at play behind how is it possible for ski jumpers to stay in the air so long and how do they train for that. 

However, the body of an athlete, equipment choices, and the wind can impact the quality of the jump in many ways. 

Also, there are a lot of rules and regulations to keep a ski jump fair. 

You will see many officials changing the starting and ending points up and down the slope during the events. 

This adjustment happens to ensure a safe landing, depending on the speed of the wind. 

When the headwinds are faster, there will be more lifts and longer jumps. As a result, an athlete can go past the scure zone for landing. 

Moreover, the regulations of a ski jump will also depend on the height and weight of a skier. 

Usually, skis have to be “145% of the skier’s height.” Also, if the skier has a body mass index of less than 21, they will get shorter skis. 

Again, long skis are not the best in every case. When the ski is heavy, you will need more lift to fly and stay in the air. 

Also, you have to wear a tight-fitting suit. You cannot wear anything that will need additional lift. 

So, when you see a skiing event, think of how the skiers have also mastered the concept of physics.

Why Is Ski Jumping Riskier Than It Looks?

Ski jumping looks graceful. However, we cannot undermine how physically demanding and risky the sport is. 

Athletes fly through the air at highway speeds with only their skis and body position keeping them stable. 

A poor landing, a sudden gust of crosswind, or a small error in the takeoff can cause a loss of balance that’s difficult to correct mid-flight. 

This is part of why regulations are so strict that the rules on suit tightness, ski length relative to height and BMI, and the ability of officials to adjust the start gate are all safety measures as much as they are fairness measures.

Wind is the biggest variable officials can’t fully control.

Which is why competitions are sometimes paused or delayed when crosswinds pick up, and why the point-compensation system exists to account for conditions that shift mid-competition.

How Is It Possible For Ski Jumpers To Stay In The Air Long? Some Quick Questions And Answers

1. Why Do Ski Jumpers Spread Their Skis Into A V-Shape?

It increases their surface area and creates a better angle of attack, both of which generate more lift and let them fly farther.

2. How Fast Do Ski Jumpers Go Before Takeoff?

Around 60 miles per hour (96 km/h) by the time they reach the end of the ramp.

3. How Long Do Ski Jumpers Actually Stay In The Air? 

Roughly 5 to 7 seconds in standard competition, and even longer during ski flying events on the largest hills.

4. Is Ski Jumping Scored Only On Distance? 

No. Final scores combine distance points with style points awarded by judges for body position and landing control.

5. What Is The Difference Between Ski Jumping And Ski Flying? 

Ski flying happens on larger hills built for greater distances, allowing longer flights and higher speeds than standard normal or large hill ski jumping.

Read Also:

Share on Social Media

Sibashree is a travel, culture, and leisure writer who has been writing since the age of 12 and professionally since 2014. With more than a decade of travel writing experience and journeys across India and several parts of the world, she brings a deeply personal and thoughtful perspective to her work. A student of English Literature and Mass Communication, Sibashree has always viewed travel as more than movement — for her, it has been a way of understanding people, cultures, and herself. Her passion for spiritual exploration has also led her to many unusual and meaningful destinations over the years. Outside of writing, Sibashree enjoys watching European cinema, reading about global politics, and reflecting on the stories hidden within everyday places.

Leave a Reply

Your email address will not be published. Required fields are marked *

title-img Related

READ MORE Ritigala Forest Monastery

Ritigala Forest Monastery: Location, Timing, History, Climbing Experience And More

BY  Sibashree Feb 18, 2026

After exploring the Tamil culture and the Hindu temples of Jaffna, it was time to visit an ancient and secluded Buddhist meditation retreat in Sri Lanka.  It has stone ruins from the 1st century BC, and it was once home to the Pamsukulika Sect of monks, who were known for their meditation-based and secluded lives in the forest.  Moreover, the Ritigala Forest Monastery has an association with the stories of the Ramayana. Also, this monastery is inside the Ritigala Forest Reserve. So, it is a place where history, spirituality, and wildlife await you.  Hi, in today’s blog, I will talk about how I climbed up the stone steps to reach the Ritigala Monastery in Sri Lanka, the history, legends, and the main attractions of visiting the ancient monastery today.  I will also talk about the transportation options.  Where Is Ritigala Forest Monastery? Sri Lanka maybe one of the cheapest places to travel in the world. However, its natural beauty and the cultural and historical richness are matchless. The Ritigala Forest Monastery is one of the hidden gems in Sri Lanka.  The Ritigala monastery is located across the mountain of Ritigala. The mountain of Ritigala is the highest mountain in the dry northern region of Sri Lanka.  It is close to Harbarana, which is again the epicenter of the cultural triangle, the Sigiriya Rock Fortress, Dambulla Cave Temple, and Polonnaruwa. It is also the gateway to many wildlife safaris in Sri Lanka.  The distance between Harbarana and the Ritigara mountain is around 21 km. Other important locations near the mountain are Anuradhapura, which is at a distance of 42 km, and Sigiriya, at a distance of 32 km.  Furthermore, the Ritigala Forest Monastery is inside the Ritigala Strict Nature Reserve.  However, remember one thing. As I mentioned in my Jaffna, Sri Lanka, travel guide, you have to rely on the locals when you are exploring the cultural landmarks or a secluded place like the Ritigala Forest Monastery.  You cannot trust Google Maps completely for locating the Ritigara mountains and monastery.  How To Reach The Ritigala Forest Monastery?  Harbarana was the base for my road trip to the Ritigara mountain and trekking further.  1. Reaching Harbarana From The Bandaranaike International Airport (CMB) I took a flight to the Bandaranaike International Airport (CMB). The distance between the Bandaranaike International Airport (CMB) and Habarana is around 151 km. You can take a car rental for the entire journey. However, being a fan of the LowDownUnder Travel, I chose a different path.  After reaching the Bandaranaike International Airport, I took a taxi to Gampaha and then took a train to Harbarana. The ticket cost me around INR 400, and the travel time was around 4 hours and 40 minutes.  The Sri Lankan Railways runs two trains daily from Gampaha to Habarana.  Other airports close to Harbarana are Sigiriya Airport (18 minutes), Kandy Airport (2 hours), and Trincomalee (1 hour and 36 minutes).  2. From Harbarana To The Ritigara Mountain  From Harbarana, I took a taxi to reach Ritigara. It cost around INR 420, and the travel time was around 35-40 minutes.  You can also reserve a car or tuk-tuk to take you to the mountains, wait for you at the entrance gate, and take you back home when you are done trekking. In such cases, the reserve cost will be around INR 1000-1200.  The route from Harbarana to Ritigara was beautiful. My cab driver pointed out the local farming practices and the land on the way.  It was a fulfilling experience, and as Jaffna has a unique food scene based on its local agricultural practices, the food habits of this northern-central region of Sri Lanka. Red rice, jackfruit curry, and river fish are the staples here.   Also, my driver told me to keep my eyes open to spot elephants. However, I was not lucky enough to spot my favorite animal. I noticed some fresh dung in the road, though.  Furthermore, when the car came off the main road, the ride became a little bumpy. The route from here to the Ritigara mountain was a combination of dirt tracks and semi-paved roads.  Finally, I reached the entrance of Ritigara and purchased my ticket. The ticket cost me around INR 450, and I even got a guide for INR 1200. What Is The History Of Ritigala Forest Monastery?  The history of the Ritigala Forest Monastery goes back to the 1st century BC. You will find here more than 70 rock caves, the 9th-century meditation spots of the "Pansukulika” monks, and unadorned stone pathways.  Here is a brief historical timeline of the Ritigala Forest Monastery.  1. Establishment Of The Ritigara Forest Site For Monks Buddhist monks came here and started living in the sacred mountains in the 1st century BC. There were more than 70 caves where monks started meditating in solitude.  Even today, there are many rock inscriptions from which we can learn about how many patrons helped to build and maintain the site, which was home to monks who left the luxury of monasteries and used to meditate in the caves.  2. Receiving Royal Patronage This site received adequate royal patronage, and from the inscriptions, we especially get to know about King Pandukabhaya.  He founded Anuradhapura and built a reservoir at the base of the mountain for the hermits here in the 4th century BC.  3. Building Of The Pansukulika Sect Monastery King Sena I built the Ritigara Monastery in 833, and it was meant for the Pansukulikas or monks in rag robes.  These monks practiced the highest form of asceticism, and they were on a mission to revive the simple teachings of Lord Buddha.  4. The Decline Of The Pansukulika Sect And The Monastery  From the 9th to the 11th century, the Ritigala Forest Monastery and the Pansukulika Sect of monks enjoyed immense glory.  However, with increasing donations and the monks getting inclined toward what they earlier rejected, the core philosophy of the sect was lost.  Two rival sub-sects were formed within the Pansukulika Sect. Finally, King Vijayabahu I confiscated their extensive holdings in 1070-1110 CE as a part of a Buddhist monastic reform.  5. Abandonment And Discovery Of The Ancient Monastery Despite the royal patronage, the Ritigara Forest Monastery was abandoned around the 10th to 12th centuries due to the Chola invasions.  It was an unprotected ruin until James Mantell, the British colonial surveyor, saw the ruins while climbing up the mountain.  Then, he drew the attention of H.C.P. Bell, the first Archaeological Commissioner of Ceylon. He understood the historical and religious importance of the place and expanded it extensively in 1893.  Finally, in 1941, the 1528 hectares of the forest area, including the ruins, were designated as a Strict Nature Reserve.  Today, the conservation efforts strike a balance between the ecological and archaeological preservation of the monastery and the site.  Design And Engineering Of The Ritigala Forest Monastery: The Incredible Ruin The monastery does not look like the traditional stupas. Here, you will find interconnected stones, paved pathways, and stone bridges.  Furthermore, there are bathing areas like the famous Banda Pokuna.  The most unique thing about the Ritigara Monastery is that here you will not find any Bodhi Tree or any Buddha statue.  It is a place where you can walk, meditate, and contemplate.  You may call it a failed attempt to revive the radical simplicity of Buddhism, but for every seeker, it will always be a place to introspect and connect to a higher energy.  I had goosebumps the moment I entered the monastery. Let’s delve deeper into the unique architecture of the monastery.  1. The Padhanaghara And Stone Pathways  The ruins of the Ritigala Forest Monastery cover an area of around 120 acres. You will see around 50 distinct meditation houses or Padhanaghara in the area.  Inside each meditation house, you will find two raised platforms in the east-west direction, and those were made of stone. A small maot surrounded the platforms, and a small stone bridge connected the platforms.  Probably, these structures were used for some rituals or meditation purposes.  Interlinking stone pathways connect these meditation houses. These pathways are 1.5 meters in width, and the width is consistent as the pathways ascend the slope. These pathways also have circular intersections.  2. Water Management System, The water management system in Ritigala Forest Monastery was sophisticated. Banda Pokuna and Kumbuk Wewa, these twin ponds were carved from rocks.  Furthermore, I found a large stone trough in the courtyard, which was used for cooking food.  Also, I saw the ruins of the monastery hospital and stone mortars, which were used to grind and prepare herbal medicines.  Moreover, the monastery did not have any residential complex. The monks lived and meditated in the caves.  However, there were urinal stones, which were the only amenities or the luxury the monks enjoyed in this austere setup.  What Is The Legend Of The Ritigala Forest Monastery?  The Ritigala mountain has a connection to the Hindu mythology, the Ramayana. Attacked by Ravana, Lakshama, the brother of Lord Ramachandra, became unconscious on the battlefield.  Lord Hanuman, on Lord Rama’s command, went to fetch a life-saving medicinal herb from the Dronagiri. However, he forgot the name of the herb and carried the entire mountain on his shoulder.  When he was crossing the Palk Strait, five segments of the mountain fell from his grasp. The biggest fragment fell on the site of the Ritigara Mountain.  Now, you may not believe the legend of the Ritigala Mountain. However, the presence of various medicinal plants in the mountains keeps the myth alive.  Moreover, among the 417 species of plants here, around 96 varieties are for medicinal purposes. Moreover, the northern peaks have names such as the Wannati-kanda and Aushada-kanda.  Climbing To The Ritigala Forest Monastery In Sri Lanka  Climbing up to the Ritigara Forest Monastery was a free-flowing experience. There are many things to see, but more to feel.  Here is how I explored the ruins.  1. The Bathing Pond  As I left the ticket counter behind, I found the first ruin. I took the stone steps to visit a massive bathing area.  You have to be careful with the steps here, as they are cracks and have overgrown tree roots.  Large trees have grown in the bathing area now. However, you can still understand its massive scale.  2. A Winding Stone Path And Ruins Of The Monastery The winding stone pathway took me through various ruins, and they stood like the blueprints from a bygone era.  The most striking one among them was the ruins of the hospital. It still had a sunken bath and grinding stones for preparing medicines.  As I climbed up, I found the meditation platforms, big multi-chambered rooms, and urinals.  3. The Large Pavilion With Columns  I found a large pavilion here with big columns. However, the more intriguing was the Big Tree behind the ruin.  It is so massive that its ground roots have created a labyrinth. The road seems to fizzle out at this stage. However, my gut instinct said that there is something more.  4. The Hidden Ruin  My guide was not happy with me for continuing further. As I headed down, after the initial disappointment of landing on the forest floor, I found another ruin.  There was a stone bridge, and it took me to a promontory with a square structure. It was the ruins of the library that had many precious manuscripts.  The view from the promontory was amazing.  It is a shame that most trekkers miss it, as the signs are not adequate and often hidden in the overgrown bushes. Furthermore, most of them are only in the Sinhalese language, which only locals can read.  However, I used the absence of signboards to my advantage.  Practical Tips For A Visit To The Ritigara Forest Monastery  If you are traveling with your partner or in a group, you must reserve a tuk-tuk or car to bring you back. You may not get a passing traffic. I took the risk as it was a solo adventure.  You have to carry snacks and water. Wear sunscreen and carry insect repellents.  You will find a toilet at the entrance of the ruins. I did not use it. So, I am not sure about the condition or the amenities available.  Ritigala Forest Monastery: Frequently Asked Questions (FAQs)  Here are the frequently asked questions and answers about the Ritigala Forest Monastery. 1. How Much Time Is Needed At Ritigala? Trekking the Ritigala Forest Monastery is going to take around 2 hours. So, overall, you will at least need 3 hours in Ritigala. Trekking up the route is easy. However, walking through the cracked stone steps can be challenging.Also, signboards are scarce and incomprehensible on the route. So, you must take a local guide.  2. Where To Stay Near The Ritigala Forest Monastery? I stayed at Habarana, and the name of my hostel was The Lake Breeze. The tariff for the hostel was around INR 2000. The amenities were basic, with fans, Wi-Fi, and mosquito nets.  3. Is Taking A Tour Of Ritigala Forest Monastery Worth It? Yes, taking a tour of the Ritigala Forest Monastery is absolutely worth it. Here, you will find the ruins of the 1st century BC, and it is great for anyone with a keen interest in the history and evolution of Buddhism. Furthermore, the ambiance of the ruins is introspective and meditative. Moreover, you can easily reserve a car or tuk-tuk to reach the base of the Ritigara Mountain and then start your trek for 1.5 to 2 hours. 

READ MORE trekking in Nepal

10 Tips For Trekking In Nepal: A Beginner’s Guide

BY  Sibashree Mar 21, 2025

Nepal has remained one of the best trekking destinations in the world, catering to every kind of adventurer. From the famous Everest Base Camp to the famous Annapurna Circuit and the much-demanding Kanchenjunga Base Camp trek, the trekking routes in Nepal are also the litmus taste for the most seasoned trekkers.  So, preparation is very crucial to make your trekking expedition safe and enjoyable. In this Tour and Travel Blog, we will quickly touch upon some helpful tips for your treks in Nepal. Best Tips For Trekking In Nepal: Approved By Local Guides And Seasoned Trekkers  Trekking in Nepal is like a dream come true moment for mountain lovers and adventure seekers.  Further, with a renewed focus on sustainability, Nepal is now committed to offering the best trekking experience that aligns with environmental values.  Along with the beauty of the mountains, the trekking routes here are pathways to learning about local culture, heritage, and diverse wildlife.  Nevertheless, the bounty or the fruit of the treks does not come easily to you. In fact, the trekking routes will throw you challenges.  So, you need to do the following preparations before you hit the mountains.  1. Choose The Right Trek Trekking in Nepal is ideal for trekkers across all expertise ranges. They welcome beginners and the ones with years of experience.  However, if you are a beginner, the Everest Base Camp Trek helicopter return and the Annapurna Circuit treks are not for you. These are for the most seasoned and the fittest hikers.  Rather, you can focus on the Langtang Valley treks, Helambu Trek, and Ghorepani Poon Hill Trek.  So, assess the altitude, trek duration, and difficulty of a trek route to make the right choice.  2. Train Before You Go For Trekking In Nepal Physical and mental training can make your body used to the long hours of travel and walking for days or weeks. Further, you must start training for the trek at least two to three months before you start trekking. During physical training, you must focus on your muscles and leg strength.  Also, you must practice carrying extra weight so that trekking with your backpack becomes easier.  These exercises or practices will help you adjust to what you’ll experience on the trails.  Moreover, working on your weight and getting in better shape will reduce fatigue and make your trek much more enjoyable. 3. Pack Smart And Light For Trekking In Nepal Packing light and wise is the ultimate tip for trekking in Nepal. Make sure that you only carry the things you need to avoid carrying extra baggage.  Check out the table below to have some ideas about the things you need. ClothingFootwearWeather ProtectionWarmthAdditional ItemsBreathable, long-sleeved shirtsLightweight trekking pantsFleece pullover or jacketThermal socks for colder areasStrong, waterproof hiking bootsGaiters for snowy or muddy trailsWaterproof jacketFleece or wool beanieSunglasses with side shieldsSleeping bag and linerInner gloves or thermal glovesNotebook and penSun hatLip balm SunscreenTowel In addition to the essentials mentioned in the table, you need to carry a small kit with bandages, blister treatment, pain relievers, and personal medications. Further, you will need soft flasks or reusable water bottles. You can even choose insulated water bottles, and don’t forget to keep the purification filters and tablets handy.  Moreover, you will need a headlamp with extra batteries, and your backpack must have a solid frame with multiple compartments and adjustable straps.  4. Get The Necessary Permits When you plan a trek in Nepal, you have to bring the right permits.  Most trekking routes require a Trekking Information Management System (TIMS) card. You’ll also need entry permits for national parks or conservation areas like Everest, Annapurna, or Langtang.  These permits not only ensure your safety but also support local communities.  Further, If you’re heading to restricted areas such as Upper Mustang or Dolpo, a special permit is mandatory.  Get these permits, carry your passport, visa copies, and passport-size photos. Moreover, hire a guide from a registered agency if you are doing solo trekking in Nepal.  5. Hire A Guide Or Porter For Trekking In Nepal A local guide shares valuable knowledge about the culture and trails, and porters can help by carrying heavy loads, allowing you to trek comfortably. Further, on remote and high-altutde routes, you will need a guide and porter for safety.  Moreover, by hiring a guide or porter, you can support the community and promote sustainable tourism. Overall, having a guide or porter enhances your trekking experience while positively impacting the region. 6. Acclimatize Properly When Trekking In Nepal Trekking in Nepal comes with the risk of altitude sickness. To stay safe, you have to follow the ‘climb high, sleep low’ rule. The rule means ascending during the day and sleeping at a lower altitude. This is essential for a successful peak climbing experience. For example, during your Everest Base Camp trek, you can acclimatize at Namche Bazaar and ensure a successful peak climbing experience. Further, staying hydrated is crucial while trading the high-altitude routes. So, drink four liters of water every day.  7. Respect Local Culture When Trekking In Nepal As you pass through the local villages during trekking, you must be respectful of local traditions. Greeting people with “Namaste” is a warm and respectful way to say hello!  Be polite and show interest in their in their way of life. Dress modestly, covering your shoulders and knees, especially in religious areas. Further, always ask for permission before photographing locals or sacred sites. Respect customs such as removing shoes to enter temples and walking clockwise around stupas.  These small acts of respect go a long way in your relationship with the locals.  8. Be Environmentally Responsible Keep Nepal’s trails clean and beautiful, and follow simple eco-friendly habits. Always carry a reusable water bottle to cut down on plastic waste.  Further, you must dispose of trash and use biodegradable soap to protect water sources. Stick to marked trails to avoid harming plants and animals. Also, avoid using single-use plastics and choose lodges that support sustainable practices.  In addition, you have to be respectful to the local community by preserving cultural sites and keeping the noise levels low. 9. Prepare For Unpredictable Weather Trekking in Nepal will surprise you with changing weather conditions. A moment you can see bright sunlight and the next moment everything can be covered in snow, fog and rain, making it very difficult for you to trek.  The change of weather conditions is also crucial if you want to go for a mountain view helicopter tour. Further, to stay warm, you must dress in layers and carry a rain jacket.  10. Enjoy The  Trekking Journey Enjoy your journey to the fullest when trekking in Nepal. Indulge in the scenic views and immerse in the local culture and hospitality.  Make the trek or the journey all about acquiring meaningful experiences and just being present in the moment. 

READ MORE Van Life

Van Life: 10 Most Important Truths You Should Know To Avoid Mistakes

BY  Sibashree Feb 16, 2026

It’s okay that you love TheLowDownUnder Travel philosophy. However, even this philosophy focusing on spontaneity does not undermine the importance of basic safety measures.  So, after spending around 3 years of van life, I wanted to talk about the mistakes I made and the ones you should not make.  Also, I will share my experience of the years of van life, which have helped me a lot to learn about myself, my vehicle, and dormant problem-solving skills.  Here is everything I learned (often the hard way) during my 3 years of van life experience. How Do Social Media Influencers Create A Wrong Image About Van Life?   When you look at the social media pictures of van life on influencers, you might find all the photos dreamy.  Those photos can be all about good-looking people hanging out in picture-perfect locations. There is no worry or no effort.  However, the reality is completely different as the influencers are selling that fantasy to get more likes and comments so that they can start making money and get brand sponsorship.  Do you know why I never choose these vans for family road trips? Because it’s difficult. We have to live in a tiny space. It’s difficult for even us. So, how tough would it be for children and the elderly?  So, yes, there is something really fun and adventurous about the trip. However, you have to accept the harsh realities.  How We Learned The Harsh Truth Of Van Life?  Now, before getting into the details about the struggles and perils of van life, I want to share how we learned the harsh reality the hard way.  My partner and I were traveling across North America, and we stayed there for 3 years. During those three years, we met many travelers who had begun their lives in a van with great enthusiasm.  However, after a few months, they felt the burnout, and they had to sell their vans. Also, there were some gaps in the community of fun-time van travelers.  Some people have spent a few months in van life, and there are people who have been doing it for years. So, there are people who are heavily experienced and those who are novices.   Also, with family life taking the center seat, we are now more into part-time van living. So, as I did not want my lessons about van life go to waste. Here are the ten most important lessons to learn to make your van life a success.  How To Live A Van Life? Here Are 10 Best Tips From The Road  You have to watch the weather and build and maintain new bonds during the years of van life.  Anything more? Of course, your mini fridge will sometimes go out of order, or there will be no network in your phone.  You have to deal with these challenges. Also, trust me! A little preparation goes a long way.  1. Watch The Weather I want to start the tips with my experience in New Mexico. I was aware of the weather forecast. However, when I reached the first camping site, I did not like it, and I started exploring the next.  It was my mistake that I did not pay much heed to the weather forecast. Then, the storm took me over. It rained like never before, and there we were in the Albuquerque area, with the tires of our van stuck in the mud.  Another trouble I faced due to rain was in the Tucson area. Same mistake and same results.  We initially had a plan to visit a nearby site. It had paved roads, hot showers, and flush toilets. However, we suddenly made a plan to visit the Catalina State Park.  Now, it rained and got flooded, and this time, we were not alone. We had 100 other campers stranded. We were stuck in the national park for almost a week.  So, there needs to be a balance. Van life will allure you to spend your time in the natural world.  It’s lovely to open the sliding door of the van and walk into the desert or forest. However, you also have to be careful that the weather can go south anytime.  So, you cannot ignore the weather forecast, and you have to be very careful about what you choose as your camping destination.  Floods can ruin the vehicles, and in extreme conditions, you will be stuck way longer than expected. If that happens in a different country, it is even worse. 2. A Beautiful Campsite Can Be Stressful And Challenging You cannot only consider the beauty of a campsite when choosing a camping destination. However, you also have to think of the stress and challenge.  You can arrive at a campsite, and it can already be full. Or, it may have trash dumps.  It’s a tough task to reach before the crowd arrives, especially during the holiday weekends.  Furthermore, dispersed camping is a challenge. Whenever I reach a dispersed camping site, I need at least an hour to find out potential locations for camping.  Now, it is okay when someone wants to be carefree, and they hate planning. However, I don’t want to sleep in the Walmart parking lot just because I didn't plan. Do you?  Trust me! After two days or so, you will not feel like you are camping anymore. You will feel like a homeless person.  3. Ensure That The Toilet Is Depressurized Before You Open It  Does your van have a cassette toilet? You have to ensure that you are depressurizing it before opening the lid.  How to do it?  You have to just pull the handle to depressurize the toilet. Also, remember that the toilet can be pressurized if you have driven up a significant elevation after using the toilet for the last time.  If you don’t depressurize it, when you open the toilet bowl, you will notice the emission of a fine mist.  4. Don’t Trust The 5G Or LTE Signals On Your Phone Are you a digital nomad? Are you planning to work during your van life?  Don’t trust your phone when it shows 5G or LTE as the signal strength. It can show you all the bars and yet offer no connectivity at all.  In simple words, the phone signal says nothing about the actual connectivity you are going to get.  So, when you visit a campsite, Search "Speed Tester" on your telephone and check the speed.  Now, connectivity will be inconsistent when you are camping in the forest or the mountains. That is why you will need additional arrangements, such as StarLink.  5. Are You Using A Pocket Knife To Clean The Ice Buildup In Your Freeze? If you are camping in humid conditions, the small freezer of your camping fridge will accumulate ice.  Do not use a pocket knife to clean it. It will work 9 out of 10 times. But on the tenth time, it can cause a disaster as I faced.  The knife just slipped, and it punctured the lining of the freezer.  So, the safest way to do it? You have to turn down the temperature of the freezer. Thus, the ice will melt a bit, and the melted ice will fall off the sides.  Then, you can easily scoop it with your hands.  6. Things Will Break Down: You Have To Accept It  The side mirror has scars, or it’s broken! The mini fridge is damaged.  Or, you have bashed your oil pan on a boulder.  Now, these things are common in van life.  You can mend some damage with gumption or duct tape. However, for most cases, you will need to visit a repair shop or call an expert to your van.  This process is expensive for sure.  So, always keep some healthy emergency amount in your fund for these sudden repairs.  7. Concussing With The Cabinet Is Common  Even with a height of 5 feet and 2 inches, I find the cabinet small for me. Also, sometimes, the place is full of travel gear, biking gear, and camping essentials.  So, the interior can get really claustrophobic.   Naturally, I have banged my head on the roof or the cabinet corner if I tried to sit up quickly in my bed or walk into the van’s cab.  8. You Will Make Friends: But Will They Remain So? 10 people and the same shit! Van life and the challenges during it help meet amazing people.  However, too much of the community bonding is against the core spirit of van life. So, even if you meet many amazing people during your van life, the nomad in you will not agree to keep them as friends forever.  9. Work Challenges Will Be There Suppose you are driving across the depths of the Alaskan bush, or you are fully immersed in the beauty of British Columbia.  You can even camp on the beautiful banks of the Rio Grande River. Or, you can climb up the mountains in Colorado.  Now, these are moments for which we have decided to go on a van life.  Imagine an emergency email or a phone call asking you to complete the assignments then and there. Firstly, you never know whether you will get a place to park the van or the connectivity to finish your assignment.  Secondly, when I am busy with my work, the moment is gone.  So, after years of van life, I have realized that balancing work and van life is difficult. This is another reality that #vanlife influencers will never highlight.  10. Medical Care Is A Challenge  A van life or a nomadic lifestyle is challenging for fragile human bodies. As nomads, we don’t have access to any specific dentist or physician.  Also, you have left your house physician 1000 miles behind.  In such a scenario, if you face some urgent health issues, you will have to rely on urgent care visits.  Also, certain health issues need regular physical therapy, or even something like a dental appointment needs to be booked in advance.  When you are always on the move, all these become a challenge.  So, at some point in time, you will have to find a balance between healthcare and a nomadic life.  However, that does not mean that you will stop leading a van life. You can plan a vacation in the caravan for a month and then again lead a civic life in your home.  Hardships Will Happen During A Van Life: It’s How You Tackle It  When you choose van life, you have to minimize your possessions. You must carry only what fits in the van.  Also, van life is radical, and you cannot expect the status quo of the home.  However, you are doing it for the love of adventure, right? So, even when things get difficult, you cannot quit.  It will be the saddest thing if you sell your van and buy a condo to settle for the rest of your days.  I understand that with time and age, priorities change, especially when kids start going to school or the parents get older.  You can still create a balance by securing a month or two in a year to relive the old van life days.  Van Life: Frequently Asked Questions (FAQs) Here are the frequently asked questions and answers about van life.  1. What Kind Of Van Is Ideal For Van Life?  The best vehicle for van life depends on many factors. You have to consider the budget, your requirements, and the mechanical abilities of the vehicle. Mercedes Sprinter, Ram Promaster, and Ford Transit are the common vehicles for the perfect van life. You can also choose school buses or older models like the Chevy Express for your van life. However, before choosing a particular model, you have to consider the reliability, ease of maintenance, fuel economy, and interior height.  2. DO I Need A 4WD Or AWD For Van Life?  You don’t always need a 4WD or AWD for van life. You can even choose a two-wheel drive. Having said that, an AWD or 4WD ensures your peace of mind, especially when you are camping in sandy, snowy, or muddy areas.  3. How Can I Shower When Living In A Van?  You have to understand the mechanism and interior of your van to find an answer to this. You can have an outdoor or indoor shower stall with water tanks. However, that eats up a lot of space. So, the more common alternative is using a public rec center, a gym membership, or truck stop showers.  4. How Can I Go To The Bathroom In A Van?  Well, wag bags and pee bottles have been in use for the longest time. However, for me, these are usually the last resorts. I have always travelled in a van with a cassette toilet. You can also have a composting toilet or a portable toilet. Also, you can use the campground facilities and public restrooms.  5. Is Van Life Safe?  Yes, Van life is safe. However, you cannot compromise the basic precautions, such as locking your doors or choosing safe parking areas. Furthermore, you can now install cameras or motion lights for complete safety.  6. How Can I Find Free Campsites?  You can use applications such as The Dyrt, Campendium, FreeRoam, and iOverlander to find free and legal camping spots. BLM lands and national parks are ideal for finding these campsites. You will get a clear idea about the ownership of these camping spots from onX Maps. However, whatever campsite you choose for van life, you must follow the Leave No Trace method.  7. Can I Sleep In My Van Anywhere? Is It Legal? No, it is not legal to sleep in your van anywhere. Many towns have anti-camping ordinances. Furthermore, you have to follow the local laws. Also, the Walmart and Cracker Barrel parking lots can be options in such towns for parking your van.In addition, you can park your van at the truck stops. However, you have to keep it very discreet.  8. How Can I Make Money When Living A Van Life?  You can earn money by doing seasonal jobs, freelance gigs, remote work, or content creation. You can also write, teach online, code, or do any virtual assistant work. Furthermore, trail maintenance and camp hosting are other ways to make money during van life.  9. Can I Live In A Van With A Pet?  Yes, you can live in a van with a pet. However, you have to ensure that the space, temperature, weather, and safety situations are ideal for them.  10. How Will I Manage Insurance And Healthcare During Van Life?  You have trust in the marketplace plans for health insurance. COBRA or health-sharing networks are great options because of the nationwide access. Furthermore, you can research travel medical insurance.  11. How To Power Electronics In A Van? Solar power is the most popular choice for powering electronics in a van. That is why van life is also a sustainable way of traveling. You can combine the panels with the following elements. • Lithium Battery• Inverter• Controller• ChargerYou can even use an alternator for charging the electronics during a drive. Moreover, you can use shore power and a backup generator as a supplement.  12. How To Stay Warm Inside The Van In Winter?  Window coverings, a diesel heater like Espar or Webasto, and insulation keep the interior of a van warm. You can even use a propane heater. Cold weather is one of the biggest challenges for planning a van life. So, keep an eye on the weather updates and choose a warmer place.  13. How Can I Keep The Meals And Food Fresh?  You can keep your food and meal fresh by usinga  12V fridge. Furthermore, you can use induction burners or propane stoves (for the vans with solar panels) or camp grills to cook your food. Furthermore, meal planning is very crucial when you have a limited space like a campervan. 14. Is A Full-Time Van Life Sustainable In The Long Run?  Yes and No. For some people, a full-time van life can be suitable for years, and then they can shift to part-time van life. However, the sustainability will depend on your health, your source of income, your family members, and how much adversity you can withstand.  15. Is Downsizing Important For A Van Life? Yes, you have to be a minimalist if you want to lead a successful van life. You have to carry only the tools, clothes, and gear that you absolutely need. Also, if you are traveling with your family, you can use a small storage unit. 16. What Are The Common Rookie Mistakes For A Van Life?  Overpacking is surely the biggest rookie mistake for van life. Furthermore, you cannot ignore insulation, maintenance, or planning the route. Moreover, you also have to factor in some time for emergencies and rest.  17. How Can I Stay Clean On The Road? You can stay clean on the road by taking sponge baths and using wet wipes. Furthermore, you can take a public shower or have a gym membership. However, you will have to plan right and make an effort to stay fresh.  18. Can I Find Water Easily On The Road?  It depends on the location where you are camping. You will find many water kiosks, rest stops, campgrounds, or gas stations for filling up your water bottles. Moreover, you can use apps like iOverlander to find reliable sources.  19. Do I Have To Build My Own Van? No, you don’t need to, and you should not build your own van. It is time-consuming and resource-intensive. Also, the professional conversions of the DIY vans are going to cost a lot of money.Thus, buying the partially finished rigs and pre-owned vans is the best option. 20. Is A High-Roof Or Low-Roof Van Better?  The answer depends on your requirements and your budget. For example, if you are using a high-roof van, you will get more standing room and comfort. So, these are ideal for those who live a fan life full-time. However, if you are planning a van life for a shorter time, you can choose a smaller van. These vans are cheap, and they can pass any route.  21. How Can I Make My Van Feel Like Home?  You can transform your van into a living home by adding cozy bedding, lighting, artwork, and some amenities for comfort. Furthermore, you need to keep it organized and clean.  22. Is A Van Life Eco-Friendly?  Yes, van life is eco-friendly, considering it runs on solar power and you lead a minimalistic lifestyle. However, if you are driving frequently, there will be high carbon emissions. Also, the van construction has an environmental cost.  23. How To Stay Organized During Van Life?  You can stay organized during van life by using labels, roof boxes, bins, and drawers. In other words, you need a designated place for even the tiniest things.Staying organized in van life is more important because you can notice clutter easily in a small space. Read Also: Unique Things To Do In Savannah, GA: 7+ Best Ideas (With Tour And Travel Tips) Your Guide To Buying A Holiday Caravan In Lincolnshire Want to know, Is Vancouver Safe for a Traveler?