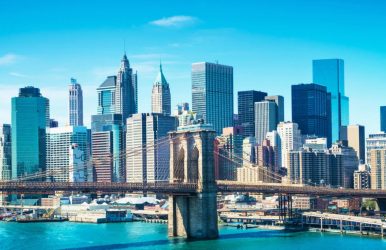
Things To Do In Rocky Mountains National Park

Aug 4, 2022

Last Updated on: Apr 21, 2026

Travel Guides

“Things to do in rocky mountains.”

As you are searching about this particular thing, I am assuming that you might be planning your next holiday in the Rocky mountains.

We never want to ruin our vacations or trips and that is why we always search on Google and gather as much knowledge as we can. From the best seasons, to where to stay, you should know everything.

But as you are particularly searching for the fun things you can do in the Rocky mountains, here we are with the solution.

With majestic landscapes, with rough terrains on one side and alpine forests and lakes on the other side. The Rocky Mountains National Park is a heaven for scenic beauty, wildlife, and mesmerizing waterfalls and lakes.

Fun Facts About The Rocky Mountain National Park:

It was on 26th January 1915, when the Rocky Mountain National Park was first established. For about 415 square miles, the park encompasses. Just a short drive from Denver, Colorado, the national park is one of the most parks in the US. Here are a few things to do in Rocky Mountains.

About 4.5 million people visited in 2016 for a “World-class recreation” opportunity. This ranged from biking, hiking, fishing, camping, mountaineering, and horseback riding.

  1. The Rocky Mountain National Park is the highest park in the Country at an elevation of about 7,860 ft to 14,259 ft.
  1. The Rocky Mountains are more than just rough terrain; it has an alpine tundra ecosystem along with a montane ecosystem. These ecosystems have the widest variety of wildlife and plant diversity.
  1. The trail ridge road of the park offers an awe-struck vision even before it was travel worthy. It was called the “scenic wonder road of the world.”
  1. Most of the park is designated to be a part of the wilderness. There are about 250,00 acres of about designated wilderness according to Congress 2009.
  1. The Rocky Mountains have an extensive collection of museums. These museums collect the artifacts of the forest that defines the park and its history.

Things To Do In Rocky Mountains National Park

The Rocky Mountain National Park is a large area with thousands of acres. So it is obvious that there are a lot of things to do there. But if it’s your first time visiting, then I have a list of things for you to do there. 

1. Drive Trail Ridge Road

If you have ever visited the Rocky Mountains or not, then let me tell you that trail ridge road is the highest in the US, not only in Colorado. The road is about 48 miles long and stretches from Estes Park to Grand Lake.

The road is beautiful for a long drive through it. It is surrounded by alpine tundra, and there is a chance you might see bighorn sheep or elks. This amazing wildlife out in the open is what makes driving the trail roads the best things to do in the rocky mountains, colorado.

So, this is a must when you are thinking about “things to do in rocky mountains.”

2. Forest Canyon Overlook

The are many beautiful overlooks along the trail ridge road. But this one, in particular, located along the trail ridge road, is just beautiful. The overlook is about 11,716 ft high, looking the Long s Peak, Hayden Gorge, Gorge Lakes, and Stones Peak.

3. Go Hiking

What can be better than hiking along the beautiful trails of the Rocky Mountains? There are a number of trails throughout the Rocky Mountains, and you can go on to any, depending on your expertise. Hiking is the most popular and one of the best things to do in Rocky Mountains, Colorado.

Here are some of the best trails along the RMNP are:

  • Alpine Ridge Trail for a short hike to a viewpoint of the mountains. It is an easy hike for beginners.
  • Gem Lake trail is a moderate-level hike. It gives a wonderful view of the alpine lake.
  • Ute Trail to Tombstone Ridge is an easy to moderate level hike. It is among the more popular hikes among hikers.

4. Bear Lake

Another one that you can add in your “things to do in rocky mountains- list” is Bear lake.

Bear lake is among the most popular shorter hike, but it’s worth it. The hike is about 0.6 miles long, with a beautiful view of the lake surrounded by trees. A walk around the lake is just beautiful for your body and soul.

5. Alberta Falls

There are beautiful falls all around the RMNP where you can have a relaxing afternoon and a quaint picnic. One such fall is the Alberta falls; with a beautiful scenic beauty amidst nature, you can really enjoy your time here.

The hike to the falls is about 1.7 miles hike which is not too strenuous and quite easy. But I should point out that you have to walk uphill from the Glacier Gorge to reach the falls.

6. Moraine Park

If you love the aesthetic of sitting on a blanket and having a beautiful picnic in the open, then Moraine Park is the best place for you. It is one of the best things to do in rocky mountains.

Here, you can gaze upon the wonderful wildlife grazing in the valley, like Elks and deers. And most of the mountain trails start from the park here.

7. Holzwarth Historic Site

In 1917, immigrants from Germany, John Holzworth, along with his family, built a cabin here. Gradually over the years, they built several cabins for guests.

In 1974, their property was bought by The Nature Conservancy, and since then, it has become an integral part of the park. The site became a popular tourist spot for visitors to learn about the life of the Colorado homesteaders.

8. Go Mountaineering

For years now, rock climbing and mountaineering have been popular adventure sports in the Rocky Mountain National Park. Numerous mountain peaks over the height of 12,000 ft have intrigued a lot of avid rock climbers from all around the world.

Different types of climbing experiences, from vertical climbs, to multi-day and even easy climbs, are all available here. Even during the winter months, for experienced climbers, ice climbing is also an option. 

Mountaineering is among the most popular things to do in Rocky Mountains.

Frequently Asked Questions (FAQs):

Though most of the things to do in rocky mountains are listed above. To help you with further queries, here are some questions that people often ask.

1. How Many Days Do You Need To See Rocky Mountain National Park?

Ideally, it would take about three days to travel and explore the whole of Rocky Mountain National Park. Within that time, you can visit all the attractions of the place.

2. Is It Worth Driving Through Rocky Mountain National Park?

The ride through the Rocky Mountain National Park is beautiful and gives a wonderful view of the park.

3. How Scary Is Trail Ridge Road? 

Since it is a mountain trail road, you can imagine the height of the road. So if you have a phobia of heights, then take caution in advance. However, the mountain road is less scary than most Colorado mountain roads.

Wrapping Up!

It is a reason why Rocky Mountain Nature Park is popular among tourists from all over the world. There are lots of things to do in rocky mountains that you can expereince. The beautiful valley road, with scenic parks and wildlife with lakes and waterfalls are really mesmerizing. Altogether these things are what make the mountain a highly popular attraction among tourists.

Share on Social Media

Nabamita Sinha loves to write about lifestyle and pop-culture. In her free time she loves to watch movies and TV series and experiment with food. Her favourite niche topics are fashion, lifestyle, travel and gossip content. Her style of writing is creative and quirky.

Leave a Reply

Your email address will not be published. Required fields are marked *

title-img Related

READ MORE can i bring makeup on a plane

Can I Bring Makeup On A Plane? – Answering The Most Asked!

BY  sagnika Jul 21, 2023

Are you traveling someplace? Still interested in the issue? Can I bring makeup on a plane? Of Course, you can, but you need to follow the restrictions established by the Transportation Security Administration (TSA). Makeup is essential for many in their personal and professional life. Similarly, when they are traveling, makeup is important for them. Hence, asking about the credibility of carrying makeup while traveling on a flight is important. It is necessary because the security check-in can be performed successfully if the makeup follows the established norms by TSA. According to the norm, the agents must see all the makeup products. Passengers, therefore, must carry makeup in a different clear bag so that there is no issue during screening. Can I Bring Makeup On A Plane? Answering The Most Asked! Makeup is really needed in our daily lives, so imagine how important it must be when you are traveling. You need to look good in those travel pictures! Therefore, pack your makeup with all the information so you are not penalized. At times, passengers are asked to dump makeup in paste, gel, lotion, liquid, or cream form leading to a waste of product and money. Makeup products in recent times have become costly; hence, losing even one product is arduous. Makeup cannot be considered as only lipstick, foundation, eyeliner, and others. It also includes toiletries, skincare, hair care, perfume, etc. The TSA rules are limited to makeup products and other care products. Tsa Rules For Carrying Makeup When traveling, stress soars because of all the norms and regulations. You must follow the rule of TSA called 3:1:1, where one quart-sized bag is allowed with 3.4 ounces or 100 ml liquid, cream, gel, or pastes. If you do not follow the TSA norms, there is a high chance of TSA agents pulling your bag and implementing more screening procedures. There are many instructions based on air travel because of the increasing risks of illegal substance smuggling and others. When discussing carrying makeup products, informing TSA agents about any products taken in large quantities is important. Organizing Makeup Bag Always carry makeup in a clear bag to carry all your makeup. It will make your traveling much easier. Try to use spacious storage bags and containers for transparent makeup products. It will keep clarity between you and the TSA agents. Try to carry makeup only as much as needed. Try to leave the redundant products behind; hence, make a plan and a list. Follow the TSA rules and accordingly carry the liquids and powders. 1. Makeup You can carry any makeup in powder or solid form in your carry-on and checked baggage without any restrictions. However, try to avoid taking powder makeup above 12 ounces. During the screening, the powder product must go in a separate pin when check-in. No restrictions are implemented by the Transportation Security Administration (TSA) concerning the quantity or the size of the product as long as it is in solid or powder form. The restrictions are implemented if the makeup products are in paste, gel, lotion, liquid, or creamy form. The first restriction is that the amount must be 3.4 ounces or less if you carry makeup in paste, gel, lotion, liquid, or creamy form in the carry-on bag. One quart-sized zip-top bag is allowed, where as many as travel-size liquids containing 3.4 ounces can be carried. For one passenger, only one zip-top bag is allowed. However, in the checked baggage, there are no restrictions on the makeup in liquid, gel, or cream. 2. Skincare For skincare, TSA has established the same 3-1-1 rule, especially because skincare is mostly in cream and liquid form, especially when skin care is carried in handbags. Products such as shampoo, lotion, makeup, and sunscreen are mostly in cream or liquid form; hence you must carry these products in a quart-size bag. A quick tip: the low humidity in airplanes is what causes dry and cracked lips while onboard. You're permitted to bring solid lip balms to take care of this. 3. Haircare For hair care products that you might carry, you must remember the 3.4 ounces rule for liquid products. The TSA agents can toss them away if you do not follow this rule. Hence, you can lose the product. Apart from that, you can use a hard shampoo and conditioner bar if you are tired of dealing with all these norms. It will help you follow the rules established by TSA without worrying about your liquid products being tossed out. 4. Bodycare In body care, products are in liquid form. Hence, the rule related to liquid must be followed. The 3.4 ounces norm for the liquid must also be observed, especially when carrying body care products. In checked luggage, you can carry anybody care products. There are no restrictions established for checked baggage. You can carry wet wipes in your handbags, hence because there are no restrictions on carrying wet wipes. 5. Nail Polish Nail Polish is a liquid and inflammable product; hence, you must be careful when carrying nail paint. The amount allowed for carrying nail polish is 100 ml or 3.4 ounces. In your carry bag, you must take a smaller container of nail polish that is less than 3.4 ounces. Be careful when carrying nail polish because airplane turbulence can lead to spillage or leakage in your bags. Nail polish also has a specific smell that can be disturbing for others. 6. Perfume Deodorant, perfume, or Cologne are also a part of makeup because it is used for physical hygiene, smelling good, and others. Considering the products, Cologne or deodorant can be in either aerosol or liquid form, at risk of being inflammable. Try to carry a travel-size bottle so that you do not face any potential issues of TSA agents dumping your products. Overall, passengers must take 3.4 ounces of perfume. Conclusion   Read this article to learn whether you can carry makeup while traveling on a plane. To answer the question, can I bring makeup on a plane? Yes, you can. We have also informed you about other makeup products, such as hair care, skincare, and perfume. Please let us know if you have ever faced any issues regarding carrying makeup products while traveling on a plane. Read Also: Everything About Breeze Airways: Breeze Airways Reviews, Features, And More! Can You Use Bluetooth On A Plane? – Know It All Here! Can You Bring A Lighter On A Plane? Know It All Here! Avelo Airlines Reviews You Were Looking For!

READ MORE car checks before a long journey

Essential Car Checks Before a Long Journey: Road Trip Ready

BY  Sibashree Jun 5, 2024

Are you planning to go on a long road trip? Then, you might want to start by checking the vehicle you are planning to travel in.  Having the right vehicle can travel long distances and can make your road journey so much easier.  Before you start your road trip, you must first check if your vehicle is in best of condition.  You must check that your tyres have adequate pressure. At the same time, you must look for the point to check the essential components of your vehicle. This can help you manage the long, tiresome road journey with ease. This prevents your car from breaking down and causing delays in your journey.  You also lose money when your car breaks down mid-way on your road trip due to repairs. Simple car checks with a microfibre towel and other cleaning supplies can make a world of difference.  When you have taken adequate preparation and care for your vehicle before your long road trip, you ensure safety. You want to reach your destination on time and safely, especially if you are travelling with your loved ones. his article provides the key inspections to perform on your vehicle before any long-distance trip. These key inspections during car checks before a long journey include examining fluid levels and assessing tyre condition. The inspections also include tread depth, and conducting general maintenance checks for a smooth road trip experience. Inspect and Maintain Fluids Here is how you inspect and maintain fluid changes before embarking on your long journey. These car checks before a long journey ensure you have a worry-free road trip. Check Engine Oil Level and Quality You can start by checking your engine oil level and quality before embarking on your long journey.  Try to locate the dipstick and remove it while the engine is cool. Then, wipe the dipstick with a rag or cloth before reinserting it. After a minute, again, pull out the dipstick to check the oil level. Your dipstick should have an oil level between the minimum and maximum marks for a quality ride. If the oil level is below the minimum, then you will need to top up the recommended oil type.  You will need to follow the vehicle's manual to top up with the recommended oil type and quantity.  Also, inspect the oil's color and consistency of your car and look for golden to light brown color.  These colors indicate your oil is fresh. As your engine oil gets older, it gets darker, signifying degraded oil quality that needs changing. Consider an oil change service to ensure your engine lubrication and performance is smooth during your trip. Check Coolant/Radiator Fluid Level and Condition One key car check before a long journey is to check the level and condition of the cooler and radiator fluid.  The trip may be quite long, and you will have to spend maximum time in your vehicle. In that case, you must ensure the coolant and radiators are working properly. See that they are in perfect condition.  Your coolant or antifreeze are the essential components in your car that control the temperature of your engine. It helps your car function properly during freezing temperatures. You can check your coolant when your car engine is cool. Just check the fluid level against the minimum and maximum markings, similar to an engine oil check. You can top up with a premixed coolant solution if you are traveling to a colder region. Just follow the manufacturer's recommended coolant type and mixture ratio.  Also, inspect the coolant's colour and clarity to ensure your coolant is fresh. Colours bright or light green, while being discoloured, rusty, or opaque, indicate degraded coolant.  So, you will need to consider a coolant flush service to replace the old fluid. This ensures efficient heat transfer during your journey. Check Brake Fluid Level and Condition Among essential car checks before a long journey, maintaining the proper brake fluid level in your car is crucial.  The proper conditions of the brake fluid levels ensure optimum performance of your brakes, which is essential in long journeys. Furthermore, you can check your vehicle's fluid levels to ensure the right condition. You could do this by locating the brake fluid reservoir. You can find this reservoir through the "BRAKE" symbol atop it. Then, you must look for the colour and clarity of the brake fluid.  Do you think your car's brake fluid level is between the minimum and maximum markings? It is an indicator that your brake fluid is in proper condition. You need to change the fluids of your brake and change them if they have turned dark in color.  Darker and opaque brake fluid indicates that the fluid is no longer in the best of conditions. It can hamper brake function.  So replace degraded brake fluid with fresh brake fluid specific to your vehicle's needs. This ensures smooth brake function when you are on long road trips. Check the Power Steering Fluid Level and Condition The next car check before a long journey is checking the power steering fluid and its condition. This ensures that the power steering is in top condition and that any mishaps can be avoided while making the right turn and parking the vehicle. Also, take a close look at the condition of the car's steering.  It is marked with a steering wheel symbol.  Now, look at the fluid levels. It should be between the minimum and maximum markings.  It's the right time to examine the colour of the fluid in the steering wheel. It helps you understand whether the steering wheel is in good condition.  If the fluid's color is reddish or pinkish, it means the steering fluid is in good condition and suitable for longer distances. On the other hand, dark or opaque colour indicates contaminated fluids. It's time to change the fluids.   You can also opt for a professional power fluid flush service to replace the old fluids and upgrade the functionality of the steering.  Check Transmission Fluid Level and Condition You must check the transmission fluid level to see if your vehicle has automatic transmissions.  At the same time, you must go through the vehicle's manual and then take the right reference from the vehicle's manual. This specific procedure of checking the transmission fluid level is effective.  However, you generally need to keep your car engine running and the transmission in a particular gear. Then, you need to check the fluid level and condition of the transmission. Once you have identified the dipstick, look at the level of fluid between the minimum and maximum markings.  At the same time, take a look at the colour and clarity. The colour of the transmission fluid, in optimum condition, should appear reddish or pinkish.  On the other hand, dark fluid colours may point fingers at the degradation or contamination.  If the fluid appears compromised, then you have to consider the decision to transmit fluid flush service to change the fluid immediately.   Remember, the smooth gear shifting during your trip determines the safety and ease of the driver on longer routes. Top Up or Flush Fluids as Needed After inspecting all the critical fluid levels and conditions, top up any low fluids with the recommended types and quantities. Follow the specifications in your vehicle's owner's manual. If you see that the fluids' colours are contaminated, it's an indicator of replacement. Hence, consider using a flush service to replace the old fluid to get the best performance. Please remember that considering the health and condition of the fluids in the vehicle ensures the most optimal vehicle performance.  At the same time, it is an indicator of the safety and longevity of your vehicle, especially during long journeys.  By addressing issues related to fluids in your vehicle you can reduce the risk of component failures or breakdowns. In addition, it can help you enjoy a smooth and reliable driving experience. Check and Replace Tires Consider the points related to tyre conditions, as they are the most important component related to your vehicle's mobility.  Inspect Tire Tread Depth and Condition Ensuring adequate tyre tread depth is the key to maintaining proper traction and safety on the road. It is helpful mainly on long routes.  The minimum depth, which is a must for all cars in Europe in general and the UK in particular, is 1.6mm across three-quarters of the tyre.  However, experts advise that tyres must be replaced when the tread depth reaches around 3mm. Conduct the 20p Test: First, insert a 20p coin into the main tread grooves of your tires. Can see the outer border of the coin? it indicates that the time to replace the tyre is approaching. Or you can say it has already reached the legal minimum tread depth. Secondly, check for Indicators of Tread Wear. Many tires have indicators of tread wear, such as raised bars or groove markings. However, the right approach signifies that the tire has reached the legal tread depth, and now it's time to replace it.  Thirdly, use a Tread Depth Gauge: Invest in a tread depth gauge. It is a specialized tool that measures the depth of individual tread grooves with the utmost accuracy. These gauges provide the most precise readings. Mover, they helps understand the right time for the tyre to be replaced. In addition to tread depth, check your tyre properly for any signs of damage, like bulges, cuts, or uneven wear patterns.  These issues can compromise the integrity of the tires and increase the risk of blowouts or other issues during your journey. Check Tire Air Pressure Properly inflated fuels enhance efficiency. Moreover, it enhances handling, stability, and, finally, overall safety.  You must make an effort to check tire pressure on a regular basis. It is a must, especially when you are embarking on a long journey. Tire Pressure Check Steps1. First, go through the manual of the vehicle's owner or the sticker on the driver's door jamb.  There, you will find the right recommendation on tyre pressure.2. Now, ake use of a tyre pressure gauge of the highest quality.  It helps to measure the pressure of the tyre when they are cold (after at least 3-4 hours of non-driving).3. Press the gauge firmly by removing the valve stem caps from the valve stem. It can help you to obtain the most accurate reading.4. Adjust the pressure of the tyre, either by inflating it with an air compressor or deflating it with a metal pin on the valve stem.5. After you have made the required adjustments with air pressure, recheck the tire pressure to ensure it's within the recommended range.6. Finally, don't forget to have a look and then adjust the tyre's pressure as well. Please keep in mind that maintaining the tire pressure is one of the steps to enhance safety.   Besides, it also contributes to better fuel efficiency and then extends the lifespan of your tyres. Rotate Tires if Due Tire rotation is one key maintenance practice that helps achieve even wear across all four tires.  Tires wear differently depending on their positions. The front tires wear faster because they have to ensure the effect of the additional steering and braking forces. By rotating the tires at the recommended intervals (typically every 5,000 to 8,000 miles or as specified in your vehicle's owner's manual), you can distribute the tire wear more evenly.  Ultimately, this helps attain the extended overall life of your tires and maintain optimal handling and stability. Replace Tires if Needed If your tires are excessively worn or have reached the legal minimum tread depth, it is a clear indication of replacement. This is a must before you start your long journey. Driving with bald or severely worn tires is detrimental and life-threatening. But also, if you are caught on the highways, it will result in hefty fines and potential license penalties. When replacing the old ones, you must consider investing in high-quality, reputable brands that offer superior performance and longer life.  Additionally, you can replace all four tires one at a time, which ensures persistent handling and traction. With these guidelines, you can regularly inspect and maintain your tires, ensuring a safe and enjoyable journey. Also you can easily bring down the risk of breakdowns or accidents caused by tire-related issues. Perform General Maintenance Checks Here are some important points that you need to consider when we discuss the general maintenance checks. Let's review them all here.  Check Brake Pads and Replace if Needed Take a thorough look at your vehicle's brakes, which are in the best of condition. It is one of the key points attached to a safe and secure journey.  So you must take a look at the brake pads and replace them, if necessary when you start a new journey. Here's what you need to do: Park your car on a level surface and engage the parking brake. Also, look at the brake pads through the wheel. You must be able to see them pressing against the brake disc. Thoroughly check the thickness of the material that makes the brake pad. Most manufacturers recommend replacing the brake pads when the friction material is reduced to approximately 3mm or less. Look for any signs of uneven wear and examine the brake pads' cracks closely. It's better to get new brake pads if they appear to be excessively worn out or damaged. Additionally, be attentive to any warning signs that may indicate worn brake pads, such as: A high-pitched screeching or grinding noise when applying the brakes could indicate that the brake pad wear indicator is making contact with the brake disc. Increased brake pedal travel or a "spongy" feeling when pressing the brake pedal which could signify that the brake pads need replacement. However, you may notice any of these warning signs or if the brake pad material is worn down to the recommended replacement level. Hence, it it's crucial to have the brake pads replaced before embarking on your long journey. Inspect and Replace Air Filters (Engine and Cabin) Clean air filters are essential for optimal engine performance and cabin air quality. Before your trip, inspect and replace both the engine air filter and the cabin air filter if necessary. Engine Air Filter: Locate the engine air filter housing, typically a rectangular box near the engine compartment. Open the housing and remove the air filter. Hold the filter up to a light source and check for excessive dirt or clogging. If the filter appears excessively dirty or clogged, replace it with a new one. Cabin Air Filter: Consult your owner's manual to locate the cabin air filter, which is usually behind the glove compartment or under the dashboard. Remove the old cabin air filter and inspect it for dirt, debris, or discolouration. If the cabin air filter appears dirty or clogged, replace it with a new one. Replacing both the engine and cabin air filters can improve fuel efficiency, engine performance, and cabin air quality. Alongside, it also ensures a more comfortable and enjoyable journey. Check Lights (Headlights, Taillights, Turn Signals) One of the most essential components that determines your vehicle's safety is the lights.  They are the ones who are responsible for providing peace of mind and the most comfortable journeys. So, before your trip, perform a thorough check of all exterior lights, including: Headlights: First, turn the vehicle light on. Then, take a walk around the vehicle. This technique ensures that the lights are working properly. Check for cracks in the lights. Also, look for moisture buildup or discoloration of the headlight lenses. Taillights: If you have a friend or an acquaintance, you could ask them to stand behind the vehicle. However, at this point, you could activate the brake pedal to check the lights' functioning properly. Also, check the reverse lights by engaging the reverse gear. Turn Signals: On the turn signals first. Then, take a walk around the vehicle. See if the front and rear turn signal lights are working properly. Is your vehicle's lights blinking rapidly?  The bulbs might have burnt out. Other Lights: Have you thoroughly checked the license plate lights, side marker lights, and other exterior lights of your car?  Replace the malfunctioning or burnt-out bulbs promptly.  It ensures optimal visibility and ultimate compliance with legal requirements. Inspect Belts, Hoses and Replace if Needed Belts and hoses in your vehicle ensure the proper functioning of the cooling system and vehicle's engine.  Hence, these components must be included in the inspection list. You must not compromise on safety and replace them if necessary. Belts: Pinpoint the serpentine belt(s) in your engine compartment. Look for a potential cracking, fraying, or excessive wearing of your belt. Apply moderate pressure to see the tension of the belt. Do it with your finger. The belt should deflect only a little, not much. Belts with wear and tear and improper tension must be replaced. Hoses: Inspect all coolant hoses, including the radiator hose, heater hoses, and any other visible hoses in the engine compartment. Look for signs of leakage, cracks, bulges, or any deterioration. Gently squeeze the hoses. It will enable you to check for any, internal degradation. Soft or spongy areas indicate the problem.  Replace the worn-out hoses immediately. Replacing the hoses and worn belts can stop costly repairs and sudden breakdowns during your journey. Ultimately, you can enjoy a reliable driving experience. Conclusion You have to check the vehicle from every aspect, especially the once-involved long journey. This can be helpful in making an enjoyable trip. Check your vehicle brakes, tires, and lights.  Also, give a look at the maintenance fluids and the critical components that determine the safety of the vehicle. If you are looking to make the long trip a memorable event, then you have to invest your time. Take a microscopic look at the aspects of the vehicle's conditions given above. The steps on the entire preparation on thorough checking of the vehicle can be tedious as it is time-consuming. But at the cost of it, you can ensure your vehicle is in the best of conditions before you embark on a long journey.  With these guidelines and looking at the potential issues in advance, you can enjoy a trip free from worry. This is because you know that your vehicle is ready to tackle the miles ahead with confidence and reliability.

READ MORE kawasan falls

Why Is Kawasan Falls Known For? (Description, Location, Activities, Timing, And More)

BY  Sibashree Aug 22, 2025

Thanks to Kawasan Falls and its associated canoeing activities, the Government of Badian in the Philippines is expecting a 50% tourism boom. Earl Endab, the Badian Tourism Officer, has confirmed this in a conversation with The Freeman.  However, Kawasan Falls, the multi-tiered waterfall in Badlan, has always been the prime attraction of Cebu in the Philippines, and it played an important role in the Balan tourism industry, contributing P500 in 2024.  Now, what makes Kawasan Falls so special? Turquoise blue water, refreshing pools, and lush green tropical surroundings have made Kawasan Falls the ideal place for relaxing and swimming.  In this Tour and Travel Blog, I will discuss the following key areas about Kawasan Falls.  Table of contentsWhat Is Kawasan Falls Description? Know The Key Features Of The Waterfalls What Is The Kawasan Falls Location?How To Reach Kawasan Falls From Cebu City? 1. How To Reach Kawasan Falls From Cebu City By Bus?2. How To Reach Kawasan Falls From Cebu By A Private Car?3. Take A Shared Van Ride From Cebu To Kawasan Falls Why Visit Kawasan Falls In Cebu? What is Kawasan Falls Known For?1. Canyoneering Adventure2. Swimming In The Natural Pools3. Bamboo Rafting4. Light Hiking To The Upper LevelsA Breakdown Of Kawasan Falls LevelsWhat Is The Perfect Kawasan Falls Itinerary? What Is The Best Time To Visit Kawasan Falls? What Are The Best Instagrammable Spots At Kawasan Falls?Kawasan Falls: Frequently Asked Questions (FAQs) What Is Kawasan Falls Description? Know The Key Features Of The Waterfalls  Around 3 to 4 hours away from Cebu City, Kawasan Falls is at the foot of the Mantalongon Mountain Range. Due to the high amount of limestone deposits, the water of Kawasan Falls is deep turquoise in color. The height of Kawasan Falls is 40 feet.  Furthermore, as the multi-tiered waterfall falls down, the volcanic rock formations make a pool with a depth of 11 meters. You can take a bamboo raft and reach under the falling water for a delightful “Waterfall Massage.”  These waterfalls, as part of the Kawasan Falls, get their water from the Kabukalan Spring. Then, the water passes toward the Tanon Strait and Matutinao River through the Kawasan Gorge.  Moreover, Kawasan Falls are important for the overall ecotourism landscape of the Philippines. It offers the perfect blend of a unique ecosystem, adventure activities, and scenic beauty.  Here are the key features of Kawasan Falls. Key Features of Kawasan FallsDetailsMain FallsThe first tier consists of a 40-meter-high waterfall that cascades down the Kawasan Gorge and forms a deep pool. Swimming and bamboo rafting are popular activities here. Upper TiersYou can hike up the main waterfall, and there you will find many small waterfalls and different hiking spots. Canyoneering AdventureTake an adventurous canyoneering tour from Alegria to Badian. The activities on the way include:Cliff-jumpingTrekkingSwimming in the Matutinao RiverLush Green SurroundingsEnjoy an immersive experience here thanks to the lush green tropical surroundings filled with the delightful chirpings of birds. Easy AccessibilityYou can take a drive from Cebu City and reach Kawasan Falls within 3-4 hours. Then, you can take a walk of around 10-15 minutes along the river to reach the waterfall. Hours OpenEarly Morning to Late AfternoonKawasan Falls Entrance FeePHP 45 What Is The Kawasan Falls Location? Province: Cebu, Central Visayas, Philippines Town: Badian Barangay: Matutinao Located in South Cebu, the Kawasan Falls are nestled within the Barangay Matutinao Mountains. The nearest municipality to here is Moalboal. It only takes 30-40 minutes to reach Kawasan Falls from Moalboal.  Moalboal itself is known for the most vibrant marine life, with turtle sightings and a sardine run. Moreover, Panagsama Beach here is a popular destination for scuba diving and snorkeling. How To Reach Kawasan Falls From Cebu City?  The distance between Cebu City and Kawasan Falls is close to 107 km. You can either take a bus or a private car to travel the distance. You can even opt for a shared van ride to reach Kawasan Falls.  1. How To Reach Kawasan Falls From Cebu City By Bus? You will easily find buses run by Ceres, the largest bus company in the Phillipines. Take the bus bound for Bato via Barili.  After a 2-2.5 hours of ride in the bus, you will have to get off at Matutinao Church or the Sto. Tomas De Villanueva Parish. From there, you will have to take a walk for 15-20 minutes to reach the waterfall.  2. How To Reach Kawasan Falls From Cebu By A Private Car? When you book a private car, you will get transportation assistance along with guided activities. The journey by car takes around three to four hours.  The journey will cost 200 PHP per person. You can even take a motorcycle ride, available for 50 PHP per person.  3. Take A Shared Van Ride From Cebu To Kawasan Falls  You can take public vans for 120 PHP or shared vans from the GT Express Terminal in Cebu. Shared vans are available till Moalboal. From Moalboal, you can take any southbound bus to reach the gates of the Kawasan Falls. Why Visit Kawasan Falls In Cebu? What is Kawasan Falls Known For? Kawasan Falls is famous for its deep turquoise waters, pools, and it is a hotspot of canyoneering adventure and activities such as: Sliding down rocks Hiking Swimming Cliff jumping Due to the thrills and challenges of the canyoneering route, it is also known as the natural obstacle course.  Moreover, as you take the left side of the waterfall and walk through the path briefly, you will come across many small springs. Also, Mainit Hot Springs, at the stop of Malabuyoc (to be found on the route from Oslob to Kawasan Falls), is a popular nearby attraction.  Also, Kawasan Falls has always been crucial as an eco-tourism destination. Now, everyone talks about the canyoneering adventures, lush jungle settings, multi-tiered formations, etc.  However, there is more to it. Ecotourism means balancing the tourist activities with environmental benefits by following sustainable practices.  Furthermore, ecotourism can boost local conservation efforts by creating employment opportunities and helping local commercial establishments.  Top Things To Do At Kawasan Falls: Kawasan Falls Activities From enjoying a relaxed picnic to having the most adventurous canyoneering activities, Kawasan Falls offers you the most eclectic experience.  Here are the things to do at Kawasan Falls. 1. Canyoneering Adventure View this post on Instagram A post shared by camille (@camilleguiden) Tour And Travel Blog Tips Guided tours are a must for canyoneering adventures.  2. Swimming In The Natural Pools Cool down in the main basin of the first waterfall level. It is perfect for casual swimmers and families. Here, you will get life vests available for rent.  3. Bamboo Rafting View this post on Instagram A post shared by Pao Ponce (@opao.ph) Are you ready for the ultimate “Water Massage” experience? Rent a traditional bamboo raft and float directly to reach under the falls, and allow the mighty cascades of water to fall on you.  4. Light Hiking To The Upper Levels Once you are done with all the picnic fun and adventures at Kawasan Falls, you can go for a short hike for 10 to 15 minutes and spot the second and third waterfalls.  These places are ideal if you are looking for a less crowded and quieter experience.  5. Picnicking Tables and cottages are available for rent. Bring your own food or grab some local eats nearby. A Breakdown Of Kawasan Falls Levels LevelHeightActivitiesTour and Travel Blog CommentsKawasan Falls Level 140 Meters• Swimming• RaftingIt is crowded, especially on weekends. Level 220 Meters• Swimming• RelaxationThis is quieter.Level 310 Meters• Hiking• Spending Tranquil MomentsThis offers the most immersive experience.  What Is The Perfect Kawasan Falls Itinerary?  Kawasan Falls is one of the few places that offer a spontaneous travel experience. Nevertheless, your itinerary for a perfect day at Kawasan Falls will look like this.  Kawasan Falls ActivitiesTimeThings to DoDepart from Cebu City4:30 AM• Arrive Early• Avoid TrafficStop for Breakfast at Carcar or Barili6:30 AM• Try Local Delicacies Such as Puto and Lechon. Arrive at Badian/Register8 AM• Register and Meet Your Guide. Start Canyoneering Adventure8:30 AM• Follow the Safety Briefing• Get Ready with the GearCliff Jumping, Sliding, and Trekking9 AM to 12 PM• Finally, Jump into Kawasan Falls. Lunch12:30 PM• You can choose a Tour Where Meals are included. Swimming or Bamboo Rafting1:30 PM• Relax at Kawasan Falls Level 1. Hike to the 2nd and 3rd Level2:30 PM• Enjoy an Immersive Experience at a Less Crowded Place. Freshen Up3:30 PM• Freshen Up at Basic Showers and Changing Areas. Leave from Kawasan Falls for Moalboal Beach4 PM• Enjoy the Local Marine World and Spot Marine Animals. Arrive in Cebu City from Moalboal Beach7:30-8 PM• Expect heavy traffic.  What Is The Best Time To Visit Kawasan Falls?  The dry season from December to May is the best time to visit Kawasan Falls. Moderate temperatures and clear skies make these months ideal for swimming and canyoneering.  On the other hand, the wet season from June to November impacts water safety.  Also, early morning is the best time of the day for visiting Kawasan Falls. If you visit the waterfalls before 8 AM, you will enjoy better lighting, fewer crowds, and great photography opportunities.  Budget And Expenses Of Visiting Kawasan Falls The budget and expenses of visiting Kawasan Falls will depend on the mode of transport, the food you have, the group strength, etc.  Nevertheless, roughly your budget for visiting Kawasan Falls will look like this.  ItemEstimated Cost Per PersonBus Fare (Round Trip)₱ 300-400Entry Fee₱ 45Canyoneering Tour (Including Gear and Guide)₱ 2000Lunch and Snacks₱ 200-300Locker and Cottage Rental₱ 100-300Total Estimated Cost ₱2645-3045 Where To Stay Near Kawasan Falls? Badian is the closest to Kawasan Halls. This place has many basic hotels and homestays. However, Moalboat, at a distance of 30 minutes, has the more luxurious beaches.  Also, Alegria will be the right place to find an accommodation if you are going on a canyoneering adventure.  What Are The Best Instagrammable Spots At Kawasan Falls? View this post on Instagram A post shared by Guide to the Philippines (@guidetothephilippines) The top of the bamboo raft below the first fall is the best Instagrammable spot at Kawasan Falls. Some other Instagrammable spots here are: Mid-jump during canyoneering Poolside at the second level Jungle trail bridges leading to the falls Drone shot above all three levels (with permission) Conservation And Responsible Tourism At Kawasan Waterfalls Cebu is projected to produce the highest amount of solid waste in 2025 in the Philippines. Plastic bottles, scattered sachets, and plastic bags constitute the highest amount of waste produced in the region.  A rise in the number of foreign tourist footfall here has led to the mounting wastage. In this context, ecotourism can be a great alternative to mass tourism.  Kawasan Falls is a part of the 248 protected areas of the country. Due to over-tourism, the site was temporarily closed in 2022 for rehabilitation. Since reopening, visitor caps and strict regulations have been enforced. Always follow "Leave No Trace" principles when you visit Kawsan Falls.  Don’t pick plants or disturb wildlife. Avoid loud music. Bring your own trash back. Stay on marked paths. Travel Tips For Visiting Kawasan Falls Wear aqua shoes or trekking sandals as the trails can be slippery.  Use waterproof bags/cases to protect your electronics.  Follow local guides’ instructions as a safety-first approach.  Pack out your trash and respect nature. Kawasan Falls: Frequently Asked Questions (FAQs) Here are the frequently asked questions and answers about Kawasan Falls.  1. Can Kids Visit Kawasan Falls?  Yes. Kids can visit the first-level pool of the Kawasan Falls. However, canyoneering is only recommended for ages 12 and above. 2. How Long Does The Canyoneering Tour Take? On average, the tour lasts 3 to 5 hours, depending on your pace and the weather. The tour starts from the Matutinao River.  3. What To Wear For Visiting Kawasan Falls?  You must wear quick-dry clothes and water shoes or sandals with a good grip. Furthermore, you will need a rash guard for sun and rock protection. Wear swimwear underneath if swimming is on the itinerary list.  4. What Is The Weight Limit For Ziplining At Kawasan Falls?  The weight limit for ziplining at Kawasan Falls is 100 kg. If you exceed this mark, you will have to trek to the starting point.