


 Related
Connemara National Park: Where Guglielmo Marconi Invented The First Full Duplex Radio
BY Sibashree Sep 10, 2024
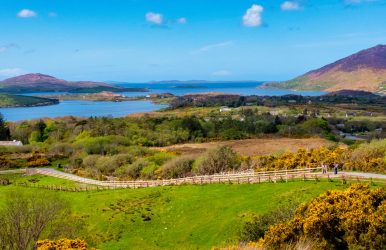
Connemara National Park has been an important Irish national park, having won the Green Flag Award in 2018. This international benchmark shows its worth as a green space and park. Further, in 2021, it also sought the New Heritage Site Accreditation, which shows the quality of the national park and how it is maintained in a sustainable way. Moreover, this park is even rich in geology and houses many historical and archaeological sites. In addition, as an outdoor enthusiast, you can explore its various hiking and walking trails. So, want to tour this Irish national park, which has a dash of history, culture, natural abundance, and more? Here is a complete guide for you. Important Information About Connemara National Park Visiting Time: 9 am to 5:30 pm Entry Fee: Free Closed On Christmas Day, St. Stephen’s Day, and Red and Orange Weather Alert Days Amenities: Education Center, Visitor Center, Playground, Cafe, Toilets and Picnic Areas How to Reach: You can reach this national park by train, car, or bus. You have to reach Galway City first and then take a bus (or private car) to reach the park. Main Access Point: Near Letterfrack along the N59 Pet Friendliness: Dogs are Welcome to Walk the Trails Fascinating Geology Of Connemara National Park The national park is a part of the Twelve Ben area. So, the park also has underlying metamorphic rocks. The sediments forming these rocks are aged between 700 to 550 million years. Further, you will find schists and gray marbles around the edges of the rocks. Moreover, at the top, you will see quartzite. In addition, it is astonishing to know that the final shaping of the park took place around 10000 years ago or during the last ice age. The park has a rocky formation with boulder clay and a deposit of sand and gravel. The distinct geological features have contributed to the type of vegetation found in this area. What Animals Are In Connemara National Park? Which Plants Does This Park Have? The International Union for Conservation of Nature, or IUCN, has marked Connemara National Park as a Category II Protected Area. So, there is a constant endeavour to safeguard the landscape, wildlife, and ecology of the park unadulterated. The park has many heritage breeds along with a wide range of protected flora and fauna. In addition, there are some conservation projects to protect the flora and fauna. The table below shows the details. Birds* Stonechats Wrens Robins Peregrine Falcon Merlin Sparrowhawk Kestrel Mammals Nocturnal Animals Pine Marten Bats Foxes Badgers Diurnal Animals Pygmy Shrews Red Deer Wood Mice Otters Hares Stoats Connemara Ponies Other Fauna Freshwater Pearl Mussel Salmon Trout Smooth Newt Common Frog Rare and Protected Plants and Other Flora Sundews Butterwort Purple Moor Grass Roseroot Purple Saxifrage Starry Saxifrage Pale Butterwort Lesser Twayblade Mountain Sorrel St. Patrick’s Cabbage St. Daboec’s Heath Heritage Breeds Connemara Ponies Cladoir Sheep Moiled Cattle Old Irish Goats Galway Sheep Conservation Projects** Control of Rhododendron Mweelin Exclosure New Found Wood Connemara Pony Cladoir Sheep Preservation Committee Irish Moiled Cattle & Conservation Grazing *The national park has a large number of birds in the winter. Many native birds of Ireland, such as woodcock, song thrush, mistle thrush, snipe, and starling, increased in numbers in this season. Moreover, fieldfare, redwing, and many other birds from Northern Europe flock to this park in great numbers during winter. **The conservation projects in the park are designed to maintain biodiversity. These also try to eradicate the negative impacts on the rare and protected flora and fauna of the park. Habitats Of Connemara National Park Connemara National Park has wet boglands and uplands as its habitats. Further, the extremely wet boglands are the hubs of various vegetation. However, the uplands have drier mountain bog communities. Boglands Boglands are found in the low-lying areas of the park. Further, in these wet boglands, you will find the western blanket bog. In addition, purple moor grass surrounds this western blanket bog, and thus, it has a grass-like appearance. In the national park, you will find these boglands near the pool surface, slope inclines, flat lands, and flushes. However, these boglands can appear on your route if you're hiking off trails, and there can be swallow pools. So, be careful! Uplands The mountainous and rocky uplands also house a wide variety of vegetation. The grasslands and heather here are also home to some rare and endangered animals, such as red deer and Old Irish Goats. Moreover, the heathlands here are drier due to a higher altitude. Hiking And Walking At Connemara National Park For hikers, all roads in the Connemara National Park lead to the Diamond Hill summit. , panoramic views of Letter Hill or Tully Mountain. Twelve Bens and Kylemore Abbey are also visible from the mountain summit. However, the national park has three more major hiking trails. Check out the table below. Name of the Trail Difficulty Level Distance (in Km) Upper Diamond Hill Difficult 3.7 Lower Diamond Hill Moderate 3 Sruffaunboy Trail Easy 1.5 Ellis Wood Nature Trail Easy 0.5 If you are planning to complete a multi-day hiking trip in the national park, you can consider camping here. However, you have to abide by the Wild Camping Code and the regulations related to the Camping Exclusion Zone. Moreover, you can take a walk (self-guided) through the Tree Trail in the park. It begins from the Car Park Kiosk, and throughout the trail, you will meet tree varieties such as holly, hazel, oak, and Scots’ Pine. Did You Know? Through the Connemara National Park West Center and the Letterfrack Village, you can have a thought-provoking walk. The trail you will take is known as the Poetry Trail. Further, in various locations along the path, you will find nine poems by eminent Irish poets like Mary O’Malley and Moya Cannon, which are placed on plaques. In addition, it is a one-of-a-kind experience for poetry lovers. Some of these nine poems talk about the park and its importance in Irish history. Further, the remaining ones are more generic in nature. Exploring History At Connemara National Park The archaeological and historical sites at Connemara National Park tell the tales of human lives and the history of the park for thousands of years. The park’s two megalithic tombs (West and East Tomb) in the park were already popular. However, thanks to the surveys of Helen Riekstins, an archaeologist and national park guide, we have 13 other sites that add to the importance of the park. Among these 13 sites, six further have been visited by NMS or the National Monuments Service and Department of Housing, Local Government and Heritage. Here are the visited sites. A standing stone A cairn Enclosures A pre-bog wall Nearby hut A house Further, the other seven sites are to be a part of the Record of Monuments and Places (RMP) review for inclusion. The pre-bog wall is likely to be associated with neolithic farming. On the other hand, the hut sites and standing stones are believed to be from the Bronze Age. Connemara National Park has sites that are 10000 years old. These sites existed as coastal middens and belonged to the Mesolithic or Stone Age. Many archaeological and historical sites are found near Diamond Hill, Letterfrack, and Mweelin. The megalithic tombs in the park are around 4000 years old. Connemara National Park is a twin historic site with Terra Nova National Park in Newfoundland. These twinning sites speak for the cultural bond between Ireland and Canada. Guglielmo Marconi, who received the patent for two-way radio in 1912, is associated with the place. Between Diamond Hill and Mweelin, he suspended the wires, and the current site of Bunaboghee Bog and Park Office had the second line. Here, he invented the first Full Duplex Radio. So, the presence of various archaeological sites and the association with famous personalities make this park a delightful site for history lovers. Moreover, the Letterfrack Industrial School (1890) is a site important in modern history. Further, the school’s graveyard here tells the grave tales of injustices to the boys resting there. Final Words Located in County Galway, Connemara National Park covers around an area of 2,000 hectares. The park opened its door to visitors in 1980, and since then, it has been a place of attraction with its scenic beauty, geological variety, rich wildlife, and hiking trails. The park also hosts many events like the Summer Evening Lecture Series and Heritage Week Celebration. Moreover, stargazing has become a popular activity in the park, and adults and children over 7 years of age can participate in the star-watching event. You can also check the National Parks website for the latest events at Connemara National Park. So, are you planning a visit to this historically and naturally rich Irish national park anytime soon? Or have you already been to this wonderful place? Don’t forget to share your experience with us! Also read Why Include Whale Watching In Your LA Itinerary. From Cocktails To Kickflips: Must-Try Activities In San Diego. Lake Clark National Park And Preserve: Very Few Know How It Preserves The Alaskan Spirit And Culture.