


 Related
Fun Activities In Nashville For Adults Throughout The Day: Kicking Off Your Nashville Experience With Focus On Christmas Celebrations
BY Sibashree Nov 30, 2024
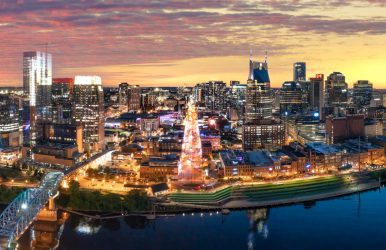
Nashville once again gears up for Christmas, and it is already under the spotlight, thanks to Mariah Carey's performance. Her Christmas Time Tour at Bridgestone Arena on 25th November 2024 has been a gala success. Further, she looked dreamy in her mermaid outfit. However, Christmas in Nashville is always special, with many musical performances. In fact, attending these music concerts and events at Gaylord Opryland are the topmost fun activities in Nashville for adults. Dickens of a Christmas is another attraction if you visit Nashville during Christmas. So, do you want to set your itinerary right when you visit Nashville this December? Here is a detailed Tour and Travel guide. Fun Activities In Nashville For Adults: Christmas On My Mind As winter sets in and you get to hear Ho! Ho! In the air, Nashville turns into a wonderland. So, if you have doubts about why Nashville is such a brilliant place during winter, you will find the answer in the pleasant weather conditions, festive markets, and light decor. Moreover, you cannot miss the happening Christmas Village. Still, do you want more reasons to visit Christmas in Nashville? Then, you must try the signature Southern holiday cuisine. Food in Nashville is also popular on socials, with 251k posts on #nashvillefood. So, with so many fun activities in Nashville for adults, let’s celebrate Christmas in the “Music City” this year. However, before I get into the fun activities every Christmas, I must share the details about some upcoming events and celebrations in Nashville in December-January (2024-25). Christmas And Winter Events In NashvilleDatesVenueJack Daniel's New Year's Eve Live: Nashville's Big Bash31st DecemberBicentennial Capitol Mall State ParkHoliday Screenings: The Santa Clause + How the Grinch Stole Christmas + The Polar Express25th December W NashvilleHoliday Screenings: National Lampoon's Christmas Vacation + Elf + Christmas with the Kranks24th DecemberW NashvilleHoliday Movie Series: Elf 23rd DecemberHampton SocialHoliday Movie Series: How the Grinch Stole Christmas (2000)22nd DecemberHampton SocialChristmas Fit for a Queen20th DecemberAnalog at Hutton Hotel David Alford's Southern Christmas SamplerDecember 19-20, 22, 27, & 29Belmont MansionPhotos with Santa8th November - 24th DecemberThe Green Hills MallChristmas8th November 2024 - 4th January 2025Gaylord OprylandThe Dancing Lights of Christmas8th November 2024 - 4th January 2025Lebanon, TNZoolumination14th November 2024 to 9th February 2025Nashville ZooHoliday Lights22nd November 2024 - 5th January 2025Cheekwood So, have you marked the dates? Then, let’s know more about our favorite fun activities in Nashville for adults during Christmas. 1. Spend Your Christmas at Gaylord Opryland https://www.instagram.com/p/DCHirPQhFU6/?img_index=1 Gaylord Opryland’s Christmas Festivities are the topmost fun activities in Nashville for adults during Christmas. Further, it has “Frosty the Snowman” and brilliant Christmas lights, among other attractions. Moreover, the fun Christmas activities at Gaylord Opryland include: Snowtubing Soundwaves Water Experience Exploring the Most Amazing Christmas Decorations Ice Skating A Country Christmas Dinner Show Also, currently, Gaylord Opryland is offering a festive discount on its tickets and passes. However, the discount will be applicable till 1st December 2024. So, hurry up now! In addition, to know more about Christmas fun and the offers at Gaylord Opryland, you can call 1-615-889-1000. 2. Be A Part Of The Dickens of a Christmas In Franklin, Tennessee (14th-15th December 2024) If you want to be a part of the Dickens of a Christmas, you will have to drive for at least 20 minutes from Nashville Downtown. Also, on 14th December, 2024, Saturday, the event will take place between 10 AM to 6 PM. Further, on 15th December, Sunday, the timing of the event will be between 11 AM to 5 PM. Wilson Bank & Trust is at the helm of this event and as the name suggests, they try to create a wonderland from the times of Charles Dickens. The iconic architecture of Franklin works as a wonderful backdrop for the event. Moreover, you get to see people dressed as famous characters from Charles Dickens novels on the streets. There will be musicians and performers adding to the festive spirit of Franklin. Meanwhile, if you feel hungry, you can find a quick bite from the festive food trucks. In 2024, Dickens of a Christmas in Franklin is celebrating its 39th year. The highlights of this event are: “Arts & Crafts Vendors Food & Beverage Vendors Main Stage Entertainment by Nissan Victorian Village with Holiday Dancers, Characters, and Carolers Acoustic Stage StoryTimes by Atmos Energy & Hart and Home Whiskey Lounge by Leipers Fork Distillery Beer Garden by Bavarian Bierhaus” (Source: Heritage Foundation of Williamson County) The Dickens of a Christmas In Franklin also impresses me with its inclusive nature. It has accessible parking for handicaps at Franklin Transit’s Park & Ride service or the 2nd and 4th Avenue garages. Moreover, you don’t need to buy any tickets or pay fees to be a part of the Dickens of a Christmas In Franklin. 3. Be Amazed By The Holiday Lights At Cheekwood This year, a visit to Nashville in December can make you a part of the “10th Annual Holiday LIGHTS.” Starting from 22nd November and continuing till 5th January, this event will take place every day from 4:30 PM to 10 PM. So, why is this event one of the topmost fun activities in Nashville for adults? Let’s find out what the event says about your “Time to Shine.” “Experience Nashville’s classic holiday tradition as you embark on a magical one-mile walk through Cheekwood’s gardens illuminated by more than a million lights. A delightful experience for all ages awaits, complete with s’mores, seasonal libations, and a Holiday Marketplace. Tour the Historic Mansion, specially decorated this year by former White House florist Laura Dowling.” The ticket to be a part of Holiday Lights at Cheekwood starts at $16 (members) for adults. However, it can go up to $32 for the non-members. Further, you can buy the Merry & Bright Package to get 10% off on Holiday Marketplace and other facilities. For members, the package costs $125, and for non-members, the package comes at $150. To get more information about Holiday Lights At Cheekwood, you can call the authority at 615.356.8000. Want To Explore More Fun Activities In Nashville For Adults? Find Your Accommodation First The fun activities in Nashville for adults are endless during Christmas. However, it all begins with finding a comfortable stay for you. So, here are some curated options for you. Name Of The HotelAddressContact NumberHampton Inn & Suites Nashville Downtown Capitol View706 Church St Nashville, TN 37203(615) 742-5550Tempo by Hilton Nashville Downtown530 11th Ave N Nashville, TN 37203(615) 780-2000Hyatt Place - Nashville Downtown301 3rd Ave S Nashville, TN 37201(615) 687-9995The Hermitage Hotel231 6th Ave N Nashville, TN 37219(615) 244-3121The Russell819 Russell St Nashville, TN 37206(615) 861-9535 The hotels mentioned in the table are picked on our in-house assessment of the amenities. We have also factored in Yelp reviews and ratings. So, with cozy accommodations and festivals awaiting, it’s time to book your ticket to Nashville. Moreover, once you reach Nashville, you will be able to explore the city easily, thanks to the public bus system and electric rides. Also read Top 10 Most Popular Paraguay Food That You Must Try. Top 13+ Famous Wonders Of India That You Must Visit [Updated 2024] Top Tips For Motorbike Rental In Phuket – A Guide To Exploring The Island On Two Wheels.