Related
Best Beaches In Costa Rica For Family Vacation
BY Arnab Apr 14, 2023
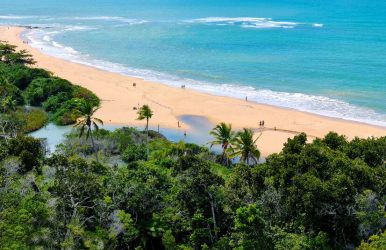
Costa Rica is a tropical gem between the Pacific Ocean and the Caribbean Sea. This is home to various picture-perfect beaches. Beaches in Costa Rica have over 800 miles of coastline. They are as diverse as the country's lush rainforests and vibrant wildlife. This Central American paradise is perfect for families seeking unforgettable experiences. However, Costa Rica has 300 beaches. So, choosing a destination that caters to all age groups can be challenging. Fortunately, Costa Rica's beaches offer many attractions and activities. You can choose gentle waves, thrilling water sports, or pristine sands. These handpicked best beaches in Costa Rica are perfect for family vacations. Each has its unique offerings, safety, and family-friendly atmosphere. Are you ready to find the ultimate beach haven for your family? Dive into our guide and let us unveil the magic of Costa Rica's coastal treasures. Let’s get started! Criteria for Family-Friendly Costa Rica Beaches As mentioned earlier, there are tons of beaches in Costa Rica. And if you are just traveling for a short amount of time, it is impossible to go to all of them. Thus, it's essential to choose the right beach that meets the needs of every family member. This is to ensure that you’ll have an unforgettable experience. The following criteria will help you select the best beaches in Costa Rica. Safety and Cleanliness Safety should always be a top priority when planning a family vacation. Look for beaches with calm waters and gentle slopes. This is ideal for children who want to splash around without worrying about strong currents. Additionally, choose clean and maintained beaches. This will ensure a healthy environment for your family. Accessibility and Facilities Find a beach that’s accessible, with parking options and well-maintained paths. Additionally, consider beaches with essential facilities. These are restrooms, showers, changing areas, and nearby restaurants or snack bars. This will please everyone throughout the day. Activities and Attractions A family vacation is only complete with activities and attractions to entertain everyone. When selecting the best beaches in Costa Rica, consider those that offer water sports. Also, find beaches near attractions, like national parks or wildlife refuges. Top 5 Family-Friendly Beaches in Costa Rica Now that we’ve established the criteria for family-friendly beaches, let’s discover the top 5 beaches in Costa Rica. These beaches will offer a blend of natural beauty, safety, and activities for the family. 1. Playa Conchal Playa Conchal is one of the most beautiful and pristine beaches in Costa Rica. It's unique white sand and turquoise waters make it perfect for family vacations. The beach is on the northwestern coast of Costa Rica, in the province of Guanacaste. It's accessible by car, with paved roads leading to the beach. The beach is famous for its crushed-shell sand. It gives a unique and stunning appearance. Also, its crystal-clear waters are ideal for swimming and snorkeling. Activities and Attractions Playa Conchal offers a variety of family-friendly activities. Boat Tour: You can take a boat tour to explore the Catalina Islands. It is typical to spot various marine creatures. On a good day, you'll see manta rays, turtles, whitetip reef sharks, and much wildlife on the Island. Snorkeling and Swimming: The beach has calm waters and rich marine life. This makes Playa Conchal an excellent spot for snorkeling. Kids will love spotting colorful fish and marine creatures. Nearby Resorts and Restaurants: The beach is close to several all-inclusive resorts. They offer many amenities and activities. There are also various local restaurants nearby, serving delicious Costa Rican cuisine. 2. Manuel Antonio Beach Manuel Antonio Beach is one of the best beaches in Costa Rica. It is on the Pacific coast within the renowned Manuel Antonio National Park. This beautiful beach is accessible by car or bus. This makes it a popular destination for Costa Rica vacations. The beach is also known for its white-sand shores and crystal-clear waters. Manuel Antonio Beach offers a stunning backdrop for your family vacation. The surrounding rainforest is teeming with wildlife. You’ll see monkeys, sloths, and colorful birds on a good day. Activities and Attractions Manuel Antonio Beach is a picturesque location and offers many activities. Here you can swim, snorkel, or simply relax on the shore. There is something for everyone to enjoy. Manuel Antonio National Park: This is a popular national park next to the beach. It is the perfect spot for family hikes and wildlife spotting. The park's well-maintained trails suit all ages. This makes it a must-visit destination during your Costa Rica vacation. Guided Tours and Beach Activities: Plenty of guided tours and activities are available for families. This ranges from wildlife safaris and snorkeling to zip-lining and horseback riding. Nearby Accommodations and Dining Options: Manuel Antonio boasts many accommodations. You can choose from luxury resorts to budget-friendly hotels. Many dining options have local and international cuisine. This will ensure a satisfying culinary experience during your stay. 3. Tamarindo Beach Tamarindo Beach is on the Pacific coast in Guanacaste province. It is one of the most accessible and popular beaches in Costa Rica. Liberia International Airport is only an hour away from the beach. Tamarindo has a long stretch of sandy beach and consistent waves. This makes it a favorite destination for beginner and experienced surfers. The wide beach also offers plenty of space for sunbathing and playing in the sand. Activities and Attractions Besides surfing, Tamarindo Beach offers a variety of activities. Examples are snorkeling, horseback riding, and canopy tours. Additionally, nearby national parks provide opportunities for wildlife watching and eco-tours. Surf Lessons for All Ages: Many surf schools in Tamarindo offer lessons for all ages and skill levels. This makes it the perfect place for the entire family to learn and enjoy surfing together. Wildlife Watching and Eco-Tours: For nature lovers, Tamarindo Beach has diverse ecosystems. It provides opportunities for wildlife watching and eco-tours. Families can explore the nearby Marino Las Baulas National Park. You can also enjoy a boat tour through the mangroves of the Tamarindo Wildlife Refuge, or even head out on one of these Tamarindo fishing charters. Variety of Restaurants and Accommodations: Tamarindo offers a wide selection of restaurants and accommodations. Nearby restaurants offer Caribbean-inspired cuisine, local seafood, and international options. 4. Playa Hermosa The beach is in Guanacaste Province. Playa Hermosa is one of the most accessible and best beaches in Costa Rica. It is only a 25-minute drive from Liberia International Airport. This tropical haven is perfect for families looking to maximize their beach time. Playa Hermosa boasts calm waters and a relaxed atmosphere. This makes it the perfect spot for a family getaway. It has gentle waves and warm, crystal-clear waters. This makes it an ideal destination for swimming and lounging on the golden sands. Activities and Attractions This Costa Rica beach offers plenty of family-friendly activities and attractions. There's no shortage of things to do. You can go kayaking and paddleboarding or play beach volleyball. If you’re adventurous, consider a snorkeling tour to explore the vibrant marine life. Beachfront Restaurants and Hotels: Families will appreciate the beachfront restaurants and hotels along Playa Hermosa's shoreline. Choose from various dining options that include local Costa Rican cuisine and fresh seafood. Many hotels also offer kid-friendly amenities. It ensures a comfortable and enjoyable stay for the whole family. Nearby Adventure Parks and Wildlife Reserves: Families can venture to adventure parks and wildlife reserves for a break from the beach. Explore Rincon de la Vieja National Park. This is perfect for hiking, wildlife spotting, and volcanic hot springs. Also, Diamante Eco Adventure Park lets you zipline through the rainforest. This allows you to encounter Costa Rican wildlife up close. 5. Tortuguero Beach The beach is on the Caribbean coast of Costa Rica. Tortuguero Beach is an enchanting destination for families seeking a unique beach experience. This remote beach is only accessible by boat or plane. This makes it a true tropical paradise, free from the hustle and bustle of the city. Tortuguero Beach is the gateway to Tortuguero National Park. The park is home to an incredible array of wildlife. Families can enjoy the sights and sounds of the rainforest. If you’re lucky, you can see monkeys, toucans, and sloths while exploring the canals and lagoons surrounding the beach. Activities and Attractions There are plenty of family-friendly activities at Tortuguero Beach. Kids will love exploring the nearby trails and waterways. At the same time, parents can indulge in the serene beauty of the beach itself. Sea Turtle Nesting and Hatching: One of the most unforgettable experiences at Tortuguero Beach is witnessing sea turtles nesting and hatching. From July to October, families can watch as green, hawksbill, and leatherback turtles lay their eggs. Later in the season, baby turtles can be seen emerging from their nests and making their way to the ocean. Guided Tours and Educational Programs: Consider joining a guided tour or participating in an educational program. This is to make the most of your visit. These activities teach visitors about the local ecosystem. It also promotes responsible tourism and wildlife conservation. Eco-Friendly Lodges and Accommodations: There are lots of eco-friendly lodges and accommodations near Tortuguero Beach. These options blend seamlessly with the surrounding environment. It allows you to fully immerse yourself in the beauty of Costa Rica's best beaches. Conclusion The dazzling array of beaches in Costa Rica offers an unforgettable family vacation. These beaches in Costa Rica cater to families of all sizes and ages. Your vacation perfectly blends relaxation, adventure, and quality time. Costa Rica's natural beauty is unparalleled. It offers lush rainforests, volcanic landscapes, and teeming wildlife, complementing its idyllic shorelines. Immerse yourselves in this remarkable country. Discover its hidden gems and create lasting memories. So pack your bags and grab the sunscreen. Explore the incredible beaches in Costa Rica, where family vacations become treasured stories for years.