Related
Best Must-See Punta Cana Neighborhoods And How To Visit
BY Ankita Oct 26, 2023
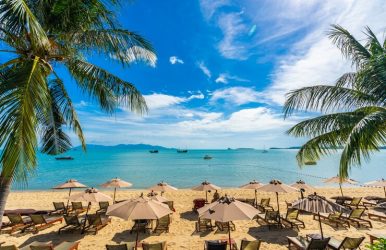
If you occasionally yearn for an escape to a tropical paradise, Punta Cana may beckon you with its irresistible allure. This picturesque stretch of the Dominican Republic's coastline is graced with magnificent beaches such as Cortecito and Bavaro, exceptional golf courses, and a sun-drenched tropical climate—lounge beneath the shade of swaying palm trees while your family embarks on snorkeling adventures with rays. Indulge in expertly crafted cocktails infused with Caribbean rum and tropical fruits, watching the sun descend below the horizon. Explore the lush Dominican Alps by canoeing or rafting in the scenic terrain, or journey to Santo Domingo to witness the oldest European city in the Western Hemisphere. Alternatively, you can unwind and bask in the beauty of Punta Cana. The charm of Punta Cana lies in its versatility – it accommodates both active vacations and leisurely sunbathing, making it one of the Caribbean's premier destinations. About Punta Cana Neighborhoods Punta Cana, a renowned resort town on the eastern coast of the Dominican Republic, is a captivating destination celebrated for its breathtaking beaches, upscale resorts, and a wealth of leisure activities. Beyond the pristine shores and luxurious accommodations, the area comprises several distinct neighborhoods, each with character and allure. These neighborhoods offer travelers diverse experiences, from bustling nightlife to tranquil escapes in natural beauty. One of the most iconic neighborhoods in Punta Cana is Bavaro. Famous for its postcard-perfect beaches, Bavaro is a hub for water sports and recreational activities. The neighborhood boasts a wide selection of high-end resorts, fine dining establishments, and shops, making it a popular destination for tourists seeking a luxurious beachfront experience. Cap Cana stands out for those searching for an exclusive and opulent retreat. This upscale neighborhood features lavish resorts, championship golf courses, and a world-class marina. Cap Cana's marina is a magnet for yachting and deep-sea fishing enthusiasts, while its golf courses, designed by golf legend Jack Nicklaus, cater to golf enthusiasts. Punta Cana Village offers a different atmosphere, catering to locals and expatriates. This neighborhood is a vibrant center for shopping, dining, and entertainment. It hosts a variety of international restaurants, supermarkets, and charming boutique shops, making it a bustling locale within Punta Cana. For a more lively and culturally rich experience, visitors often gravitate toward Cortecito. Nestled near Bavaro Beach, Cortecito is renowned for its energetic ambiance. What Are The Must-See At Punta Cana Punta Cana is a tropical paradise with many must-see attractions and activities catering to various interests. Here are some of the top must-see things in Punta Cana: Pristine Beaches: Punta Cana is renowned for its stunning beaches, including Bavaro Beach, Macao Beach, and Juanillo Beach. Relax on powdery white sands, swim in crystal-clear waters, and enjoy water sports like snorkeling, paddleboarding, and parasailing. Water Adventures: Explore the vibrant underwater world by snorkeling or diving in the coral reefs. You can also enjoy catamaran cruises, speedboat tours, and swimming with dolphins. Saona Island: Take a day trip to Saona Island, a protected nature reserve with beautiful beaches, mangroves, and a serene lagoon. It's an ideal spot for relaxation and nature appreciation. Hoyo Azul: Visit Hoyo Azul, a natural cenote (sinkhole) in Scape Park. The vibrant turquoise waters surrounded by lush tropical vegetation create a mesmerizing sight, and you can even take a refreshing dip. Indigenous Eyes Ecological Park: Explore this ecological park, part of the Puntacana Resort & Club, which features 12 freshwater lagoons, a lush forest, and walking trails. It's an opportunity to witness the region's native flora and fauna up close. Manati Park: Meet the local wildlife at Manati Park, where you can interact with dolphins, sea lions, parrots, and other animals. The park also offers cultural displays and horseback riding. Altos de Chavón: Visit this charming Mediterranean-style village located in La Romana. It boasts a cultural center, theater, art galleries, and picturesque streets. It's a great place for art and culture enthusiasts. Other Places To Visit Punta Espada Golf Course: If you're a golf enthusiast, tee off at Punta Espada Golf Course, designed by Jack Nicklaus. It offers breathtaking ocean views and is considered one of the best golf courses in the Caribbean. Zip Lining: Experience the thrill of zip-lining in the tropical forests of Punta Cana. Several adventure parks offer zip-lining adventures through lush canopies. Explore Local Cuisine: Savor Dominican and international cuisine at restaurants and beachside shacks. Try traditional dishes like mofongo and fresh seafood. Nightlife: Punta Cana's nightlife scene is vibrant, with beachfront clubs and bars offering music, dancing, and entertainment. It's an excellent way to enjoy the Caribbean rhythm. Higuey: Take a day trip to Higuey, a nearby town with cultural and historical significance. Visit the Basilica of Our Lady of Altagracia, a revered Catholic pilgrimage site. How To Visit? Arrival by Air Punta Cana boasts its own international airport, PUJ, which is a major Caribbean air hub, serving over 30 airlines across three terminals. The added convenience is that Punta Cana can be reached in hours from numerous major North American cities. Travelers must ensure they possess a valid passport for stays of up to 30 days, while visits exceeding 30 days require a travel visa. Great flight deals can be easily found through our flight search tool. Private Transfers In Punta Cana, private transfer options offer a seamless as well as enjoyable journey from the airport to your lodgings. Professional drivers will take you to your destination in comfort. Private sedan transfers for up to 4 passengers generally come to around USD 6, while for larger groups, private van transfers accommodating up to 8 passengers usually start at approximately USD 13. Reserving your private transfer in advance is advisable. Taxis Getting a taxi in Punta Cana is a straightforward process, with taxis readily available at the airport taxi bay. Taxi rates in Punta Cana are established by local authorities and categorized by zones. It's worth noting that taxis are one of the more expensive modes of transportation in Punta Cana. Fares typically range from $10 to USD 80, and additional fees of $10 to USD 20 are common for nighttime fares. Taxis can be hailed directly from the Punta Cana Airport taxi bay, just outside the customs area on the right. Most taxi drivers carry fare charts and accept currencies, including dollars, euros, as well as Dominican pesos. Car Rental Renting a car to explore Punta Cana is a convenient option, and most rental companies have a presence at Punta Cana International Airport. Car rental prices in Punta Cana usually range from $21 to USD 55 per day. You can rent a full-sized SUV for approximately USD 57 per day or an intermediate car for about $38 per day. A valid driver's license is required to rent a car Punta Cana, but it's important to note that most rental companies do not permit travel into Haiti. You can find excellent rental car deals through our search tool. By Bus If you're considering bus travel, bus operations in Punta Cana as well as nearby towns are primarily from Expreso Bavaro, with buses departing roughly every 15 minutes. However, it's important to note that bus schedules in Punta Cana are only sometimes there, and you may sometimes face lengthy wait times, exceeding an hour, for a scheduled bus. While public transportation, such as local buses known as Guaguas, is available, there are more recommended choices for tourists. Regrettably, the bus system around Punta Cana is generally an unreliable mode of transportation, but it is an economical option. The bus fare in Punta Cana is USD 1 (40 DOP), making it an exceptionally budget-friendly means of travel throughout the Punta Cana area. This fare is typically consistent for bus travel within Punta Cana. Final Thoughts Punta Cana is a tropical haven with many experiences waiting to be explored. From pristine beaches and lush golf courses to cultural gems as well as natural wonders, this Caribbean paradise has something for everyone. As you plan your visit, remember the diverse neighborhoods that offer unique charms and attractions. When traveling to Punta Cana, the journey begins with flights to Punta Cana International Airport. It is conveniently accessible from numerous North American cities. Remember to check your passport validity and visa requirements, especially if you plan to stay longer than 30 days. Upon arrival, various transportation options are available, from private transfers that provide comfort and convenience to taxis and car rentals for more independent exploration. Bus travel is an economical choice but may involve unpredictable schedules. As you delve into Punta Cana's neighborhoods, each has its own story. From the lively atmosphere of Bavaro as well as the exclusive luxury of Cap Cana to the cultural charm of Punta Cana Village, you'll find the perfect setting for your Caribbean adventure. Whether you're looking for water adventures, cultural immersion, golfing getaways, or simply relaxing on the beaches, Punta Cana neighborhoods offer diverse experiences. Remember to savor the local cuisine, enjoy the vibrant nightlife, and prioritize safety during your stay. In Punta Cana, the possibilities are endless. With careful planning as well as a spirit of adventure, visiting these must-see neighborhoods will be an unforgettable journey through the heart of this tropical paradise. So, pack your bags and let Punta Cana's beauty and culture inspire your next vacation. Read Also: Best Neighborhoods To Discover In Mexico City How To Make The Most Of Your Trip To Rome 10 Best Restaurants In The US