


 Related
Unique Things To Do In Gaylord, MI: Exploring Michigan In Style
BY Sibashree May 13, 2025
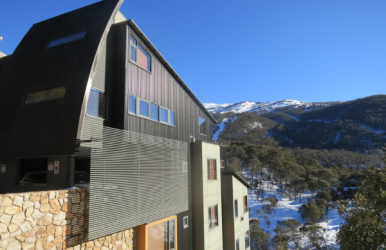
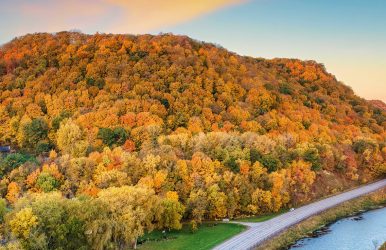
It has been years since our visit to Gaylord in Michigan. But the Alpine village left such a lasting impact that anytime I hear something good about the city, it feels personal! As a traveler and travel writer, I have to write about itineraries or stuff like things to do in Gaylord, MI. However, this time, I have decided to keep it very candid. This time it’s not about how much I know. On the contrary, it’s about the connection I felt and the meaningful things that happened to me. And you know, I was very happy when my feelings for Gaylord were validated by the “Slow Tourism Movement” started by Pure Michigan. So, the next time I am in Gaylord, I will just smell the tulips, relax and unwind, and have the best pizza. Nevertheless, Gaylord, with its diverse terrains, has a lot to offer to outdoor enthusiasts. So, you can be a traveler like me, just soaking in the moment. Also, you can be a traveler eager to explore the trails. Irrespective of the type of traveler you are, you wil have many options as you search for “What to do in Gaylord, MI today.” Let’s discuss all those in this Tour and Travel Blog. What Is The Best Time To Visit Gaylord, MI? April to October is the best time to visit Gaylord, MI. The summer months from May to July are ideal for many outdoor activities, such as biking, hiking, and elk spotting. Also, Gaylord celebrates the Alpenfest in the summer season. It is a celebration of the Alpine heritage. The temperature in Gaylord starts dropping from November, and the lowest temperature becomes sub-zero. Moreover, October is the wettest month in Gaylord and February usually has the most amount of snowfall. Do you want to know more about the weather conditions in Gaylord, MI, by month? Have a look at the table below. MonthsHighest Temperature (Degree Celsius)Lowest Temperature(Degree Celsius)Days of RainfallJanurary-5-107February-3-126March4-67April12-110May 2079June25109July27148August26147September22108October15412November7-39December-1-88 Unique Things To Do In Gaylord, MI For Adults And Children It’s not easy to find a quick answer to what is Gaylord Michigan known for. However, here I have jotted down my favorite experiences during the trip to this beautiful “Alpine Village.” 1. Spot Elk At Gaylord's City Elk Park: Free Things To Do In Gaylord, MI View this post on Instagram A post shared by Gaylord Michigan (@gaylordmichigan) Location: 116 Grandview Blvd, Gaylord Hours Open: 24 Hours Is Gaylord, Michigan, worth visiting for a wildlife enthusiast? Of course! You can plan a day trip to Gaylord's City Elk Park and find the elk grazing peacefully. 2. Exploring The Trails At Aspen Park: Things To Do In Gaylord MI In Winter https://www.instagram.com/p/C-qrDFVIm91/?img_index=4 Location: Commerce Blvd, Gaylord Hours Open: 6 AM to 11 PM Aspen Park, with its unique geographical features, is the one-stop destination for bikers, hikers, and casual strollers. During the winter months, the wooded and hilly terrains here become ideal for cross-country skiing. 3. Visiting The Call of the Wild Museum: Things To Do In Gaylord, MI, To Know About Local Culture Location: 850 S Wisconsin Ave, Gaylord Hours Open: 9 AM to 9 PM A theater, a gift shop, and a display of North American wildlife in their natural habitat! The Call of the Wild Museum is a fusion of all these. Here you will learn about the local history and wildlife, and collect some fun souvenirs from the award-winning gift shops. 4. Relaxing At A Spa: Things To Do This Weekend For Adults View this post on Instagram A post shared by Gaylord Michigan (@gaylordmichigan) If the week-long activities have kept you busy, you can visit a spa this weekend for massage, Reiki, aromatherapy, and other wellness services. The Holistic Spa at 104 W Main St is a popular spa here. 5. Spending Time At Otsego County Sportsplex: The Kids’ Favorite View this post on Instagram A post shared by Gaylord Michigan (@gaylordmichigan) Location: PO Box 1886, 1250 Gornick Ave, Gaylord Hours Open: Monday and Friday: 6 AM to 7 PM; Tuesday & Thursday: 6 AM- 8:30 PM, Wednesday: 6 AM - 7:30 PM, Saturday: 8 AM - 6 PM; Sun: 10 AM - 6 PM The Olympic-sized swimming pool and ice rink are the biggest attractions of Otsego County Sportsplex. However, it also has segments for Yoga, Kayaking, and Karate training. Moreover, you can rent a room to play softball, baseball, or golf here. 6. Playing Golf At Bavarian Falls Park: Things To Do In Gaylord, MI In The Afternoon View this post on Instagram A post shared by Gaylord Michigan (@gaylordmichigan) Location: 850 S Wisconsin Ave, Gaylord Hours Open: 10 AM to 10 PM You can spend the afternoon trying your luck at the turf. The golf course at Bavarian Falls Park is a favorite of young couples, and the scenic view here is relaxing. 7. Watching Sunsets At Otsego Lake State Park Location: 7136 Old Hwy 27 S, Gaylord Hours Open: 8 AM to 10 PM Kissing by Lake Otsego was the biggest “IT” moment for my partner and me in Gaylord. It’s a place to relax away from the noise of city life. Also, the Sun setting behind the trees offers transcendental views. 8. Exploring The North Blueberry Farm View this post on Instagram A post shared by Up North Blueberry Farm (@upnorthblueberryfarm) Location: 3964 Hallenius Rd, Gaylord Want to have the best blueberries in the region? Head to the privately-owned North Blueberry Farm. Enjoy some slow moments here, cherishing the scenic beauty, and carry some fresh blueberries back home. 9. Visiting The Otsego County Historical Society Location: 320 W Main St, Gaylord Entry: Free Otsego County Historical Society is a museum that brings the history, culture and socio-economic characteristics of Gaylord under one roof. The hours of cooperation vary for the museum. So, call at +1 989-732-4568 to plan your visit. 10. Visiting The Gaylord Area Council For Arts Location: 125 E Main St, Gaylord Entry Fee: Free How beautifully Gaylord has built an art community to promote its local talents! A visit to the Gaylord Area Council for Arts is one of the best things to do in Gaylord if you want to know about the local culture. Further, the Gallery Room here is fascinating, and you will see different forms of art here. Some of them even depict the history of the area. 11. Collecting Fresh Produce At Gaylord Farmer's Market View this post on Instagram A post shared by Gaylord Michigan (@gaylordmichigan) Location: 829 W Main St, Gaylord Hours Open: Saturday, 10 AM to 2 PM All of us who talk about sustainable tourism must pay a visit to Gaylord Farmer's Market. Michigan has always been one of the biggest promoters of the farm-to-table culture. At Gaylord Farmer's Market, I got to see how things happen. Local farmers and vendors gather here with their fresh produce. Moreover, you see so much energy and emotion when you buy something from them or just have short and meaningful conversations. It’s the best way to know about the local community. 12. Shopping At Old Spud Warehouse View this post on Instagram A post shared by The Old Spud Warehouse (@theoldspudwarehouse) Location: 314 S Otsego Ave, Gaylord, MI Hours Open: Monday-Saturday, 10 AM to 6 PM, Sunday: 12 PM to 4 PM The old world charm of the Old Spud Warehouse building spoke to me at first glance. Along with the clothes and accessories, what I loved the most there were the vintage items. I collected all the gifts for my friends from there. Where To Eat In Gaylord? Know The Restaurants In Gaylord MI You must have heard of Detroit-style pizza. Also, the pasties in the Upper Peninsula Region are a sheer gastronomic delight. Further, if you have a sweet tooth, all roads in Michigan lead to Mackinac Island, home to the famous Mackinac Island fudge. Along with these signature dishes, the local fresh ingredients and flavors such as thimbleberries, cudighi, and white fish, cherries, apples, maple syrup, and artisan cheese make Michigan an ideal place for culinary tourism. Nevertheless, these are our favorite restaurants in Gaylord, MI. Bennethum's Northern Inn at 27 Old US Hwy Mi Vallarta at 1006 W Main St The Iron Pig Smokehouse at 143 W Main St Things To Do in Gaylord, MI: Frequently Asked Questions (FAQs) Here are the frequently asked questions and answers about things to do in Gaylord, MI. Why Does Gaylord, Michigan Get So Much Snow? Gaylord, the highest city in the Lower Peninsula region, gets copious snowfall due to its high altitude (411 meters), the northern and northwestern winds blowing into the city, and the lake-effect. The two Great Lakes, Superior Lake and Michigan Lake, are the two most prominent elements contributing to the heavy rainfall in the city. But how? Jim Keysor, the warning coordination meteorologist at the National Weather Service in Gaylord, says, “The process of lake-effect snowfall, and rainfall, is the process of cold air moving across an unfrozen body of water … and we normally have a wind direction that blows from north and northwest that brings the air across the Lakes into our area.” What Is The Snowiest City In Michigan? Munising, Houghton, and Marquette are the snowiest cities in Michigan. However, this year (2024-25 Winter), Gaylord has become the center of attraction due to a heavy snowfall of 204.6 inches. However, it is still behind Munising, which had a record snowfall of 238 inches in the 1996-97 winter, and in the 2024-25 winter season, it recorded a snowfall of more than 218.1 inches. What Is Gaylord Famous For? With heavy snowfall and a mild summer, Gaylord is the ultimate “Alpine Village” you want to visit. No wonder that it is often referred to by this nickname. Its skiing and golf resorts attract a lot of enthusiasts every year, and it is the ultimate land of outdoor adventure with diverse terrains and activities such as biking, hiking, elk spotting, etc. With a Swiss heritage and a sister city to Pontresina in Switzerland, Gaylord also celebrates the Alpine connection through festivals and other cultural activities. Alpenfest is the biggest celebration in this regard. In 2025, Alpenfest in Gaylord will take place from 8 to 12 July 2025. It is the 60th year of the festival. Moreover, don’t miss the Alpine-themed architecture when you are in Gaylord. What Should I Wear To Gaylord Ice? You should wear long pants, a hat, gloves, and a Gaylord Rockies parka to Gaylord Ice. Gaylord is one of the coldest cities in Michigan, and snowfall reached a record high in the 2024-25 winter season. What Is America's Snowiest City? Valdez, in Alaska, is the snowiest city in the United States. Thanks to the Aleutian low-pressure system, frequent and lasting snowstorms, and mountain drainage, Valdez experiences around 325.3 inches of snowfall in a year. What Is The Coldest City In Michigan? In the Upper Peninsula, Stambaugh is the coldest city in Michigan, with the temperature going down to -30 degrees Celsius on 20th January, 2025, and -28 degrees Celsius on 21st January 2025. In winter 2024-25, the Upper Peninsula and some parts of the Lower Peninsula experienced frigid cold. Further, the temperature in various parts of the Upper Peninsula decreased to -25 degrees Celsius. Nevertheless, here is a list of the temperature records of the cities in the Upper and Lower Peninsulas of Michigan during the winter of 2024- 25. Name of the CityTemperature (Degree Celsius)Stambaugh-28Ironwood-27Herman-25Marquette Area-19Bergland-17Munising-14Manistique-13Sault Ste Marie-13Engadine-13Houghton/Hancock:-12West Branch-12Atlanta-9Kalkaska-6Battle Creek-5Grand Rapids-5Vanderbilt-4Lansing-4Gaylord-4 What Month Does Michigan Get The Most Snow? December to February are the snowiest months in Michigan. However, snowfall in Michigan starts in November and continues till April. In the 2024-25 winter season, the Upper Peninsula Region of Michigan had a snowfall of over 320 inches (National Weather Service). It was the highest of the season. Further, Gaylord had a snowfall of 204.6 inches in the 2024-2025 winter season1, achieving a 138% high of the usual average of 148 inches. Also, during the same months, Traverse City received 152.2 inches of snow, and Detroit received 28.7 inches. Up Next.. A Guide To National Parks In Michigan Is The Bahamas Part Of The US Or Canada? Here’s A Quick Guide To The Top 12 Hiking Destinations In The US