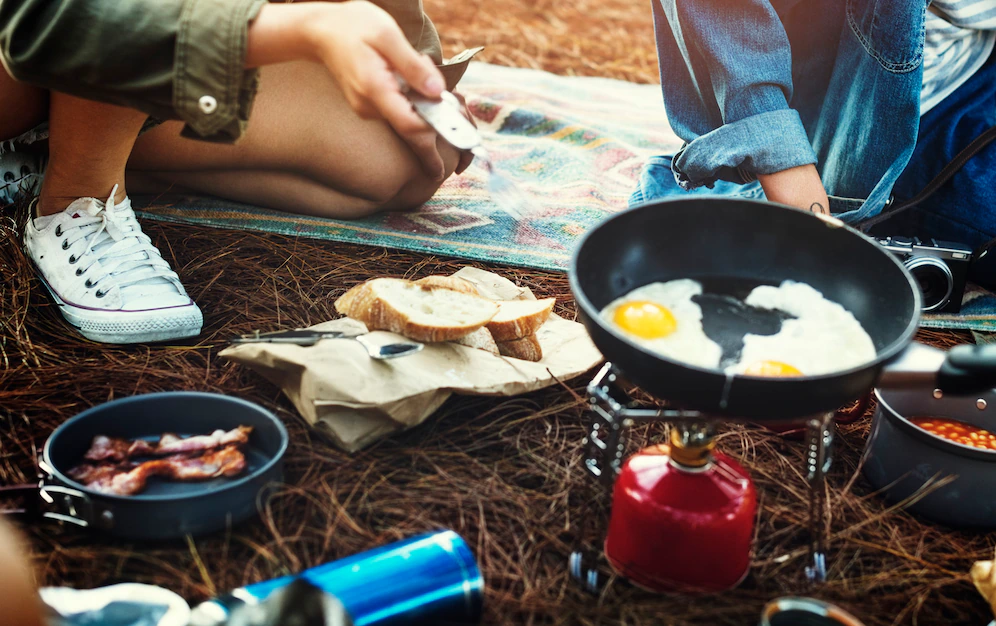
If you’re reading this, you probably love the great outdoors as much as you enjoy good food. There’s something undeniably special about preparing a meal surrounded by nature, with the warmth and crackle of a campfire as your backdrop.
Whether you’re a seasoned camper or new to the outdoor cooking game, this comprehensive guide on campfire cooking techniques is here to help you elevate your skills and impress your fellow campers with mouthwatering meals under the stars.
For centuries, humans have huddled around campfires for warmth and to cook food that sustains us on our journeys. Campfire cooking is an art, and like any art, it requires a bit of know-how and practice.
In this post, we’ll delve into essential equipment, building the perfect cooking fire, various cooking techniques, temperature control, and even some tempting recipes to try out on your next adventure.
Essential Campfire Cooking Equipment
Before diving into the various campfire cooking techniques, let’s ensure you’re well-equipped for the journey.
Having the right tools on hand can make a difference when you’re out in the wilderness, transforming your campfire meals from ordinary to extraordinary.
Here’s a handy list of essential campfire cooking equipment that will serve you well during outdoor culinary escapades.
Cast Iron Cookware
Cast iron is a camper’s best friend when it comes to cookware. It’s durable, versatile, and retains heat like a champ. Here are the key players you’ll want to have in your campfire cooking arsenal:
Skillets: A good cast iron skillet is indispensable. From frying eggs to searing steaks, it can handle almost anything you throw at it.
Dutch ovens: These heavy-duty pots are perfect for slow cooking, stews, and even baking. With a snug-fitting lid and sturdy construction, a Dutch oven is an investment that will last for countless camping trips.
Cast iron pot: A versatile cast iron pot can be used for boiling, simmering, and even deep frying. Whether making a big pot of chili, whipping up a batch of pasta, or frying some delicious campfire donuts, a cast iron pot is a must-have addition to your outdoor cooking equipment.
Cooking Grates And Tripods
A sturdy cooking grate or tripod can be a game-changer for campfire cooking. They provide a stable platform for your cookware and make it easy to control the heat by adjusting the distance from the flames.
Long-Handled Utensils
Cooking over an open fire can get hot—literally. Long-handled utensils like tongs, spatulas, and spoons will give you the extra reach you need to keep your hands safe from the heat while flipping, stirring, and serving.
Fire-Resistant Gloves
Safety first! A good pair of fire-resistant gloves can protect your hands from accidental burns, making it easier to handle hot cookware, adjust logs, or even move cooking grates.
Chimney Starters And Fire Starters
Getting your fire going quickly and efficiently is key. A chimney starter can help you easily light charcoal, while fire starters (like tinder, firelighters, or even some trusty old newspaper) can make starting a wood fire a breeze.
Of course, these are just the basics. Depending on your preferred cooking techniques and personal preferences, you might want to add a few other items to your campfire cooking kit.
Wire Grill Brush
Keeping your cooking grates clean is vital for both hygiene and flavor. A wire grill brush is essential for scrubbing away stuck-on food and residue from your grill grate. This will ensure a clean surface for your next campfire meal, preventing unwanted flavors and potential flare-ups.
Building The Perfect Campfire For Cooking
Now that we’ve got the equipment sorted, it’s time to talk about the star of the show: the campfire itself.
Building the perfect campfire for cooking might seem intimidating at first, but with a little know-how and practice, you’ll be a fire-taming pro in no time.
Let’s walk through the steps to create a safe and efficient cooking fire that’ll have you whipping up scrumptious meals in the great outdoors.
Selecting The Right Location
Location is everything when it comes to setting up a campfire. First and foremost, make sure fires are permitted in the area you’re camping in.
Once you’ve got the green light, choose a spot that’s flat, clear of any overhanging branches or vegetation, and protected from strong winds. If there’s an existing fire pit or ring, use that to minimize your impact on the environment.
Gathering And Preparing Firewood
Fuel your fire with the right kind of wood. Hardwoods like oak, hickory, or maple are ideal for cooking because they burn longer and hotter than softwoods.
Gather a mix of tinder (small, dry twigs or leaves), kindling (slightly larger sticks), and firewood (larger logs) to ensure a well-balanced fire.
Remember to collect only downed and dead wood, and never cut live trees for firewood.
Building A Fire Pit
If there isn’t an existing fire pit, create one by digging a shallow hole and surrounding it with a ring of rocks.
This will help contain the fire, making it safer and easier to manage. Keep a bucket of water or sand nearby to extinguish the fire when you’re done cooking.
Different Types Of Campfire Structures
The structure of your campfire plays a significant role in how it burns and how suitable it is for cooking. Here are three popular campfire structures you can try:
Teepee: This classic structure involves stacking tinder and kindling in a cone shape, with larger logs leaning against them. It’s easy to light and perfect for a quick, high-heat fire when you need a hot fire for faster cooking.
Log cabin: Build a square structure by stacking logs in alternating layers, with tinder and kindling in the center. This creates a stable, long-burning fire that’s great for extended cooking sessions.
Lean-to: Place a large log as a windbreak and lean smaller logs, kindling, and tinder against it. The lean-to structure works well when shielding your fire from the wind.
Fire Safety Tips
The biggest priority when dealing with fire is campfire safety. Keep your fire at a manageable size, never leave it unattended, and fully extinguish it before you leave or go to sleep. Drown the fire with water, stir the ashes, and ensure they’re cold to the touch before you call it a night.
Campfire Cooking Techniques
Armed with your essential equipment and a perfect campfire, you’re ready to dive into the world of campfire cooking techniques.
There’s more to outdoor cooking than just throwing some hot dogs on a stick (although that’s always a fun option).
Explore these different methods to expand your campfire cuisine repertoire and impress your fellow campers with your culinary prowess.
Direct Heat Grilling
Direct heat grilling is the most straightforward and intuitive campfire cooking method, especially when cooking meat. Place your food directly over the heat source and let the flames work their magic. This technique is perfect for:
Skewers and kebabs: Thread your favorite meats, veggies, and even fruits onto skewers for a quick and easy meal that’s as fun to make as it is to eat.
Burgers and hot dogs: No campfire cooking experience is complete without the classics. Throw some burgers or hot dogs on a grill grate and enjoy the smoky, charred goodness.
Plank Cooking
Plank cooking involves placing your food on a water-soaked wooden plank, which is then set over the fire. This cooking method infuses your food with a subtle, smoky flavor while keeping it moist and tender.
It’s particularly popular for cooking fish, but don’t be afraid to try it with other proteins or even veggies.
Foil Packet Cooking
Foil packet cooking is a fuss-free, versatile method perfect for campfire cooking. Foil packet cooking allows your ingredients to cook evenly, ensuring every bite is flavorful.
Simply wrap your ingredients in a double layer of aluminum foil and place the packet directly on the coals or a grill grate. This technique is great for steaming vegetables, cooking delicate proteins, or even baking potatoes.
Dutch Oven Cooking
Dutch ovens are the workhorses of campfire cooking, capable of tackling a wide range of dishes. With a little creativity and practice, you can master these two popular techniques:
Slow cooking: Hearty stews, soups, and chili are just some comfort food classics you can cook low and slow in a Dutch oven.
Baking: Yes, you read that right—you can bake over a campfire! From bread and biscuits to cobblers and cakes, the sky’s the limit when it comes to Dutch oven baking.
Skillet And Griddle Cooking
A cast iron skillet or griddle is perfect for cooking up a hearty breakfast, sizzling fajitas, or even frying up some fresh-caught fish. Use a grill grate or tripod to position your skillet over the fire, and you’ll be cooking up a feast in no time.
Ash Cooking
For a more primitive approach, try ash cooking. This technique involves burying your food (wrapped in foil or encased in a protective layer of dough) directly in the hot ashes of your campfire.
It’s an excellent method for cooking root vegetables, corn on the cob, or even whole fish.
Cooking Over The Coals
Instead of cooking directly over the flames, try cooking over the hot coals for better heat control and even cooking. This method is ideal for foods that require a longer cooking time or more gentle heat.
To cook over the coals, let your fire burn down until you have a bed of glowing embers, then place a grill grate over the coals or use long-handled tongs to position your food directly on them.
This technique works wonders for roasting vegetables, slow-cooking meats, or even cooking up some mouthwatering BBQ.
Roasting Sticks
Sometimes, simplicity is key. Roasting sticks (or skewers) allow you to cook your food right over the open flame, giving you direct control over the heat and cooking process.
This method is perfect for toasting marshmallows, roasting hot dogs, or even grilling up some tasty veggie skewers. Just remember to use a sturdy, heat-resistant stick or skewer, and always be mindful of safety when cooking over an open flame.
Mastering Campfire Cooking Temperature Control
Temperature control is the key to culinary success, even when cooking food over a campfire.
While it might seem tricky to manage the heat without the convenience of a kitchen stove, with a little practice and a few handy tips, you’ll be a campfire temperature control pro in no time.
Let’s explore the art of mastering campfire cooking temperature control, so you can enjoy perfectly cooked meals every time.
Importance Of Temperature Control
Just like in your home kitchen, controlling the temperature while cooking over a campfire is crucial for achieving the right balance of flavor, texture, and doneness.
Different foods and cooking techniques require different heat levels, so learning how to regulate the temperature is essential for outdoor culinary success.
How To Gauge The Heat
Without a built-in thermometer, gauging the heat of your campfire can be a bit of a challenge.
A simple method to estimate the temperature is to use the hand test. Hold your hand, palm-side down, about 6 inches above the heat source. Count how many seconds you can comfortably keep your hand in that position:
High heat: 2-3 seconds
Medium heat: 4-5 seconds
Low heat: 6-8 seconds
Keep in mind that this test is subjective and depends on your heat tolerance, so use it as a rough guideline rather than an exact measurement.
Adjusting Cooking Distance And Fire Intensity
There are a few ways to control the heat while campfire cooking:
Move your food closer to or farther from the heat source. Using a grill grate with adjustable height, a tripod, or simply placing your food on a cooler area of the coals can help you find the sweet spot for the perfect cooking temperature.
Control the fire intensity by adding or removing fuel. If you need a hotter fire, add more logs or kindling. Let the flames die down or spread out the coals for a cooler fire.
Create different heat zones within your fire pit by shifting coals to one side for direct heat and leaving the other with fewer coals for indirect heat. This way, you can easily move your food between high and low heat as needed.
Using A Thermometer
While the hand test and adjusting your fire can give you a good sense of temperature control, using a thermometer—particularly for meats—can be a game changer.
A probe thermometer can help ensure your meats are cooked to a safe internal temperature, eliminating the guesswork and ensuring perfectly cooked results.
A digital meat thermometer is an excellent choice for precise temperature readings, ensuring that your meats are always cooked to perfection.
Delicious Campfire Recipes To Try
Now that we’ve explored various campfire cooking techniques, it’s time to put your newfound skills to the test with these delicious recipes.
There’s one for each cooking method we’ve discussed, so you can try them all and find your favorite way to enjoy a scrumptious meal on your next camping trip.
Direct Heat Grilling: Sizzling Steak Skewers
Skewer chunks of your favorite steak, bell peppers, onions, and cherry tomatoes on metal or wooden skewers (soak wooden skewers in water for 30 minutes beforehand to prevent burning).
Season with salt, pepper, and a sprinkle of garlic powder. Grill directly over the flames, occasionally turning, until the steak is cooked to your desired doneness and the veggies are tender.
Plank Cooking: Cedar-Planked Salmon
Soak a cedar plank in water for at least an hour. Season a salmon fillet with salt, pepper, and a drizzle of maple syrup or honey.
Place the salmon skin-side down on the soaked plank, and set it over the fire. Cook until the fish is opaque and flakes easily with a fork, about 15-20 minutes.
Foil Packet Cooking: Campfire Veggie Medley
Chop your favorite veggies (such as zucchini, bell peppers, and red onions) into bite-sized pieces. Toss with olive oil, salt, pepper, and your choice of herbs (such as rosemary or thyme).
Wrap the veggie mixture in a double layer of aluminum foil, sealing the edges tightly. Cook the foil packet on a grill grate or directly on the coals for 15-20 minutes, flipping halfway through until the vegetables are tender.
Dutch Oven Cooking: Hearty Campfire Chili
Heat a bit of olive oil and brown ground beef, diced onions, and minced garlic in a Dutch oven. Add canned crushed tomatoes, kidney beans, and chili seasoning packet.
Stir well, cover, and let it simmer over a bed of coals for about an hour, stirring occasionally. Serve with shredded cheese, sour cream, and cornbread for a comforting camping meal.
Skillet Cooking: Campfire Breakfast Hash
In a cast iron skillet, cook diced bacon until crispy. Add diced potatoes, bell peppers, and onions, and cook until the potatoes are tender and the veggies are softened.
Make a few wells in the hash and crack an egg into each one. Cover the skillet with a lid or foil and cook until the eggs are set to your liking. Season with salt and pepper, and serve with hot sauce.
Ash Cooking: Ember-Roasted Sweet Potatoes
Pierce whole sweet potatoes with a fork and wrap them individually in aluminum foil. Bury the wrapped sweet potatoes in the hot ashes of your campfire.
Cook for about 45-60 minutes, occasionally turning until the sweet potatoes are tender. Carefully remove the foil and serve with a dollop of butter, a sprinkle of cinnamon, and a drizzle of maple syrup.
Cooking Over The Coals: Slow-Roasted BBQ Chicken
Season chicken pieces (legs, thighs, or breasts) with your favorite BBQ rub. Place the chicken on a grill grate set over a bed of glowing coals.
Cook, turning occasionally and basting with BBQ sauce, for about 45 minutes to an hour, or until the chicken reaches an internal temperature of 165°F (74°C) when checked with a digital meat thermometer.
Roasting Sticks: Classic S’mores
No campfire recipe list would be complete without the ultimate camping dessert: s’mores! Skewer marshmallows on roasting sticks and toast them over the open flame until golden brown and melty.
Sandwich the roasted marshmallow between two graham crackers with a piece of chocolate and gently press them together. Allow the warm marshmallow to melt the chocolate slightly for a gooey, delicious treat that’s sure to be a hit with kids and adults alike.
Abdul Aziz Mondol is a professional blogger who is having a colossal interest in writing blogs and other jones of calligraphies. In terms of his professional commitments, he loves to share content related to business, finance, technology, and the gaming niche.
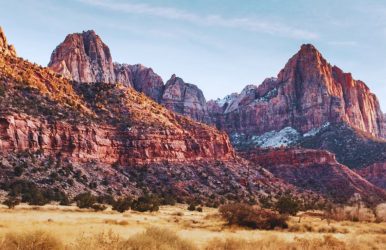
Every time I have been to Zion National Park, adventures, stunning landscapes, and thrilling outdoor activities have made me make a promise to come back.
A summer trip to Zion National Park is always special, and 2025 is no exception. In 2024, Zion National Park had 5 million visitors, the second-highest number among the country's national parks.
Furthermore, during the Memorial Day Weekend in 2024, 92000 people visited this national park.
So, as we approach the Memorial Day Weekend in 2025 and the summer season in Zion is about to start in full swing, the park authorities have taken several measures.
Also, there are a few changes and additions in the park attractions to make your summer trip to Zion more enjoyable.
Whether you're into rock climbing, exploring the breathtaking views, or hiking in Zion National Park, you can be ready for a mesmerizing experience.
Also, don't forget to consider accommodations like The Riv At Zion, which provides comfort and convenience near the park's entrance.
Moreover, this season, you can explore many features and additions in the park and in this Tour and Travel Guide, we are going to talk about them.
A Summer Trip To Zion National Park: Know The Quick Facts Before Packing Your Bags
Established: 1919
Area: 148,016 Acres
Elevation: 1117 to 2660 Meters
Standard Pass: $20-35
Pet Safety: The water of the Virgin River in the park has cyanotoxins and cyanobacteria. Cyanotoxins are very harmful to dogs and other pets. So, keep them on a leash during a summer visit to Zion National Park.
Hours Open: 24/7 (All the facilities in the park have different opening and closing hours.)
Know About The Operating Hours Of Various Facilities In The Park
Have a look at the table below to know the operation hours of the facilities in the park. The data here is updated on 7th May 2025.
Park Facilities Hours Of OperationZion Canyon Visitor CenterInformation Desk8 AM to 5 PMZion Forever Park Store8 AM to 7 PMZion Canyon Wilderness DeskAllow at least 20 minutes to get a permit8 AM to 5 PMZion Human History Museum10 AM to 5 PMKolob Canyons Visitor Center8 AM to 12 PM and 1 PM to 5 PM
Furthemore, before planning your summer trip to Zion National Park, you must note that the Zion Nature Center Junior Ranger Station is closed for the season. The Kolob Canyons Wilderness Desk also remains closed.
Moreover, oversized vehicles can pass through the Zion Mountain Carmel Tunnel between 8 AM and 4:30 PM.
How To Reach Zion National Park And Where To Stay?
Zion National Park is situated in southwestern Utah, and the closest airport is St. George Regional Airport, about 50 miles away.
You can rent a car or take a shuttle to the park from there.
Furthemore, you can fly into Las Vegas, Nevada, or Salt Lake City, Utah, and enjoy a scenic drive to Zion.
Talking about accommodations, nearby resorts offer a blend of comfort and convenience, and they are just a short drive from the park entrance.
Do you want your stay to be more adventurous? You can give the luxury hotels and resorts a miss and choose camping or staying in cozy log cabins.
Exploring Zion National Park: Things To Do During A Summer Trip To Zion National Park
The first thing you can do is hike to Angels Landing. This is my favorite route for breathtaking views. Furthermore, the Narrows will allow you to wade through the Virgin River between steep canyon walls.
You can join a ranger-led hike, take a photography tour, or even try rock climbing with experienced guides.
If you prefer a more relaxed pace, consider scenic drives or shuttle tours to take in the beauty of Zion without strenuous effort.
Additionally, the park has recently upgraded facilities and expanded shuttle services, making it easier to navigate its popular areas.
What's New In 2025? Your Summer Trip To Zion Will Now Be More Exciting
In 2025, Zion National Park unveils several exciting updates to enhance your visit.
Noteworthy upgrades include improved facilities and expanded shuttle services, making it easier to access popular park areas.
New interactive exhibits at the Zion Human History Museum offer fresh insights into the park's rich cultural and geological background, providing a more immersive experience for visitors.
Additionally, the park introduces a range of events and programs like stargazing and nature workshops to engage and educate visitors.
Things You May Have To Face During A Summer Trip To Zion National Park
Considering the record number of visitors to Zion National Park in 2024, you must be ready to face the following situations during your summer trip to Zion National Park in 2025.
Heavy traffic congestion in the Zion National Park, and especially in the Springdale Area
Temporary and intermittent closures of the vehicle entrance station in the east and south of the park
Long waiting time while boarding the shuttle from Zion Canyon and Springdale
Long queues at the visitor center, trailheads, and park entrances
Tips For A Successful Summer Trip To Zion National Park
To maximize your enjoyment in Zion, avoid peak times by visiting on weekdays or early mornings, especially during the summer.
Spring in Zion National Park is beautiful, and the fall season also offers pleasant weather and fewer visitors, providing a more serene experience.
1. Pack The Right Gear For Your Summer Trip To Zion National Park
Make sure to pack the right gear for your activities. Sturdy hiking shoes, ample water, sun protection, and layered clothing for fluctuating temperatures are essential.
If you plan to hike, the Narrows, water shoes, and a walking stick will be necessary to navigate the riverbed.
A camera is also a must to capture the park's stunning landscapes.
2. Stay Hydrated And Stay Updated About The Weather During Your Summer Trip To Zion
Stay hydrated and take breaks in shaded areas to avoid heat exhaustion.
Familiarize yourself with the park's shuttle schedule and routes to streamline your travel within the park.
Keep a map handy and know your surroundings to ensure a safe and enjoyable experience.
Lastly, check for any trail updates or weather advisories from park rangers before heading out daily.
It’s The Right Time To Plan A Summer Trip To Zion National Park
With the latest upgrades and new activities, there's never been a better time to visit.
From exhilarating hikes to serene drives and educational programs, every moment in this remarkable national park will contribute to a memorable and fulfilling trip.
Hey there! Are you a fan of adventure parks? How about water parks? If you’re excited by the idea of an adventure water park, then you’re in for a treat! Today, I’m diving into a review of the popular Adventure Lagoon Waterpark in sunny Anaheim, California.
If you’re ready for some fun under the sun, keep reading! I’ve got all the details you need to make the most of your visit to this awesome waterpark. Let’s jump right in!
Exploring The Adventure Lagoon Waterpark In Anaheim: Things To Do
Before you can find out all the crazy things to do in Adventure Lagoon Anaheim, check out the table below for all the details you need to know about this place!
Official Website theadventurelagoonRun By Orange County Water District (Brainchild Of David Wabiszewski) Location Anaheim, California Address 3255 E Miraloma Ave, Anaheim, CA 92806 Phone (714) 983-7314 Google Rating 4.2 Stars (110 Google Reviews) Opening Hours Monday – Friday: 4 pm – 9 pm | Saturday & Sunday: 12 pm – 9 pm Activities Aqua Park, Kaos, Thunderdome, Freefall Extreme, Freefall Supreme, Jungle Joe 2, Monkey Dome Other Activities Floating obstacle course, Paddleboarding, Pedal & bumper boats, Kayaks, Water volleyball Food & Beverage Food, Drinks, Treats, Retail
Now that you have a fair idea about the Adventure Lagoon water park, let’s check out specific details for more information, especially if you are planning to head out to this crazy location soon!
Aqua Park:
The best part of visiting the adventure lagoon in anaheim is there are so many activities that you can try out. If you want to know the best things to do in the Adventure Lagoon Waterpark in Anaheim, then you have come to the right place.
Check out the table below for details on all the fun activities you can check out here!
ActivityDetailsAqua ParkThe park boasts a crystal-clear freshwater lake - the Aquaglide Ring Monsoon XXL sits on the top of this lake!KaosMove over conventional trampolines because it’s time for the unique bouncing dome to take charge.ThunderdomeFeaturing ten mesh panels and 32 mesh panels, Thunderdome is a massive and versatile arena.Freefall ExtremeA zero-entry slide featuring a 10 ft tall climbing wall in ladder style accompanied by a huge enclosed splash zone.Freefall SupremeA zero-entry slide featuring a mid-level loft, an internal splash zone, three external ladder walls, and a mesh shade. Jungle Joe 2The Jungle Joe 2 features pyramidal walls accompanied by internal mesh floors, splash Zones, and multi-level terraces.Monkey DomeMove over land-based monkey bars because the Monkey Dome provides visitors with the ultimate challenge of crossing the area without falling into the water.
Other Activities:
Absolutely! The Adventure Lagoon waterpark has so much to offer beyond just the Aqua Park.
Why spend your time on anything else when you can dive into a world of fun activities?
Take a look at the table below for an overview of all the exciting things you can experience during your visit!
What Is The Pricing Of All The Activities In The Adventure Lagoon?
If you're planning a visit to the park, everyone is required to pay general admission, no matter what activities you want to enjoy. Here’s a breakdown of the admission prices and offerings:
For visitors aged 6 and up, the entry fee is $35 on weekdays (Monday to Thursday) and $40 on weekends (Friday to Sunday). This gets you all-day access to the lagoon.
If you're 65 or older, your admission is just $10.
Kids aged 3 to 5 can also enter for $10.
Children aged 0 to 2 can join in for free!
If you're celebrating a special occasion, you might want to consider renting out the VIP or Birthday Section. It’s $150 on weekdays and $250 on weekends.
For some extra fun, you can try out activities like the Obstacle Course for $10, or rent equipment like paddle boards, kayaks, or aqua bikes, with prices starting at $10 to $15 per hour. And don't forget, the pedal boats in the Kids Zone are free for little ones aged 0 to 5.
Enjoy your time at the park!
Rules You Must Follow For The Adventure Lagoon
Even though it is a great way to experience adventure and fun, you must be careful, especially when you visit the adventure lagoon.
There are certain rules that you must follow to make your experience safe and sound.
You can bring life vests, and the Coast Guard will love you.
Additionally, please bring beach chairs, as they will make for a more comfortable experience.
You must not carry alcohol as they have a zero tolerance policy for that; hence, you will be removed from the premises, and you will not receive any refund.
Outside food or drinks are not allowed, so it is better if you do not carry any outside products.
The flasks or water bottles are non-useable; hence, try to be careful when carrying these products.
You cannot smoke or vape in the parking lot.
Once you check out, you cannot re-enter the park.
You will not get any refunds, exchanges, or returns once you have obtained the entry tickets.
An important rule to maintain is that if you visit the amusement lagoon, you must have the basic capabilities of swimming.
All the sales that are made with credit card purchases must be carried with valid ID.
If you have children going with you at the Amusement lagoon, make sure they are 6 years old and above.
Things To Take With You:
While the adventure lagoon Anaheim can have been ruling hearts with its crazy features and unique adventure activities, there are certain things that visitors can carry for the best experience.
Here’s what you must take with you if you are planning a trip to this adventurous waterpark!
Identification,
Bathing Suit,
Beach Towel,
Hat, shirt, towels,
Sunscreen, and
Cash or Debit/Credit Cards.
Visiting The Adventure Lagoon Waterpark In Anaheim: Tourist Reviews!
Image Source: blogger.googleusercontent.com
Exploring The Adventure Lagoon Waterpark in Anaheim can be a crazy experience. Still, at the same time, it’s always best to check some user reviews before you can visit the location.
Review By Melissa Hunter: 4/5 Stars
“All my kids had THE BEST time! The obstacles are so much fun and lots to do. However, the extra $10 an hr is a bit much. I think you should pay admission and have access to it all day. Rules are not enforced…people brought food in their backpacks, and no one checked, so I’ll be bringing food next time. The water is a little Murky but not disgusting, in my opinion.”
Review By Mary Flow: 5/5 Stars
“I would definitely recommend this place. Super kid friendly. I love that they have a little Play water area for the toddlers. Workers are kind. Alejandra was really help anything. She was there to assist. Also, the party planner, Jennifer, coordinates our event for our son. She was kind and sweet as well as helpful, happy, and pleased. Everything was set up super nice spacious and clean.”
Review By Nikita Wheaton: 1/4 Stars
“Where do I start? Went here today for my nephews birthday and it was ok. Staff was nice, no issues there. The issues was they have all these rules online but when you go inside the rules are not enforced whatsoever. They said No outside food but people did. They have food trucks about 3 of them and it’s pricey. It’s like 90 degree weather and the food truck serves warm drinks. The obstacle course was fun but it’s very dangerous that’s why they have you sign waivers.”
Review By Kristen Bromley: 3/5 Stars
“The actual obstacle course is very fun.. it'll leave you with bruises.. but the water has little chunks of green stuff floating in it from the algae. Know that when you pay for the "basic part," you only get access to two little plastic baby slides and two volleyball courts. The bucket did not work when we went. Nothing else is included. Everything else is something you have to rent. The food truck is pricey but yummy.”
Review By Mark Allen: 3/5 Stars
“Lots of rules on the website but very relaxed on enforcement while we were there. When asked staff questions about the facility's amenities. We received answers of, "I don't know." But you do work here, right?? So we did make the best out of it, and the ten kids we brought enjoyed it.”
Our Verdict: You Can Add The Adventure Lagoon Waterpark To Your Bucketlist
If you are already googling ‘adventure lagoon anaheim address,’ then you are absolutely doing the right thing! This place has a fairly good rating, and moreover, visitors have mostly good things to say about this place! So what are you waiting for? Plan your weekend today and check out this water park as soon as possible.
Meanwhile, don’t forget to let us know your thoughts about this waterpark and your experiences related to the same in the comments below.
Raed Also:
What Are The Unique Things To Do In Santo Domingo, Dominican Republic?
Unique Things To Do In Tuscany: What Is A Must-See In Tuscany?
The BEST Things To Do In Indiana Dunes National Park In 2025!
A trip to an Idaho Ski Resort is always a fun, luxurious, and unforgettable experience. Some people like camping, some people enjoy relaxing on the beach, but there are others that just can’t get enough of the frigid winter chill and love hitting the slopes.
When people think of Ski Resorts, their minds typically wander to states such as Colorado, California, or Utah, but there is another state that deserves to be on that short-list: Idaho.
Idaho and its ski-resorts have much more to offer than you might think.
Idaho shares a border with Canada and stretches all the way south past Washington and Oregon. This leaves Idaho with a large variety of terrain, mountains, and landscapes. There are tens of thousands of acres of forest with a massive amount of national forest. Idaho is actually in the top 3 in the country for acres of national forest. If you couple these forests with the mountain ranges that span nearly the entire state, Idaho really seems like an ideal place to be.
When it comes to snowfall, you won’t be disappointed there. You can expect several hundred inches of snowfall in the upper mountains. Perfect if you enjoy dropping into puffy piles or carving through the snowy powder with skis.
Mountains with large drops? Done.
Windy trails for skiing? Has it.
What more could you ask?
So, Idaho has plenty of territories fit for skiing, snowboarding, and other wintery activities, but what about the Ski Resorts?
From North to South, Idaho has ski resorts in nearly every major area. There are around 16 Ski Resorts located in Idaho, 4 of which are especially notable.
Tamarack:
Tamarack is Idaho’s top Ski Resort and it is also the closest one to Boise. It offers affordable lift rides, a variety of dining options, and places to stay for nearly any budget.
When it comes to the mountain, Tamarack doesn’t disappoint. The mountain sports a near 2800’ vertical drop, nearly 300 inches of annual snowfall, and 50 named runs with decent lift access.
Silver Mountain:
Located all the way up in Kellogg, Silver Mountain is a great option if you want more than the typical winter experience.
While not as accessible as the others, it is still not a resort to skip out on. Silver Mountain has plenty of runs (73 to be exact), great lift access, 1600 acres of skiable land, and, surprisingly, an indoor water park.
When it comes to vertical drops and snowfall, you can still be satisfied here. Silver Mountain boasts a near 2200’ drop and around 300 inches of snowfall. It’s not as high as the others, but don’t let that stop you from enjoying what it has to offer.
One additional detail to keep in mind: Silver Mountain is relatively close to Spokane, Washington. This makes the Spokane International Airport an option for landing.
Schweitzer:
Located in Northern Idaho, even further than Kellogg, Schweitzer mountain resort offers a 2400’ vertical drop with 300 inches of snowfall. It sports a massive 92 named runs with 10 separate lifts to ensure you can get around the mountain.
Prices are affordable and there are many lodging options. There are wide-open slopes and trails through the trees. Schweitzer has something for everyone.
Sun Valley:
Sun Valley is the largest and most popular Ski Resort Idaho has to offer. Its location is more centralized in the state and it has a variety of activities available.
Its location is close enough to the Friedman Memorial Airport to make the drive to the actual resort less than 30 minutes. This makes it one of the easiest resorts to access.
In addition to that, it also has the largest variety of activities. More than skiing and snowboarding, it has shopping, dining, and even golfing to offer.
The mountain is also very impressive. It has the largest vertical drop at a staggering 3400’. This is the only resort with a drop over 3000’ (Tamarack at 2800’ is the closest match) and 220 inches of average snowfall. It also has the largest number of named runs and the largest number of lifts. There are 121 runs with 18 lifts to accompany them.
If you’re looking for the best all-around experience, this is absolutely one to consider.
How do I choose which Ski Resort to go to?
There is a large amount of information in regards to the different ski resorts. If it’s your first time, a lot of it may not make a lot of sense. To help understand, there are only a few factors that really matter. Ignoring the total cost of the trip, you should look at the vertical drop with snowfall, the number of named runs and lifts, and also its location relative to airports/major towns.
Using these metrics, you can narrow down which Ski Resort would be best for you. If you look at the numbers, you can generally assume bigger is better. More named runs and lifts usually mean the resort is more developed and easier to traverse. Looking at the vertical drop can be a decent way to gauge the difficulty range. And, of course, the time it takes to travel to the resort itself is important as you’ll need to plan travel accordingly.
It’s unfortunate that Idaho isn’t higher on people’s lists of Ski Resort states. From relaxed rides to big vertical drops, Idaho has everything you could want. Deep powder, amazing views, and a growing number of resorts are just a few of the many reasons Idaho is gaining popularity in the snow sports community.
Frequently Asked Questions (FAQs)
How many ski resorts are there in Idaho?
Idaho has 18 ski resorts with their own personality and unique ways. You will experience different things in each of them. They are very creative while having their plans made.
what is the largest ski resort in Idaho?
Schweitzer Mountain resort.
There are over 2,900 skiable acres. You don’t have to share your space with other skiers.
Is snowboarding allowed in Sun valley?
Yes, you can, with all ability levels. For beginners, it is quite a lace as it allows them to explore the mountains. Other resorts just aloes the beginners to explore the base area.
How cold does Sun Valley get?
In summer the Sun Valley is mostly warm, dry, and clear. In winter it gets freezing, cloudy, and snowy. The course of the year has the temperature typically varies from 10 degrees to 81 degrees.
Read Also:
The Last Ski-Only Resorts In The USA: Why Do They Still Exist?
Top Ten Southern Africa Off-The-Beaten-Path Adventures
A Traveler’s Guide To Lutsen
Trekking Kilimanjaro & Salkantay