


 Related
20 Of The Best Places To Travel In Africa In 2024
BY Ankita Nov 13, 2023
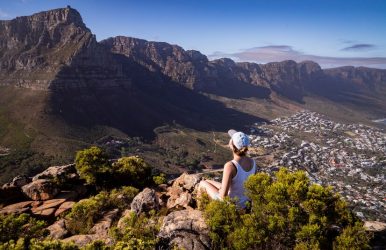
If you’re here, then it’s settled, you’re a travel enthusiast. But what about Travel to Africa? Are you eager to explore the world’s richest continent, or are you looking to return for more unforgettable experiences? Here’s a rundown of 20 of the best places to travel in Africa in 2024, based on data from the web— with their history and peculiarity, and wonderful activities that people generally do there. These are just a few of Africa’s top tourist locations, for your bucket list! 1. Serengeti National Park, Tanzania Location: Arusha Region, Tanzania The Serengeti National Park is one of the most well-known and iconic wildlife sanctuaries in the world. It is the most coveted of Tanzania’s top National Parks. It is home to the annual Great Migration, one of the largest natural events on Earth, where millions of wildebeest, zebra, and gazelle travel across the Serengeti plains in search of new grazing land. Unique and incredible things to do here: Go on a safari to see the Serengeti's incredible wildlife, including lions, elephants, giraffes, cheetahs, and rhinos. Visit the Ngorongoro Crater, the world’s largest caldera, which is home to a variety of wildlife. They include black rhinos, lions, and elephants. Take a ride on a hot air balloon over the Serengeti plains for a bird’s-eye view of the Great Migration. Interesting Facts & Figures Over 500,000 people visit the Serengeti National Park each year. It is the most popular tourist destination in Tanzania. The Serengeti National Park is a UNESCO World Heritage Site. 2. Victoria Falls, Zambia/Zimbabwe Location: Mosi-oa-Tunya National Park, Zambia and Zambezi National Park, Zimbabwe Victoria Falls is the largest waterfall in the world by the volume of water flowing over it. It is a UNESCO World Heritage Site and one of the most popular tourist destinations in Africa. Unique and incredible things to do here: Take a helicopter or microlight flight over Victoria Falls for a stunning aerial view. Go white water rafting or kayaking on the Zambezi River below Victoria Falls. Take a sunset cruise on the Zambezi River and watch the sunset over Victoria Falls. White water rafting Kayaking Nature walks Interesting Facts & Figures Over 1 million people visit Victoria Falls each year. It is the most popular tourist destination in Zambia and Zimbabwe. Victoria Falls is one of the Seven Natural Wonders of the World. 3. Cape Town, South Africa Location: Western Cape, South Africa Cape Town is one of the most beautiful and vibrant cities in Africa. Tourists get the unique opportunity to explore iconic landmarks such as Table Mountain, Robben Island, and Victoria & Alfred Waterfront. It is also an amazing idea for people with a business mind. Yes! You can also launch a business in Cape Town with some key considerations. Unique and incredible things to do: Take a cable car to the top of Table Mountain for stunning views of Cape Town and its surroundings. Visit Robben Island, where Nelson Mandela was imprisoned for 18 years, and learn about the history of South Africa's fight for democracy. Take a walk along Victoria & Alfred Waterfront, a popular tourist destination with shops, restaurants, and entertainment venues. Real tourist statistics: Over 4 million people visit Cape Town each year. It is the second most popular tourist destination in South Africa, after Kruger National Park. Cape Town is one of the most popular tourist destinations in Africa. 4. Pyramids Of Giza, Egypt Location: Giza, near Cairo, Egypt History: Built over 4,500 years ago, the pyramids are a testament to ancient Egyptian civilization. The Great Pyramid is one of the Seven Wonders of the Ancient World. In 2021, Giza welcomed over 14 million tourists (Egyptian Ministry of Tourism and Antiquities). Must-Visit: Explore the Sphinx and Valley Temple. Take a camel ride around the pyramids. Kruger National Park, South Africa Location: Limpopo and Mpumalanga provinces, South Africa. Kruger National Park is one of the largest and most popular game reserves in Africa. Established in 1898, it is one of Africa's oldest and largest game reserves. For Safari enthusiasts, the Kruger National Park is also one of the most popular safari destinations in the world. Over 2 million people visit Kruger National Park each year. You’ll meet an incredibly wide variety of wildlife, including lions, elephants, rhinos, leopards, and buffalo. Unique and incredible things to do here: Go on a safari to see Kruger’s incredible wildlife. Visit the Blyde River Canyon, the third-largest canyon in the world. Take a ride on the hot air balloon over the Kruger National Park and look at the stunning and breathtaking landscape from the top. 6. Zanzibar Archipelago, Tanzania Location: Off the coast of Tanzania The Zanzibar Archipelago is a group of islands off the coast of Tanzania. Known for its spice trade, Zanzibar has a rich blend of African, Arab, and European influences. Zanzibar is a popular tourist destination known for its beautiful beaches, turquoise waters, and rich culture. If you’re a scuba diver looking for greater experiences, by all means, visit Zanzibar. Unique and incredible things to do here: Go Scuba diving in Zanzibar and her sister Islands like the Pemba Island. The region happens to be one of the most popular scuba diving destinations in Africa. Relax on Zanzibar's beautiful beaches and swim in the crystal-clear waters. Visit Stone Town, the historic center of Zanzibar City, a UNESCO World Heritage Site. Take a spice tour around Zanzibar’s colossal spice farms. Learn about some of the world’s most used spices and take special cooking lessons directly on the farms to discover the best of East African food. Interesting Facts & Figures about Zanzibar It is the second most popular tourist destination in Tanzania, after the Serengeti National Park. Zanzibar is one of the most popular beach destinations in Africa. Over 500,000 people visit Zanzibar each year. 7. Chobe National Park, Botswana Location: Chobe District, Botswana Chobe National Park is one of the largest national parks in Africa and is known for its large elephant population. It is also home to a variety of other wildlife, including lions, hippos, crocodiles, and antelope. Unique and incredible things to do: Take a boat cruise on the Chobe River and see elephants swimming and bathing. Go on a game drive and see Chobe's incredible wildlife up close. Visit the Savuti Marsh, a unique ecosystem that hosts a lot of wildlife. Interesting Facts & Figures Over 490,000 people visit Chobe National Park each year. It is the second most popular tourist destination in Botswana, after the Okavango Delta. Chobe National Park is a popular safari destination for tourists from all over the world. 8. Okavango Delta, Botswana Location: Okavango Delta, Botswana The Okavango Delta is a unique wetland ecosystem in Botswana. It is fed by the Okavango River, which flows from Angola into the Kalahari Desert. The Okavango Delta is a piece of hot cake, famous for its variegated wildlife, including elephants, lions, hippos, crocodiles, and antelope. Unique and incredible things to do here: Take a mokoro boat ride through the Okavango Delta and see wildlife up close. Visit the Moremi Game Reserve, a protected area within the Okavango Delta. Go on a helicopter safari and see the Okavango Delta from above. Nature walks Go camping on the 60 or so camps and lodges in the Okavango Delta. Ensure you pick the right tour guide for camping. Here are skills to look for in your tour guide. Interesting Facts & Figures Over 100,000 people visit the Okavango Delta each year. It is the most popular tourist destination in Botswana. The Okavango Delta is a UNESCO World Heritage Site and is considered one of the most beautiful places in Africa. 9. Tsingy De Bemaraha National Park, Madagascar Location: Menabe Region, Madagascar People say Madagascar is the 8th continent, not for its Geographic isolation from Africa, but for its uniqueness– being home to some of the rarest animal species in the world. If you’re curious about wildlife in the universe, by all means, visit Madagascar. The Tsingy de Bemaraha National Park is a UNESCO World Heritage Site known for its limestone karst formations. The stingy are sharp limestone pinnacles that can reach up to 40 meters in height. The Tsingy de Bemaraha National Park is a territory for a multitude of wildlife, including lemurs, chameleons, and birds. Must-do tourist activities here: Hike through the Tsingy de Bemaraha National Park and see the incredible limestone karst formations up close. Visit the Tsingy de Bemaraha Special Reserve, a protected area within the national park. Go on a boat cruise on the Tsiribihina River and see wildlife from the water. Interesting Facts & Figures Over 87,000 tourists visit Madagascar and the Tsingy de Bemaraha National Park each year. It is the most popular tourist destination in Madagascar. 10. Ngorongoro Crater, Tanzania Location: Ngorongoro District, Tanzania The Ngorongoro Crater is a UNESCO World Heritage Site and is the world's largest intact caldera. The crater is home to a variety of wildlife, including lions, elephants, rhinos, leopards, and buffalo. Unique and incredible things to do: Go on a game drive through the Ngorongoro Crater and see wildlife up close. Visit the Olduvai Gorge, a UNESCO World Heritage Site where early human fossils have been found. Take a hot air balloon ride over the Ngorongoro Crater for a top view of the entire wildlife. Interesting Facts & Figures Over 600,00 people visit the Ngorongoro Crater each year. It is a popular tourist destination for tourists from all over the world. There goes your top 10 must-visit places in Africa this coming 2024! Add these to your bucket list. Here are some more amazing places to visit in Africa in 2024, with relevant images: 11. Masai Mara National Reserve, Kenya The Masai Mara National Reserve is one of the most popular safari destinations in the world. It is a heaven for lovers of wild beasts and the Great Migration, an endless, majestic voyage of wild beasts —which cuts across Tanzania and Kenya. On your safari tours, you’ll come close to incredible animals like lions, elephants, giraffes, zebras, and leopards. The annual wildebeest migration takes place between July and October. Must-do tourist activities here in Kenya: Go on a game drive through the Masai Mara National Reserve and see wildlife up close. Visit the Mara Triangle, a protected area within the national reserve. Go on a ride on a hot air balloon over the Masai Mara National Reserve for a bird’s-eye view of the wildlife. 12. Lake Malawi National Park, Malawi Lake Malawi is the third-largest lake in Africa and one of the deepest lakes in the world. It is also a UNESCO World Heritage Site, and UNESCO describes the National Park as an area decked with nature’s beauty and bounty and also with the rugged landscapes around it. It indeed forms a contrast with the clear waters of the lake. Lake Malawi is a popular swimming, snorkeling, diving, and fishing destination. Speaking of fishing, the area hosts hundreds of varieties of cichlid fish. Not only this, nearly all the fishes are endemic to that of the Lake Malawi. Remember to practice sustainable fishing! Must-do Tourist Activities on Lake Malawi National Park: Visit the Likoma Island, a beautiful island in Lake Malawi. Go snorkeling or scuba diving in the clear waters of Lake Malawi and see a variety of marine life. Take a boat trip on Lake Malawi and enjoy the stunning scenery. 13. Rainbow Mountains, Morocco The Rainbow Mountains are a unique geological formation in Morocco. The mountains are made up of a variety of colorful rocks, which give them their name. The Rainbow Mountains are a popular tourist destination for photographers and hikers. Must-do tourist activities here: Hike through the Rainbow Mountains and see the incredible colors of the rocks up close. Take a photo of the Rainbow Mountains at sunset or sunrise to capture their magical colors. Visit the nearby Berber villages and learn about the local culture. 14. Dogon Country, Mali The Dogon Country is a region in Mali that is known for its unique culture and architecture. People here are known for their cliffside villages and their traditional masks. The Dogon Country is a popular tourist destination for people interested in learning about African culture. Incredible things to do here: Visit the cliffside villages of the Dogon people and see their unique architecture. Learn about the Dogon people's culture and traditions. See the Dogon people's traditional masks. If you’re planning for International Travel in 2024, here are 9 great tips for a more authentic travel experience. 15. Simien Mountains National Park, Ethiopia The Simien Mountains National Park is a UNESCO World Heritage Site and is known for its stunning scenery and its population of gelada baboons. The Simien Mountains are also home to a variety of other wildlife, including mountain nyala, Walia ibex, and Ethiopian wolves. Unique and incredible things to do: Hike through the Simien Mountains and see the incredible scenery, including the Ras Dashen mountain, the highest peak in Ethiopia. Visit the gelada baboon population and see these fascinating creatures up close. Take a photo of the Simien Mountains at sunset or sunrise to capture their magical beauty. 16. Dahab, Egypt Location: Sinai Peninsula, Egypt. Originally a Bedouin fishing village, now a popular diving destination. Dahab attracted over 1 million visitors in 2021 (Egyptian Ministry of Tourism and Antiquities). Dahab is peculiar for The Blue Hole, a renowned diving site that attracts thousands of scuba divers around the world. Things you just can’t miss: Dive or snorkel in the Blue Hole. Explore the Desert of Sinai on a camel safari. 17. Etosha National Park, Namibia Etosha National Park is a large national park in Namibia, reputed for its salt pan, which is one of the largest in the world. The park has now become the top tourist attraction of Namibia with more than 140 000 visitors recorded annually. Beyond the salt pan, Tourists visit Etosha National Park to experience a diversity of wildlife, including lions, elephants, rhinos, and giraffes. Unique and incredible things to do: Visit the Etosha salt pan and see the animals that come to drink from the waterholes. Go on a game drive through the Etosha National Park and see wildlife up close. Visit the Okaukuejo waterhole and see the animals that come to drink at night. 18. Addo Elephant National Park, South Africa Addo Elephant National Park is one of South Africa’s proud National Parks, reputed for hosting arguably the largest population of elephants in the world. If you’re a fan of these giant creatures, you should be visiting South Africa’s Addo Elephant National Park in 2024. About 120,000 people check out this park every year. The park is also home to a variety of other impressive wildlife, including lions, rhinos, and buffalo. Things you can’t miss here: Go on a game drive through the Addo Elephant National Park and see elephants up close. Visit the Shamwari Game Reserve, a private game reserve within the Addo Elephant National Park. Take a helicopter safari over the Addo Elephant National Park and see the wildlife from above. 19. Bwindi Impenetrable National Park, Uganda Location: Southwestern Uganda, at the junction of the plain and mountain forests. Just realized we haven’t talked about Gorillas so far. Thankfully, there’s the Bwindi National Park, which is popular for the 400 Bwindi Gorillas and Mountain Gorillas. The Bwindi Impenetrable National Park is known for its exceptional biodiversity, with more than 160 species of trees and over 100 species of ferns 1. It is also home to many types of birds and butterflies. Impenetrable National Park is a UNESCO World Heritage Site and is home to the largest population of mountain gorillas in the world. Stuff you can’t miss here: Go on a gorilla trekking tour and see mountain gorillas up close. Visit the Mubwindi Swamp, a unique ecosystem within the national park. Take a hike through the Bwindi Impenetrable National Park and enjoy the stunning scenery. 20. Kilimanjaro, Tanzania Location: Kilimanjaro Region, Tanzania We’re ending the list with a place that’s known as Africa’s roof – The Kilimanjaro. A dormant volcano, Kilimanjaro is Africa's highest peak, a place that attracts around 50,000 climbers/hikers each year. As you hike the largest free-standing mountain in the world (20,000 ft), you’ll experience multiple climatic zones, from tropical rainforest to arctic ice cap. Visiting Kilimanjaro is different from hiking other mountains in the world, such as the Seven Magic Mountains in Vegas, because almost all the variants of the ecological system are traced on the mountain. Not only this, they are also traced to the rain forest, heath, moorland, alpine desert, cultivable lands, and an arctic summit. Did you know? Nearly every climber who has summitted Uhuru Peak has recorded his or her thoughts about the accomplishment in a book stored in a wooden box at the top. Activities you can’t miss here: Trek to the summit for a sunrise view. Explore the diverse flora and fauna along the trails. Need help planning your trip to Africa? Check out our Top planning tips for your next trip abroad. Read Also: Maldives’ Luminescent Secret: The Mesmerizing Sea Of Stars! The Stairway To Heaven Hawaii: Hiking Adventure’s Hidden Gem Walking On Sunshine: Exploring The Magic Of Vietnam’s Golden Hand Bridge!