


 Related
Sorting Out Christmas Vacation: 11 Best Places To Visit On Christmas This Year!
BY Abdul Aziz Dec 8, 2023
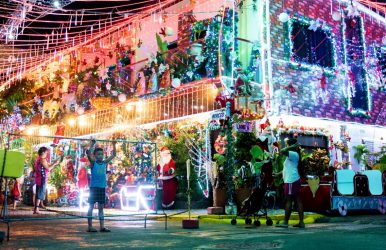
Do you have any Christmas vacation plans for this year? This article will assist you in locating the world’s top places to visit on Christmas if you are unsure of where to celebrate. We will transport you on a fantastical voyage to some of the most captivating places to visit on Christmas so you can truly feel the spirit of the festival. These places offer a distinctive and remarkable way to enjoy this joyous season, from colorful festivals and customs to snow-covered landscapes. Here are the world’s best places to spend your Christmas vacation. These are the top tropical getaways for Christmas this year for an unforgettable holiday getaway! Places To Visit On Christmas | Top Destinations For A Christmas Vacation Getaway Christmas is the time to bond with your family and loved ones. A Christmas vacation further gives you the opportunity to strengthen your bond with your family, kids, partner, and parents. So, if you want to spend quality time with your people and travel to the most desired destination, this guide is perfect for you. Image Source: cloudfront-us-east-2.images.arcpublishing.com Here are the top destinations you cannot miss: Mexico Philippines Australia Jamaica Puerto Rico Thailand Brazil Malaysia Vietnam Cuba Mexico Image Source: saltandwind.com This country welcomes tourists throughout the year. But when they celebrate, which is often, anyone is welcome to join in. The celebration of Christmas begins on December 12 with a festival called Las Posadas. On January 6, the holidays come to an end in honor of Joseph and Mary's trip from Nazareth to Bethlehem. Christmas Eve, Nochebuena, is a much bigger day than Christmas Day when processions through the streets are held in observance of Las Posadas. On Nochebuena, they celebrate with a formal dinner and fireworks before heading to mass. Mexico offers fantastic tropical beaches where you can sip on a cocktail during the holiday season. You can surround yourself with soft, white sand, the Caribbean Sea, and palm trees. In Mexico, time seems to stop for a split second as you get a very distinct Christmas vibe. And when it comes to pietas, cocktails, and festive food, Mexicans are the best. Philippines Image source: cloudfront-us-east-2.images.arcpublishing.com Christmas is celebrated for three months in the Philippines! They can be proud that their Christmas celebrations are among the longest in the world. All things considered, the Philippines is a beautiful country, but San Fernando, Pampanga, has the most beautiful lantern festival. The colorful lanterns that line the festival's streets were all handmade by the locals. During the parade, music and dancing fill the streets. Another suggestion to become the culinary center of the Philippines is San Fernando. Though it's not your usual Christmas meal, things could be worse. For beach lovers, Boracay is the place to go. It is known for having the most beautiful beaches in the Philippines. Travelers staying in Philippine hostels are also very busy during this time as they plan a special celebration among themselves. If you want something a little closer to home, Vigan is a great place to go. Vigan still has cobblestone streets from the Spanish era. Australia Image Source: cf.ltkcdn.net Therefore, you can be certain that you won't have a white Christmas. But one of the highlights of many backpackers' lives is celebrating it in Australia. It qualifies as a bucket list item, in a way. It would be possible to spend Christmas Day snorkeling in the Great Barrier Reef, followed by an all-day party on Boxing Day, and then take a road trip across Queensland. This year, the Christmas season falls during the summer. Australia follows the holiday traditions of most Western cultures in a way. December 25 is still the day for Christmas Day, Christmas Eve, Boxing Day, New Year's Day, and so forth. But it's not gloomy, dark, or cold. Everyone is having a good time with the holiday spirit and summertime. One enjoys cold beer by the seaside. Barbecues light up all over the country, sometimes along with shrimp. Everywhere you look, there are gatherings in progress. Jamaica Image Source: www.beaches.com The island of Jamaica is located in the Caribbean Sea. This is the first image you should visualize. It offers a lot to families, couples, and solo travelers in the winter months. Whether you are on a holiday or not, Jamaica is always one of the greatest Caribbean destinations. They celebrate Christmas considerably earlier in Jamaica than it is in the majority of other countries. Though music strongly influences Jamaican culture, Christmas carols play as early as October. You could listen to the holiday songs all year long because they are so great. They decorate with lights, decorations, and holiday touches all around! One of the traditional ornaments used in Jamaica is bright red poinsettias. Even the taxis in Jamaica are decorated for the holidays. Puerto Rico Image source: cdn.destguides.co Puerto Rico offers island life and is the perfect all-around destination for a tropical Christmas. Families, lone travelers, and even couples will find it ideal. People usually assemble at the plaza to partake in lively living, music, dancing, and delicious food, and festive drinks. The classic holiday dish is pig roast, which isn't very vegetarian-friendly, but then again, neither is turkey, right? If you choose to spend Christmas in Puerto Rico, don't miss the San Sebastian festival in Old San Juan. Over the four days, a large number of vendors will be selling food and drinks. There are also a lot of artists and musicians. Thailand Image Source: static.vecteezy.com Thailand is predominantly a Buddhist country, so Christmas is not a public holiday. To locate Christmas celebrations, make friends with expats and other travelers. For single vacationers looking for some company, this is ideal. It's easy to find travel companions in Thailand. Traditional Christmas roast options are available at many hotels and restaurants. Better yet, try dining somewhere new and local. Christmas is not a holiday, so things continue as normal. If you choose to spend Christmas vacation in Thailand, you can be sure of fantastic weather. December is Thailand's peak season. It is usually dry and can reach temperatures above thirty degrees Celsius. Brazil Image Source: traveltomorrow.com Brazil is an unforgettable destination for a tropical Christmas getaway. With a big dash of spice and lime, Christmas comes with warm, sunny weather throughout December. Brazil celebrates Christmas as a religious holiday, which is marked by enjoying local food and drinks and quality time with loved ones. Since it is a Catholic country, a lot of people go to the Missa do Galo, or midnight mass on Christmas Eve. Brazil is decked out for the holidays with lights and Christmas trees, and fireworks are lit every night. Brazilian carols abound, nativity scenes are on display, and Santa Claus—known as Papai Noel in Brazil—is occupied with giving the kids presents. Malaysia Image Source: ik.imagekit.io Even though Muslims make up the majority of the population, Malaysia observes Christmas as a public holiday. It is a rather unique interpretation of Christmas and the ideal beach vacation. If you want to get the most out of your tropical Christmas vacation, you should go to Malaysia's stunning white-sand beaches. Take up water sports like snorkeling and scuba diving, or simply cool off by jumping into the glistening clear water. Plenty of family-friendly activities and roomy accommodations are available on the island. Have fun island hopping and discover what's going on on the other islands. There is live entertainment and delicious food. Take some time to embark on strenuous jungle treks so you can explore the rainforest and see waterfalls. Vietnam Image Source: static.vinwonders.com Vietnam is a Buddhist country. Thus, Christmas is not a national holiday there. Despite this, Vietnamese people celebrate Christmas with a variety of festivals and gatherings. Nevertheless, Vietnamese people value Christmas Eve celebrations more than Christmas Day celebrations. The massive statues of Jesus, Mary, and Joseph in the nativity scenes demonstrate how strongly French culture has impacted Christmas customs. For a taste of vibrant Vietnamese culture, head to Hanoi's Old Quarter, which is brimming with street food vendors, charming coffee shops, and clothing stalls. After placing your order, you can people-watch from the sidewalk. Cuba Image Source: images.myguide-cdn.com Cuba celebrates Christmas in a less festive manner than other nations. Christmas was outlawed in Cuba from 1969 until 1998, so the people there became accustomed to not celebrating it. Their past has been quite challenging. If you are looking for a place to spend your Christmas vacation that isn't overly commercialized, look no further. Christmas trees and decorations may still be found in hotels built with tourists in mind, but you won't see them as much when you are out and about. Have fun on your Caribbean Sea voyage. Havana will undoubtedly be on your itinerary when visiting Cuba. Salsa music and culture are widely accessible. Get a real mojito from the place where it originated. Bruges, Belgium During Christmas and winter holidays, Bruges in Belgium exudes the quintessential charm of a medieval town. It is also one of the best places to visit on Christmas for dark academia fans, as its cobblestone streets and the cafes serving the best Belgian chocolate coffee have an unmatched allure. Moreover, when you choose Bruges as one of the best places to visit on Christmas this year, you can follow the Winter Glow light trail. The trail will take you to at least 10 of the city’s iconic historical destinations. Moreover, if you have the budget, you can find your accommodation at the Grand Hotel Casselbergh near the market. It has the vibe of a 16th-century cellar, and rooms look quaint with exposed wooden beams. You can even warm yourself up by the fireplace. Wrapping Up So, where will you be going for your Christmas vacation? When organizing your next trip, don't forget to take into account the top Christmas celebration locations around the globe, as listed above. Take advantage of these incredible worldwide holidays and experience the celebration like never before. By putting together your preferences, you can also have your itinerary customized. Read Also: Zanzibar Is Luring Tourists With A 30Kg Christmas Cake Scarborough Secrets: Your Ultimate Guide To Coastal Charms 5 Top Christmas Gift Ideas For The Guy Who Loves The Outdoors