A DIY Jaffna Food Tour: A Culinary Guide To Sri Lanka’s North
BY
Sibashree
Jan 5, 2026
For me, the Jaffna food tour was like walking into the locals' way of life. If the Jaffna temples show how the city is sincere about its culture, the food, and the art of having it, they show how rooted the entire Tamil community in Jaffna is.
How they mix the rice and curry with their right hands and consume the food is an art you will love, and it is the way to truly appreciate the flavor profile.
Furthermore, Jaffna has maintained its spicy soul in food despite years of colonization by European forces and civil wars. The Tamil cuisine here is not similar to the coconut-milk-rich curries you find in South India. Also, they use roasted spice powder instead of raw ones.
From the first bite, my taste buds knew it, and the no-frills service at restaurants made me feel comfortable and concentrate only on the steaming hot food.
So, do you want to try these authentic Jaffna dishes and experience how this Northern Sri Lankan city preserves an authentic Tamil culture? Read my complete Jaffna Sri Lanka Travel Guide, where I talk about an inclusive and hospitable city.
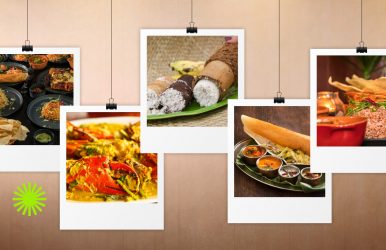
Jaffna Food Tour For Breakfast: What To Eat And Where To Eat?
The streets of Jaffna smell of freshly made Indiappa, steamed rice noodle nests, and Puttu, a steamed cylinder of rice flour and coconut. The acidic and mildly sweet taste of these dishes goes well with spicy black chickpea curries, Pol Sambol, and Onion Sambol.
You can also definitely have Pol Roti or coconut Roti and Dosas for breakfast. Here are the places that you can visit for breakfast in Jaffna.
1. Malayan Café: The Old World Charm
View this post on Instagram A post shared by りかරිකා (@rk_itooo)
The Malayan Cafe at C Ponnampalam Road is the best place to have Indiappa in Jaffna. It tastes great with Pol Sambol and Sothi or coconut milk gravy.
This eatery has marble tables and old photos on display. So, it almost feels like time travel. It remains open from 7:30 AM to 9 PM, and on Saturdays, it opens at 8:30 AM.
They served me food on banana leaves and in steel utensils. Also, remember that they only accept cash. You must make a visit to the Malayan Cafe a part of your Jaffna travel itinerary.
2. The Red Rice Puttu Experience
I tried the red rice puttu at a small local eatery. These eateries are called Saapadu Kades in the local language. I was blown away by the earthy and subtly sweet taste of the puttu.
The spicy chickpea curry perfectly complemented it. I also tried some Babat (Tripe) curry and fish kool.
The Lunch Stops And Specials
The food of Jaffna and Northern Sri Lanka has become so popular that Peter Kuruvita now conducts a food tour of the region. A tour of the Jaffna Market and attending the local cultural dance here is a prominent part of his food tour itinerary.
However, this tour offered by the Australian Chef is expensive, and you will have to spend between AUD 1885 and 6720 to be a part of the tour.
As a budget traveler, you can see much more and experience the food scene here better by walking around the city and talking to the locals.
There is so much authenticity in these DIY tours. Also, one great thing about the lunch staples in Jaffna is the variety. While the crab curry gets all the glory, there is something very comforting about the Sattvik food served here, including rice, different types of curries, and dal.
Let’s find out what to eat and where to eat.
1. Jaffna Crab Curry
Jaffna crab curry is just the way I want to have the crab. It needs to be spicy and hot without adulterating the authentic taste of a crab. I had the crab curry at Cosy Hotel & Restaurant on Stanley Road.
However, let me tell you that Cosy Hotel is expensive, and I did not mind because we were a group of 5, travelers bonded over food, and our local guide. If you are traveling solo, the pocket-pinch will be around USD 20.
You can even try the crab curry at the small eateries in the streets of Jaffna. They don’t “look” impressive, and you may raise eyebrows about the hygiene. Still, they serve piping hot food, and the locals have it. So, they are safe.
2. Vegetarian Thali On A Banana Leaf At Nallur Bhavan
During my temple visit in Jaffna, I found the Nallur Bhavan very close to the Nallur Kovil. They serve Sattvik food on banana leaves and in steel plates.
Most people were having Dosa here. However, I had some Chilli Kothu Parotta, and it was yum.
For a more comforting and filling experience, you can try rice with rasam and different types of sabzi here. The restaurant opens from 7 AM to 10 PM, and you can contact them at +94-212225556.
Evening Snacks And Cool Downs In Jaffna
The evenings in Jaffna are suitable for ice creams and snacks like Vadai. Check out where to find them.
1. Rio Ice Cream
View this post on Instagram A post shared by Rio Ice Cream (@official.rioicecream)
Rio Ice Cream at Point Pedro Road is an iconic institution if you want to try the signature Jaffna-style dessert. The Special Rio Sundae with neon jelly, nuts, and ultra-sweet syrup is out of this world.
It’s great for me or anyone with a sweet tooth, but if you are up for something milder, it may be too sweet to appease your cravings.
The Rathinam Industrial Organisation (RIO) opened its doors in 1970. So, tasting the ice cream here is like cherishing the 55-year-old heritage of a city.
So, what Rio offers is nostalgia and not a gourmet experience.
Don't go to Rio Ice Cream expecting Italian Gelato. It is sugary, gelatinous, and nostalgic. Go for an authentic Jaffna cultural experience of seeing 500 locals enjoying it on a Friday night.
2. Point Pedro Vadai
View this post on Instagram A post shared by JNS Kitchen 🔵 (@jns.kitchen)
This is a deep-fried savory snack that comes in a disc shape. It is a crispier, crunchier, and thinner version of the South Indian Vada you have been eating so far. Also, with each bite of the vadai, you will get a taste of chillies, whole cumin, and curry leaves.
The street carts near the Nallur Temple are the best places to buy these Point Pedro Vadai. Point Pedro has some of the most beautiful beaches in Jaffna. Relish the snack with the pleasant sea breeze.
Dinner In Jaffna
Are you looking for something comforting and hearty for dinner in Jaffna? Let’s gorge on Odiyal Kool and Dosa.
1. Odiyal Kool Or The Seafood Soup
View this post on Instagram A post shared by Kandy Bites by Chef Ceylon (@kandy_bites_)
This is the dish that makes you understand the power of slow cooking in Jaffna, Sri Lanka. It is Jaffna’s take on seafood soup with palmyra root flour, crab, cuttlefish, and prawns as the main ingredients.
Odiyal Kool is not fast food. It is a slow-cooked seafood bisque thickened with Palmyra flour. It takes around 3-4 hours to cook Odiyal Kool. So, if you want to have it for dinner, you must pre-order.
2. Dosa
Jaffna serves many other variations of Dosa, along with the typical Plain Dosa and Masala Dosa we are familiar with. For a richer culinary experience, you can try the Ghee roast Dosa.
Also, you can choose a healthier version with Siri Dhaniya, made with multiple millets. Adai Dosa is a protein-rich variation of Dosa with ingredients such as Urad Dal, Channa Dal, and Toor Daal. It has dried cumin and chillies.
Kondakadalai Dosa is a different take on the Adai Dosa, and here, kondakadalai or white chickpeas are the main ingredients.
Vegan Food Options In Jaffna
Some authentic vegetarian dishes in Jaffna are also vegan. So, if you are a vegan and you want to try the authentic local food, Jaffna will be your paradise.
You can have steamed rice and curry made with long beans, drumsticks, spinach, and dhai. These coconut-milk-based curries are simple and flavorful.
Dosa and Idli are, of course, the Tamil staple any vegan can eat. These are made using rice and lentils. Ponggal, a savory rice dish, and pumpkin and tapioca dishes are the other variations you can try in Jaffna.
Nallur Bhavan and Malayan Cafe are the two reliable places to have vegan food in Jaffna.
Essential Jaffna Food Vocabulary
Want to know about the local names of Jaffna food and their spice levels? Have a look at the table below.
Tamil Name (தமிழ்)English DescriptionSpicy Levelசோறு (Sōru)Steamed RiceNoneகறி (Kari)Spicy Curry with Vegetables/Fish/Chicken/Meat/Crabs and Other SeafoodMild to Hotமீன் குழம்பு (Mīn Kuzhambu)A Fish Curry with Spices and TamarindHotநண்டு குழம்பு (Naṇḍu Kuzhambu)Jaffna Crab CurryVery Hotஇறால் கறி (Iṟāl Kari)Prawn CurryMedium to Hotகோழி கறி (Kōḻi Kari)Chicken CurryMedium to Hotஆட்டு கறி (Āṭṭu Kari)Mutton/Goat CurryMedium to Hotஒடியல் கூழ் (Odiyal Kūḻ)Palmyrah Root Flour Rich Seafood SoupMildஒடியல் பிட்டு (Odiyal Pittu)Steamed Palmyrah Flour & Coconut DishNoneபிட்டு (Pittu)Steamed Rice Flour and Coconut DishNoneதோசை (Dōsai)A Crispy Pancake Made with Fermented Rice PasteNone (Can be Customized)இடியாப்பம் (Idiyāppam)String Hoppers or Rice NoodlesNoneசாம்பார் (Sāmbār)A Lentil and Vegetable Curry with Tamarid Pulp. Ideal for Having with Dosa, Idli, or Rice.Mild to Mediumரசம் (Rasam)Tamarind and Pepper Soup to be Had with Rice or Idlis. Mildசம்பல் (Sambal)A Relish Made of Chillies and Fresh CoconutHotதேங்காய் சம்பல் (Thēṅgāy Sambal)Coconut SambalMedium to Hotபால்சம்பல் (Pāl Sambal)Sambal with Coconut MilkMediumவறுவல் (Varuval)Dry-fried Seafood or MeatHotபொரியல் (Poriyal)Stir-fried Vegetables Mildஅப்பம் (Appam)Fermented Rice HoppersNoneவடை (Vadai)Deep-fried Lentil FrittersMild to Medium
A DIY Jaffna Food Tour: Listen To What The Experts Are Saying
Are you planning to have Indiappa or string hopper for lunch or dinner? You may not find them unless you have pre-ordered somewhere. It is a breakfast staple.
So, when you are new to Jaffna, you need to be familiar with the local customs about food and eating.
1. You Cannot Fear The Ghee In Jaffna
Jaffna Dosas, in many restaurants, are served drenched in ghee. The use of ghee or clarified butter makes the dish more flavorful and richer. It also makes the Dosas more filling.
2. The “Bone” Warning
When you are having chicken or mutton curry in Jaffna, you will get pieces chopped with bones in them. The bones release the flavor into the curry, and sucking the marrow out of the bone (for mutton) is the ultimate pleasure the locals relish.
So, you must be mindful while chewing your food.
3. Wash Your Hands Before You Sit
Jaffna can be yout guide for “Eating with Hands 101.” Every hotel or restaurant has a wash basin so that you can wash your hands thoroughly before or after eating your food.
If you are confused about how to eat the mix of rice and daal, follow how the locals are doing it.
4. Jaffna Foods Are Really Spicy
Jaffna foods are hot and spicy. So, if you have a poor stomach, a buttermilk drink (Chanch) or lassi (sweet buttermilk) is going to be your savior. Also, always choose the “mild” option.
In fact, the dishes in Jaffna are way spicier than the ones in Colombo. Foods that are red hot in Colombo are labelled as “medium spicy” in Jaffna.
5. Point Pedro Vadai Lasts Weeks
Point Pedro Vadai are harder and crispier. So, unlike the soft vadai, which becomes inedible in a day, the Point Pedro Vadai lasts more than a week.
So, these are even great for carrying when you are traveling. You can also take these snacks back home as souvenirs.
6. Look For The "Hotel" Sign
Small restaurants in Jaffna or Sri Lanka are often labelled as hotels. These are humble places for having tea, snacks, lunch, or dinner.
Do not expect any lodging facility there unless separately mentioned.
7. Sunday Closure
Jaffna is fairly conservative. Many authentic local spots may close or have limited menus on Sundays or Poya days.
Authority Voices On Jaffna Food: People Who Know It The Best
“Jaffna cuisine is the untamed sibling of Sri Lankan food. The Crab Curry here isn't just a dish; it's a ceremony of spice and sweat.” - Peter Kuruvita (Chef & Author).
“The flavor of the roasted curry powder in Jaffna is unlike anything else in the world. It hits you with an aroma that is deep, smoky, and incredible.” - Mark Wiens (Food Vlogger).
Jaffna Food Tour: Frequently Asked Questions (FAQs)
Here are the frequently asked questions and answers about the Jaffna food tour.
1. What Is The Most Famous Dish In Jaffna? Jaffna crab curry is the most famous dish in Jaffna. It is cooked using murunga or drumstick leaves. Also, the curry is fiery with roasted spices. However, for a more comforting experience, Odiyal Kool or the slow-cooked seafood is a close second for me. While this soup is also quite spicy, the spiciness is balanced with the use of tamarind pulp and jackfruit seeds, tapioca, and long beans, which add flavors and texture to the dish. 2. Is Jaffna Food Suitable For Vegetarians? Yes, due to the strong presence of Hindu Culture, Jaffna has suitable vegetarian and vegan options. You will find Rasam, different types of daal, curries, or Sabzies made with pumpkin, drumsticks, beans, chickpeas, tapioca, and more. Even the basic Idlis and Dosas are vegetarian and vegan-friendly food options. Nallur Bhavan, Mangos Indian, and Vishnu Bhavan are some of the best options for having vegetarian food in Jaffna. 3. Is The Food Spicier Than In The South? Yes, the food in Jaffna and the northern part of Sri Lanka is spicier than the food in the south. So, despite the use of coconut milk or tamarind pulp, your taste buds can have the heat of black pepper and dried chillies. So, what you say is fiery hot in Colombo is actually medium spicy in Jaffna. Also, the heat of the spice and the flavors are so prominent because the spices are first roasted and then turned into a paste before being used in curries. In this context, you must know that Jaffna Market is the ideal place for buying roasted spices and everything that makes Jaffna food stand out. Bring home essentials such as roasted curry powder, dried chillies, and palmyra jaggery. You can even enrich your kitchen by bringing home things like palmyra root flour and some tubar snacks home. 4. Where Can I Drink Alcohol With My Meal? Jaffna has a conservative society, and they are true to their culture. So, you will not find alcohol in the local eating houses. You have to visit hotels like the Valampuri Hotel or specific bars such as Machang Jaffna at Station Road if you want to have alcohol. Remember, alcohol in Jaffna is more expensive than in other parts of Sri Lanka. However, you can talk to the locals and try Arrack or local beer. 5. What Is Odiyal Kool? Odiyal Kool is a seafood soup and a dinner staple in Jaffna. This soup has vegetables, prawns, crabs, and a generous amount of roasted spices. The flavor balance in the soup comes from the use of coconut milk in the gravy. Also, the gravy is made thicker by adding palmyra root flour.Furthermore, this dish is made using a slow cooking method, and at least 3-4 hours are needed to make this dish. 6. Can I Drink The Tap Water? No, you cannot drink the tap water in Jaffna. There are chances of bacterial contamination. Furthermore, groundwater contamination is very common in the Jaffna Peninsula. There can be a massive presence of chemicals due to agricultural and other human activities. In addition, the groundwater of Jaffna has high limestone content. So, when you are in Jaffna, you must only drink packaged or bottled drinking water. 7. What Is The Best Time To Visit Malayan Café? The best time to visit Malayan Café is between 8:00 AM and 10:00 AM. It is the time for the freshest breakfast buzz.Also, having a glass of filter coffee here early in the morning can lead to a great start to your day. 8. How Much Does A Meal Cost In Jaffna? The cost of your meal in Jaffna will depend on the place you are having the food from. For example, if you are having Dosa or Vada from a street food vendor, it will cost around $1-2. Furthermore, if you are having a full crab curry meal at a decent budget-friendly restaurant, the cost will be around $10. 9. What Is "Jaffna Curry Powder"? You can identify Jaffna curry powder from its rich red color and strong aroma. The heat in this spice blend comes from the copious use of roasted red chillies, cloves, and black pepper. The earthy flavors these spice mixes bring come from the following roasted spices. • Turmeric• Black Pepper• Cumin• Coriander• Cardamom• Cinammon• Fennel• Fenugreek• ClovesYou can also add roasted mustard powder and roasted curry leaves paste to make the flavor profile even richer. This spice mix gives the food in Jaffna the signature heat and earthy taste. 10. Do I Need To Tip In Jaffna? If you are having food at small Kades or local street stalls, you can just round up the bill to show your appreciation. DosaHowever, if you are having food at Mangos or any other big restaurant here, a 10% tip is appreciated.


 Related