


 Related
Budget-Friendly Travel Ideas in Australia You Did Not Know About
BY Mashum Feb 26, 2019
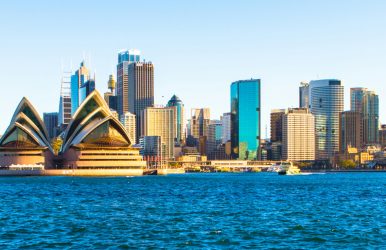
The cost-of-living caps the fantastic landscape and culture that Australia has to offer and explore. For many tourists and Australians, it is much cheaper to travel abroad and explore other countries. However, traveling around Australia is incredible and can cost you minimal amounts if you are aware of the budget-friendly travel ideas in Australia. So, before you plan a trip to Australia, learn the art of sticking to a budget. Budget-Friendly Travel Ideas in Australia The cost of traveling should never be a constraint if you want to explore the beautiful land of Australia. Let’s head straight to the most practical and budget-friendly travel ideas in Australia. 1. Stay In Hostels This tip is more relevant to Australia even though it applies to all parts of the world. Most hotels in Australia are costly, mainly if you are operating on a budget. If you wish to have a less luxurious sleep, you will save a lot of money. 2. Camp You can even try camping if you want to be more adventurous. It will help you save a lot of money. The cheapest way to explore Australia is by getting around and camping at different campsites. There are several free camping spots around Australia, although there will be areas where you will need to pay for your campsite. Even then, the fees may be as little as $5 per person. You will get access to showers and toilets, which aren’t always available on the open road. 3. Prepare Your Meals Even if you decide to eat in a fast-food joint in Australia, it will not give you much change from $10. Besides, you can bring havoc to your body by substituting main meals with fries and burgers. Make sure that you are getting food that will support healthy living. You can achieve this objective by preparing your food. It is much cheaper than relying on ready-made food. Most parks in Australia provide public BBQ facilities free of charge. All you need to do is buy some veggies or meat from the local supermarket and get some grilling. If grilling every day is not your thing, make good use of the available kitchens in the hostels. Use them to prepare your meals. You will realize a significant difference in your bank account. 4. Purchase Your Booze Bottle-O Bottle-O refers to the liquor shop or bottle shop. This store sells alcohol at a lower price than the ordinary bars. You will get affordable liquor deals in this place. Most budget drinkers like to go for the Goon, which is a cheap boxed wine. 5. Use A Private Vehicle to Commute In Australia, you must get around by car if you want to explore the country. You can do it either by purchasing a vehicle temporarily or hiring a car for your travels. However, these two options can be slightly expensive. You can use comparison sites such as Car Rental Buddy or Car Hire Choice to find and compare vehicles. Alternatively, you can opt for campervan hire from Camper Champ. You will not fail to get a cheap deal when it comes to commuting in Australia. 6. Travel On Greyhound Bus Most backpackers like to use this option as their preferred means of transport. It is among the cheapest modes of transportation in Australia. You can get a travel pass for approximately $500. It will allow you to hop off and on as many times as you would like. It is an excellent way to view the fantastic scenery of Australia. The good news is that you will not spend so much on these journeys. 7. Participate In Homestays or Couch Surfing Accommodation in Australia is expensive, even for backpackers. So, if you want to explore Australia cheaply, take advantage of staying at homestays or even Couch-surfing in people’s homes. It will help you get free accommodation in exchange for cultural learning and community interaction. 8. Purchase A Campervan This option is best if you are traveling as a group. It will help you to spit the gas among yourselves. Driving via Australia is exciting, but you can still make your trip more enjoyable. One way is to purchase a campervan in Cairns and then drive down to Melbourne or the other way around. Even though driving is more expensive than flying, you will stop anywhere you wish. Besides, if you have a big campervan, you can still use it for accommodation. 9. Have Fun by Participating in Active Hobbies Australians (particularly in the north) are known for their outdoor lifestyle. Therefore, you can join them and have a lot of fun outdoors. You will not spend lots of money when you pursue your hobby. You can try scuba diving, snorkeling, skiing, bungy jumping, and a lot more, thanks to its vivid landscape and coexistence of various geologies. 10. Spend Most of Your Time with Nature Australia has so much when it comes to natural beauty, and this offers a free experience. You can get into the botanical gardens in Melbourne for free. Also, you will not pay anything to visit the beach. You can also hike via the Royal National Park or Sydney’s Blue Mountains. You will not spend even a single cent when interacting with nature. 11. Hiking There are several scenic walking trails in Australia that you can explore. Do you want to hike along the Australian coastline and admire the beaches? Or do you want to hike up mountains to get a view of the Australian landscape? You will be able to find an abundance of exciting hiking trails for your adventure. You will get excellent hiking opportunities at no cost in Australia. 12. Check out the Galleries and Museums Unlike the rest of the world, the galleries and museums of Australia are free to get in. Therefore, if you are tired of the outdoor experience and want to get a feel for the culture, museums are your best bet. The best place to start is the National Gallery of Victoria. You can also try out the Art Gallery of New South Wales. Both locations will give you fantastic opportunities to tour Australia at budget-friendly rates. 13. Cycling In some cities, there are cycling initiatives that you can take advantage of while visiting Australia. In Brisbane, it is possible to cycle for up to half an hour for free using their city hire bike scheme. There are several cycling trails that you can also explore around the city. 14. Swimming At the Beach Australia boasts thousands of kilometers of coastline where you can go swimming and enjoy yourself at the beach. Whether you decide to stop in a major city like the Gold Coast or head to a quieter town such as Airlie Beach, there will be an option for you. 15. Fishing If you can get yourself some fishing rods, you can go fishing at a local creek, dam, river, or beach. 16. Barbecues One thing that is unanimous with all Australians is their love for an excellent outdoor grill. Having a barbecue meal with your travel group is also one of the most budget-friendly travel ideas in Australia. You can head to the supermarket and buy a loaf of bread and sausages for a tonner. You will enjoy a barbecue in the company of friends. Conclusion These are just a few of the budget-friendly travel ideas in Australia. You don’t have to break the bank to have a good time. There are plenty of things to see and do in Australia. You must be open to the different experiences the region has to offer. From Kangaroo Island to the Barossa Valley, Australia has scenic beauty that you can soak in without burning a hole in your pocket. So, make a budget and stick to it to have a happy and hearty journey!