Related
The BEST Things To Do In Indiana Dunes National Park In 2025!
BY Sibashree Jan 30, 2025
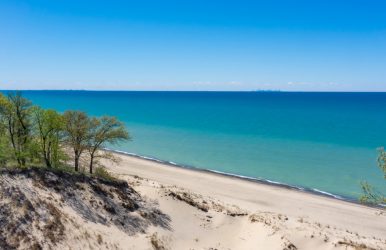
Indiana Dunes National Park At A Glance Location: 1100 North Mineral Springs Road, Porter, IN 46304 Visitor Center Contact Number: 219 395-1882 Hours Open: 6 AM to 11 PM Time Required: 1 Full Day Fees: $15-25 (Standard Pass), $45 (Annual Pass), and Free-$80 (America the Beautiful Pass, including Senior Passes) Area: More than 15000 acres Designation: National Lakeshore (1966) and National Park (15th February 2019) Famous For: Being the birthplace of American ecology, Housing 30% of the rare, endangered, threatened, and special concern plants of Indiana Best Time to Visit: April and May and Late September to October Best Way to Reach: Take the South Shore Train, having multiple stops in the park Unique Things Do In Indiana Dunes National Park | Plan Your Day Activities Indiana Dunes National Park is a year-round attraction. So, every season offers the visitors something unique to do. Let’s explore what wonders await at this national park, rich in biodiversity. 1. Swimming And Beach Activities https://www.instagram.com/p/DCK-9ndvTKl/?img_index=1 Many of the recreational things to do in Indiana Dunes National Park center around the miles of beaches in the park. The southern tip of Michigan and the beaches there are ideal for swimming and various beach activities. Beaches In Indiana Dunes National ParkPorter BeachWest BeachDunbar BeachKemil BeachCentral Avenue BeachLake View BeachMount Baldy Beach Even if you don’t want to take part in adventurous activities, you can just enjoy a sunrise or sunset stroll along the beaches. 2. Biking https://www.instagram.com/p/C7wSPbEP6Dk/ You can bike through the 37 miles trail of the Indiana Dunes National Park and explore the dunes, historical spots, and wildlife of the park. Further, the park has gravel and paved biking trails at various distances. So, you can choose a trail according to your level of expertise. Biking Trails In Indiana Dunes National ParkDunes Kankakee Bike TrailCalumet Bike TrailPrairie Duneland Bike TrailPorter Brickyard Bike TrailOak Savannah Bike TrailMarquette Bike Trail 3. Geocaching Geocaching is one of the most unique things to do in Indiana Dunes National Park. This treasure hunt game is played by geocachers. These geocachers have to collect geocaches or hidden containers. So, if you are a geocacher or a participant in the game, you will have a smartphone with a free geocaching app and a GPS device. Further, at Indiana Dunes National Park, you will be able to do four types of geocaching. You can try traditional or the most traditional geocaching at Chellberg Farm. You can even try EarthCaching at Kemil Beach, Mount Baldy, and West Beach. Moreover, other types of geocaching in the park are Lab Caches at Portage Lakefront and Riverwalk and Virtual Caching at A Century of Progress Historic District. 4. Bird Watching The park, nestled on the southern tip of Lake Michigan, attracts a lot of migrating birds. It is especially delightful with the sounds of the migrating songbirds in autumn. So, you can be a beginner or an avid birdwatcher. You will be able to spot waterfowl or other wetland birds easily. Moreover, this park hosts the Indiana Dunes Birding Festival on the 3rd weekend of May. This is a four-day event, and the more than a dozen birdwatching spots in the park are amazing. 5. Camping Camping is one of the best things to do in Indiana Dunes National Park if you want to explore the park at your own pace. Moreover, the park campground has 66 campsites for tents and 53 RV sites. The campground here does not have electric hookup facilities. Furthermore, campsites 15, 30, 41, and 55 are wheelchair accessible. However, camping facilities in the park are seasonal, and for the winter season, the camping ground will remain closed till 31st March. Moreover, the camping fee per night at the park is $25. 6. Hiking https://www.instagram.com/p/C7rInRWoYm6/ You can explore the dunes of the park, rare plants, and diverse species of birds and animals by hiking. Further, many trails take you to the historic places in the park. For example, you can hike through the Bailly Homestead Trail and enjoy the presence of oak, maple, basswood, and beech trees. You can even hike to the Chellberg Farm, Mnoke Prairie Trails, and Little Calumet River. Overall, the park has 15 trails with varying difficulty levels. So, irrespective of your expertise, you can choose the one most suitable for you. Moreover, the trails can take you from 20 minutes to 4 hours to conquer. Some moderate trails in the park are Calumet Dunes Trail, Cowles Bog Trail, Dune Ridge Trail, etc. Furthermore, West Beach Trails and Mount Baldy Beach Trail are some of the toughest hiking trails for you to complete in the park. 7. Visiting Historic Sites https://www.instagram.com/p/DBj7rf8vx3y/ Exploring the historic sites is one of the most meaningful things to do in Indiana Dunes National Park. Did you know that the park has more than 60 historic sites? The most important landmarks of the park are Chellberg Farm, Good Fellow Youth Camp, and Bailly Homestead. Moreover, you can visit the Cypress Log Cabin, House of Tomorrow, Florida Tropical House, and many other 1933 World’s Fair Century of Progress Homes. 8. Stargazing https://www.instagram.com/p/DA7De5iC5G_/ Despite being very close to the urban area. Indiana Dunes National Park is a hotspot for stargazing. The lakeshores of the park, especially, create an ideal ambiance for getting lost in celestial activities. Furthermore, the sky over the footprint of Lake Michigan is darker, creating a deeper sense of intrigue. Kemil Beach is the best place in the national park for stargazing. Also, it is the “7th designated International Dark Sky Community.” 9. Horseback Riding https://www.instagram.com/p/CwAuqi-I4q3/ You can enjoy horseback riding in the park along the Glenwood Dunes trail. The trailhead is on Brummitt Road, Chesterton and it is the only equestrian trail in the Indiana Dunes National Park. Further, the trail remains open from 16th March to 14th December. Moreover, you can opt for the best guided tours in the park. Every year, the park offers over 500 guided tours. So, you can get in touch with the park's visitor center before planning a day out. See you there! Also read Top 10 Most Popular Paraguay Food That You Must Try. Top 13+ Famous Wonders Of India That You Must Visit.