


 Related
How Many Days in Venice Do you really Need to Complete your Trip?
BY sagnika May 20, 2024
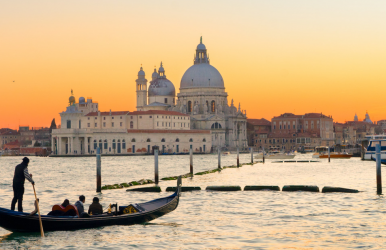
Are you going to Europe? If Venice is in your plans, let me share some of the plans that will be perfect for you. So, how many days in Venice are you planning for the trip? The capital city of northern Italy, Venice, is built on 100 small islands in a lagoon in the Adriatic Sea. Moreover, there are hardly any roads, only canals through which you can travel using gondolas. The place is filled with buildings that represent the Renaissance and Gothic periods. You will love the ambiance and surroundings if you are an old soul like me. So, are you wondering best places to go in Italy? You must also experience delicious food in Venice and visit these beautiful locations. It is very important to check out local food when you visit a place so that you can experience its culture. Factors to Consider When Visiting Venice! So, let me share with your certain aspects influencing your decision to plan your trip. The first thing you need to consider is the best time to visit! You must consider two things. If you are someone who does not like crowds, you can visit Venice during winter. However, if your plan extends for a few days, summer is the best time to visit Venice. Furthermore, you need to consider mobility issues because they will impact how long it will take you to travel across Venice. Apart from these factors, another important aspect is the Italian Itinerary! Your Itinerary will include the different places in Venice and the amazing eateries and restaurants. Accommodations come into the picture once you have decided on the places you must visit. A Few Hours in Venice There are several options based on the number of days. Accordingly, you can decide how long you want to stay in Venice and how to plan it. If you are only in Venice for a few hours, you should concentrate on St. Mark's Square. So, how many days in Venice? It is one of the most popular places in Venice, as it is the main public square of the city! Apparently, Napolean claimed that this was the world's most beautiful drawing room. The place is also known as Piazza San Marco, and it has a quite old history. There is quite an open space, with several trees lining the place. There are several government buildings and facilities in this square. Now, if you are hungry, you can go to Bacarandino, a warm and welcoming Veneziano restaurant. You can find gluten-free options, as well as vegetarian and vegan options! Another one is Osteria Numero 1, another Italian restaurant. It is a peaceful experience where you can spend a romantic evening with your partner enjoying delicious food. If you are craving Pasta, you can get hand-made Pasta here all year round. Very similar to some of the most romantic restaurants in Rome! You can take a vaporetto and travel to the Grand Canal, the major water traffic corridor in the city! A public water bus is a Venetian beauty, and you can enjoy several locations as there are about 19 scheduled lines. Then you can visit Rialto Bridge, which is an architectural genius. Another amazing place to visit is St Mark's Basilica. It is quite close to Piazza San Marco! So, once you have indulged in delicious food, you can take a stroll and visit the religious and political center of the Republic of Venice. One Full Day in Venice If you have a full day to spend, I will ask you to visit St. Mark's Basilica first and then go to Doge's Palace once you are done with the church. The church is significantly important for its religious relativity because it is the resting place of Saint Mark. If you want to check out some grandiose gothic architecture, Doge's Palace is a great place. Apparently, it houses one of the largest oil paintings in the world on canvas called The Glory of Paradise. The painting by Jacopo Tintoretto. Several masterpieces, including sculptural decoration and Gothic architecture, are exhibited here. The artists who are exhibited here are Veronese, A-Vittoria, Titian, and Tiepolo. Now that you are hungry, you can quickly go to Tuttinpiedi. A popular place in Venice, it serves food that feels like homemade street food pasta with different seasonings like wine or fish. Continue walking in the back streets after your lunch. Later in the day, you can take a gondola ride through the canals of Venice. Two Days in Venice If your plans allow you to spend two days in Venice, I have the perfect Itinerary for you. Please make sure to visit St Mark's Campanile. The bell tower is quite popular among tourists as people climb up to the tall structure and enjoy the beautiful views of the city from this bell tower. You can go anywhere in the city and see the tall structure from there. Entry costs 12 euros. You must visit this place, as it is one of the most picturesque places in Venice. If you have a problem climbing the stairs, do not worry; there is also a lift to the top. Nearby, there is also Ponte Dell' Accademia, which you can visit. The Grand Canal of Venice is quite popular, and one of the four bridges on this canal is Ponte Dell' Academia. It is at the southern end of the canal. If you or your partner dislike crowded areas, you can explore Cannaregio. When you visit Cannaregio, you will experience an authentic side of Venice. With reasonable glass pieces, you can enjoy your time with food and friends. Furthermore, after you plan a day for it, you can go on a walk to visit Museo Fortuny and Ca Rezzonico. You cannot miss Il Paradiso Perduto, where you can enjoy delicious traditional Venetian dishes. If you want to visit an opulent place to enjoy delicious food, you can go to Oro Restautant in the Cipriani hotel. It is quite extravagant and chic, so you can have a romantic lunch date with your partner. Three Days in Venice If you have three days to spend in Venice, I have an amazing plan for you! The first thing to do is head to the Murano and Burano Islands. The islands have the shape of a small Venice and are joined by bridges. They are quite popular for products such as lace, glass, and others. There are also colorful buildings across these islands, so they are a perfect heaven for photographers and visitors. Burano is quite a popular place for risotto and fresh fish, and you must taste meat, delicious desserts, and fresh fish in Murano. You can also take a gondola ride across the canals of Venice. It is one of the most romantic activities in life. Of course, you must visit St. Mark Square because, near it, you can visit different places such as St. Mark's Basilica, the National Archaeological Museum of Venice, and The Doge's Palace. If you are a museum lover, you must go to Museo Correr! With its 18th-century interior, you will lose your breath. With an extensive collection of architecture and art illustrating the history of Venice, you will experience some of the best art in life. Four or More Days in Venice This is one of the most wholesome days when planning an itinerary for Venice. If you want some beach time, go to Lido. There are also several beaches hence, there are many things to do in Venice Beach! A hamlet of the city, the water and the sand are quite gorgeous with limited crowds. For a beautiful siesta with a book, this is a perfect place to enjoy yourself and relax. A one-day trip to Padua or Verona is an ideal way to spend the second day in Venice. With the names, I am sure you will realize it is from the famous Shakespeare novel Romeo and Juliet! There are many things to do with its gorgeous architecture, old-world charm, and quiet nightlife! If you like walking or taking a stroll when you visit a beautiful and romantic place like Venice. There is a Jewish Ghetto, which you must explore when you have time. This place shows you the culture of the place; however, it is a place where the government is forcing the Venetian people to live there. It would be best if you did not miss watching an opera at the Teatro le Fenice. An experience of a lifetime, the opera experience will stay with you forever. Conclusion In conclusion, we have provided several options based on the number of hours and days! If you are wondering how many days you will be in Venice, I am sure you have got your plan. You can decide on the places you will visit and the food you will enjoy when you visit Venice. Even though you will see a lot in Venice, it is packed a lot in a small space. Apart from the crowds of tourists, there are picturesque canals, medieval alleyways, charming cafes, and beautiful streets to walk. Starting from St. Mark's Basilica, the Central Square, and Piazza San Marco, you must cover all of it. Comment on how many days you plan to stay in Venice and which plan suits you the best! Learn More Also: How Much Time To Spend In Italy? 10 Best Beaches In Italy That Will Surprise You The Most