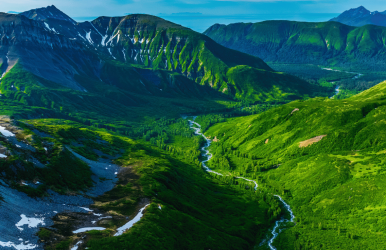
A Guide To The Scenic Drives In Kings Canyon National Park

Aug 29, 2024

Last Updated on: Sep 1, 2025

Travel Blog

Kings Canyon National Park is as grand as its name as it has to offer the most versatile landscape. The granite walls, the flowing streams, and the rugged terrain make it a paradise for hikers and geology enthusiasts. 

However, with its diverse vegetation of pine trees, grass, and sequoias, the park is also known for its unique driving experience. The rocky roads with the embrace of green trees are surely worth exploring if you want to make memories for a lifetime.  

So, if you are a national park freak and want the most memorable experience, your road should lead to the Kings Canyon Scenic Byway.  

Kings Canyon National Park Scenic Drive (Kings Canyon Scenic Byway) 

Kings Canyon National Park Scenic Drive (Kings Canyon Scenic Byway) 

As you drive on the main Highway 180 and turn to the east, you will find the Kings Canyon Scenic Byway stretch. The first stoppage along the stretch will be the Junction View.  

From Junction View, you can have a panoramic view of the Middle and South Forks of the Kings Canyon. The Kings River carving its way through the landscape makes the view unbelievable. Your journey can continue till the late afternoon, and Knapp’s Cabin will be the final major highlight of your scenic drive. 

The table below will give you a brief overview of what the scenic drive along Kings Canyon Drive is going to look like.  

Highlights Things to Do  
Cedar Grove Drive east from the road to reach the Kings River.  From there, go to the Cedar Grove Visitor Center and gather information about the park trails.   You can grab your quick lunch at the facility stores here.   
Canyon Viewpoint Behold the gigantic granite rocks and the U-shaped formations. Look at the nearby pine trees.  
Zumwalt Meadow Trail (Hiking) This is a short and power-packed hiking trail.  
Bridge over the Kings River Enjoy the scenic views and take pictures from the bridge.  
Arriving at Zumwalt Meadow The Zumwalt meadow looks like the most picturesque painting.   Behold the green grass, dark pine trees, and rocky walls made of monolithic granite stone.  Beware of mosquitoes and bugs here, and use repellants.  
Following the Trail along the River Maintain a decent pace while walking through the trail along the river, and thus, you will reach the other side of the Zumwalt meadow. 
Explore the Rocky Side of the Loop Explore the unique and gigantic rock formations on this rocky side.   The calm meadow here offers an immersive experience.  
Relax by the Knapp’s Cabin This cabin tells you the tales of George Knapp, who built this cabin in 1925.  It can be a nice escape for clicking pictures and playing hide and seek.  

Once you are done exploring the Kings Canyon National Park, you can come back to the Kings Canyon scenic byway. Behold the changing colors of the afternoon there and click the most mesmerizing photographs.  

Other Things To See In Kings Canyon National Park  

Kings Canyon National Park

As the name suggests, the Kings Canyon National Park offers you the most majestic experience. The moment you enter the park at the Big Stump Entrance, you will find the Big Stump Picnic Area, and from there, you can start exploring the big stumps in the park along the Big Stump Trail. 

The jungle of old pine trees and the magnificent sequoia trees will offer you the most quaint experience. You will feel humbled by the presence of these towering trees. However, the Mark Twain Stump is the biggest highlight of this trail. This gigantic stump has stairs so that you can climb to the top.  

Once you have visited the Mark Twain Stump, you can take up the following ventures. 

Visit The Grant Grove Village  

The Grant Grove Village

From the Big Stumps Trail, you must make your journey toward the Grant Grove Village. There, you will find the Kings Canyon Visitor Center. 

You will meet rangers at this visitor center and find the best recommendations about your journey in the national park. Once you know the hiking points and the highlights of the park and have a hiking map handy, you are all set to make the most of the national park.  

The rangers will also guide you with instructions about the routes to be avoided for a particular season.  

Hike Through The General Grant Loop Trail  

As the name suggests, the General Grant Loop Trail is filled with gigantic trees. You can take a peaceful walk here.  

Keep Walking Through The Fallen Monarch  

Keep Walking Through The Fallen Monarch

A giant fallen sequoia tree with a hollow trunk is known as the Fallen Monarch. It is fun to play around with the hollow trunk, and you can use it as a shortcut to connect two sides of the General Grant Loop.  

Meet The General Grant Tree 

Meet The General Grant Tree

The 1700-year-old General Grant Tree is surely the pride of the Kings Canyon National Park. The massive scar at the bottom of the tree trunk gives it a gothic appearance, and it shows how the tree has survived extreme weather conditions throughout the years.  

Nevertheless, it’s great to find the “Nation’s Christmas Tree” in a magnificent condition despite the ravages of time.  

Did You Know? 

  • The General Grant Tree was designated as a “National Shrine” in 1956. 
  • President Eisenhower declared it a National Shrine to commemorate men and women in the USA armed forces. 
  • It is the only living “National Shrine” in the USA.  

Visit The Hume Lake 

If you are in for an immersive experience, don’t forget to spend your time by the Hume Lake. This mountain lake is known for its pristine beauty and green water.  

The pine trees and unique rock formations surrounding the lake make it appear all the more special.  

The Hume Lake is one of the least visited places in Kings Canyon National Park. So, keep the park map handy so as to not miss the beauty of the lake.  

Relax At The Gamlin Cabin  

Relax At The Gamlin Cabin  

The Gamlin Cabin, built by Israel Gamlin, was once used as the U.S. Cavalry storehouse. This wooden cabin with a stone fireplace inside has a quaint appeal.  

After catching your breath at Gamlin Cabin, you must continue walking along the trail. At the end of the trail, you will find the other side of the Fallen Monarch tree trunk. The hollow trunk of the tree is a favorite of kids and young adults for some mischievous activities.  

From here, you can plan other activities in the national park or get back on the main road 180.  

Final Words: Is Kings Canyon Worth The Trip?   

With magnificent sequoias, colossal rock formations, and many trails, the Kings Canyon National Park is a favorite of outdoor enthusiasts. Further, a drive through the Kings Canyon Scenic Byway offers you some of the most beautiful scenic views of California. Filled with endless bends and twists, this road is only available for driving from April to October.  

Also, this glacier-carved valley with deep canyons and high mountains stands for its geological diversity. In addition, this national park is home to the General Grant Tree, the Christmas Tree of the Nation, and Boyden Cavern, with the most intriguing rock formations.  

So, overall, this park is a paradise for hikers, geological enthusiasts, wildlife lovers, and people who want to indulge in diverse outdoor pursuits. No wonder that it had 643,065 visitors in 2023. (Source

Do you want to watch glaciers and meet diverse wildlife? Pay a visit to the Wrangell-St. Elias National Park.  

Kings Canyon National Park FAQs  

How Long Should You Stay In Kings Canyon National Park?  

Based on how well you want to explore the Kings Canyon National Park, your stay in the park should be between one to four days. You can finish taking a walk in the grove of the big trees and visiting the most beautiful trails in one day. 

However, if you want to explore the Alpine peaks and the deep canyons to the fullest, you will need to stay at least three to four days in the park.  

Which Is The Most Beautiful Part Of The Grand Canyon National Park?  

The south rim of the Kings Canyon National Park is the most beautiful area according to most visitors to the park. You can experience the most unique views of the Grand Canyon from the southern rim. 

Further, from the southern rim, you will get to enjoy the most amazing view of the Colorado River.  

What Not To Visit The Grand Canyon National Park?  

You must not visit the Grand Canyon National Park in July and August. The weather is hot and humid during these months. Further, thanks to a diverse landscape and unique vegetation, it’s hard to say which season is the best to plan a trip to this park. Different parts of the park become the most attractive in different seasons. 

For example, the North Rim of the park is the best place to pay a visit during May and October. The temperature is pleasant during these months, and the crowd is smaller. Similarly, you must hit the southern rim of the park in the fall. The cooler temperature makes hiking and biking in the southern rim easier during the fall season.  

Also read

Share on Social Media

Sibashree is a travel, culture, and leisure writer who has been writing since the age of 12 and professionally since 2014. With more than a decade of travel writing experience and journeys across India and several parts of the world, she brings a deeply personal and thoughtful perspective to her work. A student of English Literature and Mass Communication, Sibashree has always viewed travel as more than movement — for her, it has been a way of understanding people, cultures, and herself. Her passion for spiritual exploration has also led her to many unusual and meaningful destinations over the years. Outside of writing, Sibashree enjoys watching European cinema, reading about global politics, and reflecting on the stories hidden within everyday places.

Leave a Reply

Your email address will not be published. Required fields are marked *

title-img Related

READ MORE Canada Trip Insurance

Coverage For Special Occasions: Travel Insurance For Canadian Festivals And Events

BY  Sibashree Nov 19, 2025

Canada is bursting at the seams with festivals, wild celebrations, and lively events. You blink, and there’s probably something going on in every corner of the country. Whether you’re catching the Montreal Jazz Festival’s energy or braving Quebec’s famous icy parties, these gatherings are honestly the stuff of bucket lists. But, you know, any trip, especially the fun, hectic kind, can bring chaos you just didn’t see coming. And that’s exactly when having decent Canada trip insurance jumps from “optional” to “pretty necessary.”  It’s your safeguard for all those “Hope that doesn’t happen, but if it does…” moments. Let’s break down why travel insurance Canada should be high on your checklist, what it actually covers, and—since it’s 2025—how to buy it without ever leaving your couch. What Is The Significance Of A Canada Trip Insurance? Honestly, the festivals and weirdly joyful events are half the reason people come here. However, let’s get real! They’re not stress-free. Big crowds and moody weather aren’t just “quirky” perks. They can flip your trip from amazing to “why did I even get on the plane?” really fast. A few solid reasons make having travel insurance for attending the festivals and events in Canada a must. 1. Medical Emergencies You never plan for a medical emergency, but all that running around, dancing, and squeezing through crowds. Yeah, accidents happen. The right policy grabs your back with coverage for surprise hospital visits, unexpected illness, and even wild scenarios (think: evacuations). That means if things go sideways, you’re not left frantically Googling “nearest clinic open now.” You get the treatment you need, fast. 2. Unpredictable Weather It can rain when it’s supposed to be sunny, or it can snow in June. The weather in Canada loves to throw curveballs at festival plans. Storms mess up flights, force cancellations, and generally make you question your packing skills. Travel insurance gives you a fallback, so changes in the forecast don’t wreck your whole trip. 3. Delayed Flights Missed connections, endless airport coffee, or racing to an event that started without you! Delays are a special kind of festival pain. Canada trip Insurance can at least help soften the sting with reimbursement for lost time (and sometimes lost money). 4. Lost Or Stolen Luggage Are there jam-packed crowds at the airport, bus stations, or the festival venue? It is Awesome for energy, but not great for keeping track of your backpack. If your stuff disappears or gets snatched, insurance can cover what you lost, saving you from the “how do I survive without my essentials?” panic. While choosing Canada trip insurance, make sure that you compare various policies. You have to be specific about your budget, needs, and coverage limits. Furthermore, you have to read the “exclusion” section carefully. Suppose you want to do rafting in Canada, and the policy you have chosen does not cover any injury that happens during that particular activity. You cannot claim compensation if such happens. In addition, pick a policy that covers the pre-existing conditions. How To Purchase Travel Insurance For Canada Online? The days of slouching through long lines at insurance offices? Gone, luckily. Getting a travel insurance plan in Canada is basically a breeze—here’s the “pain-free” approach: Step 1: Jump onto your insurance company’s website and poke around for the travel insurance section. Step 2: Toss in some basic details (they’ll ask… it’s always something), and pick the type of coverage you want. Step 3: Find Canada in the list—there’s always a dropdown. Add your departure and return dates, plus your phone number (they need it for confirmation, not for spam… supposedly). Step 4: Click whatever version of “view plans” pops up. Now, you’ll be asked for traveler info. Step 5: Hit “Next.” Browse through a few plan options, tweak the coverage amount for your stuff, and throw in any extras that seem smart. Step 6: Another round of “Next” and fill out health details, whatever else they want, and you’re basically done. Step 7: Pay up, sit back, and wait for your new insurance details—both an email and a shiny online document should show. Tips For A Smooth Festival Experience With Canada Trip Insurance If you want your Canadian festival trip to be something you’ll brag about (and not just complain about), make sure your travel insurance really covers the possible drama. There are a handful of other little tricks for making the whole journey actually enjoyable. 1. Plan Ahead Don’t just show up and read up on the festival, double-check where it’s happening, and figure out your route. Sorting tickets and booking places to stay, way before the rush, saves future headaches when everyone else is panicking. 2. Stay Informed Keep checking the weather (surprises are the default here), and watch for updates about the event. A last-minute change can throw off everything, unless you’re already in the loop. 3. Keep Records Make copies of the stuff you don’t want to lose: your insurance info, tickets, ID, passport—that sort of thing. Having backups makes it way easier if you need to file a claim (or just find your way home). 4. Carry A First-Aid Box Pack meds you actually use and a tiny first-aid kit, just in case. Minor emergency? You’ll thank yourself for thinking ahead. Travel Insurance Canada Gives You The Coverage To Enjoy Your Trip In the end, travel insurance isn’t just paperwork. It’s peace of mind. You get to throw yourself into the fun, knowing you can handle whatever hiccups the universe throws your way. Go for coverage that fits your trip: delays, lost documents, and last-minute changes. That way, you’re not stuck worrying; you’re actually enjoying the festival (and maybe even finding a new favorite one). Thinking about travel insurance for Canada right now? Give Niva Bupa Travel Insurance a look. They’ve got a huge network (10,000+ hospitals) and claim to process things in under 30 minutes. One crore customers vouch for them, which honestly calms a lot of nerves. If you want to skip stress and just focus on the adventure, it’s worth checking their plans. Read Also: Ultimate Guide to Stress-Free Holiday Travel Top 8 Travel Medical Insurance Trends to Consider The Overlooked Connection Between Safe Travel And Strong Networks

READ MORE what to see in Lassen Volcanic National Park

What To See In Lassen Volcanic National Park: Into The Darkness Of Subway Cave After A Fire Breakout

BY  Sibashree Oct 15, 2024

Lassen Volcanic National Park was in the news recently as the fourth-largest wildfire in California exploded out of proportion. The park's officials evacuated staff from the Mineral community near the park headquarters.  120 people were there in the community, and the evacuation started as the fire started moving east to the park on the evening of 26th July 2024.  However, the park fire reached near containment in August, and on 17th August 2024, the park was partially reopened. You may wonder what to see in Lassen Volcanic National Park after the fire breakout and if there is any significant destruction in the places of interest in the park.  Let me assure you. The park officials stated that the fire had never entered the park. However, there are still risks in the southern part of the park and Mill Creek and Mineral communities.  Nevertheless, the reopened parts of the park are out of danger despite some lingering smoke. So, Subway Cave, located around 15 miles north of Lassen Volcanic National Park, is one of the safest sites to explore after the fire incident. Make a rush, as it remains open from late April to November.  What To See In Lassen Volcanic National Park After The Fire Breakout (Exploring The Underground World Of A Lava Tube) Yes, you got me right! I am talking about the Subway Cave. The self-guided trail inside the cave is ⅓ miles long and 30 feet wide, and complete darkness is inside. So, many call it the journey into darkness. The USDA Forest Service maintains the cave, which remains open from dawn to dusk.  Before I get into more stories and facts about the cave, I want to present the basics you need to know briefly.  Important Facts About Subway Cave, Lassen National Volcanic Park Location in the ParkA 2-minute walk from the parking lot near the junction of “Highway 89” and “Highway 44” in Old StationAmenitiesPicnic TablesDrinking WaterParkingToiletsInterpretive SiteFeesFree (You can make donations)Pet-FriendlyNoParking FacilitiesMany Parking Facilities, Buses and RVsOutdoor ActivitiesInterpretative Sessions, Caving, PicnicTemperature Inside the Cave46 Degree Farrenheit Nearby AttractionShasta County (Mountainous landscape and multiple picnic locations)Nearby Trails*Cinder Crone TrailSpattercone Nature TrailButte Lake to Widow Lake, etc.  *Many hiking trails in the park, such as the Lassen Peak, Bumpass Hell, and Mill Creek Falls, are closed as the park has partially reopened after the recent wildfire explosion. So, check with the park authorities before you plan a hike on the park trails.  This Is How The Subway Cave Was Formed  If you are a keen learner of geology and want to know what to see in Lassen Volcanic National Park, you cannot avoid the lure of Subway Cave. I have already shared an account on the geothermal wonders of the park. This cave is an example of how lava flowed around 20000 years ago and created some magic.  A major lava explosion happened all across the Hat Creek area around 20000 years ago. The top layer of the lava flow became cold and hard in contact with air. Thus, a hard cap was formed. However, there was a continuous flow of molten lava below this cap.  The molten lava drained out Over time, but a hollow tube structure remained there. As you hike this trail, you will find traces of the more recent lava flows.  Route To The Subway Cave Is Bumpass Hell on your list of what to see in Lassen Volcanic National Park? Are you planning a trip to the park soon? Then, you will be disappointed as the Bumpass Hell trek route is closed after the park has reopened following the recent fire breakout.  Further, as Bumpass Hell is closed, you must take the Warner Valley Area route to  Devils Kitchen, which is the cave's opening. Devils Kitchen is a 4.4-mile hike from the Warner Valley Area (camping here is closed for 2024).   Accessing The Subway Cave  You have to climb down metal stairs as you access the Subway Cave. You will get down into a wide opening in the ground. The ground surface has a leveled floor. However, you must be careful as you get off the stair flight.  Further, you must wear sturdy footwear to avoid injuries and difficulties where the floor gets rough.  Fortunately, the ceiling and walls are quite smooth, minimizing the hiking difficulty level while hiking. Also, there is complete darkness inside the cave. So, you will need a flashlight to make it to the end.  The weather inside is a little cold, even in summer. So you will need a light jacket. Moreover, don’t forget to read and follow the interpretative signs through the trail to better understand the place.  The best thing about this park is that it’s 30 feet wide. So, even with complete darkness inside, you never feel suffocated.  What To See In Lassen Volcanic National Park Subway Cave It is not a long walk inside the Subway Cave. However, this short walk is enough to make it feature on the list of what to see in Lassen Volcanic Park.  Lucifer’s Cul-de-sac (An Attraction Very Few Knows About) Have you listened to Satan’s Cul-de-sac from Gangland Buries Its Own? The first thing that may amaze you inside the cave is Lucifer’s Cul-de-sac. There is a split as you enter the cave, and you are to turn to the right if you want to continue the trail. However, you will notice a big room if you are adventurous enough to turn left, when I tell you about Lucifer’s Cul-de-sac, The ceiling height starts from 6 feet and gets higher up to 15 feet. The most amazing thing about this room inside the cave is the rock formation on the ceiling and walls. It’s gothic and justified its name.  https://open.spotify.com/track/6cq37W4OXjEdQRLh2IVQOF As The Hike Advances  The ceiling height will vary as you continue the trek, and there are small boulder-like rock formations in many places. So, be careful with your steps and do not stumble upon them. Also, because of these rock formations, you must not wear an open-toe shoe while walking through the cave.  Nevertheless, the ceiling formation is fascinating, and in one section, it looks like stoned rainfall or water ripples. The section is called the Lavacicle Lane. Molten lava dripped off through the cracks in the ceiling cave, and there were formations of “drip pendants” or “lavacicles.”  Further, as you plan to take the exit, you notice all the colors in the lava rock formation, including green, blue, white, and brown lines.  Getting Out Of The Subway Cave As you approach the end of the cave, you will find a metal stair flight similar to the one at the entrance. From the top of the exit staircase, you can hike through an on-ground trail to the west or north to find the parking lot.  However, I prefer to take another walk through the cave and get back to the entrance. It will be so much fun to explore this unique geological formation again.  Things To Remember Before Getting Into The Darkness Of The Subway Cave  Subway Cave is a hidden gem if you consider what to see in Lassen Volcanic National Park. However, once you take the hike and read the interpretative signs, you will learn why it is geologically unique.  Nevertheless, you must be careful about certain things to ensure complete safety throughout the hike.  You will find rattlesnakes in the trail, and you have to be respectful to these reptiles. You must not make any move to catch or hurt them. Moreover, you cannot go off trails or litter inside the cave.  No food, water, or firelighting is allowed inside the cave. There are picnic areas nearby for you to catch refreshments. Wish you a safe, easy, and fun-filled experience inside the Subway Cave!  Also read Why Include Whale Watching In Your LA Itinerary. Traveling On A Budget: Tips For Affordable Adventures. From Cocktails To Kickflips: Must-Try Activities In San Diego.

READ MORE Banff on a Budget

The Ultimate Guide To Experiencing Banff On a Budget

BY  Sibashree Mar 13, 2025

Banff, home to the towering Rocky Mountains, is a true Canadian treasure. It has endless hiking trails and breathtaking natural beauty at every turn.  Further, tourism in Banff is centered around Banff National Park, a part of the Canadian Rocky Mountain Parks UNESCO World Heritage Site.  Also, tourism is the main economic driver of this Canadian town, with Banff National Park having around 4 million visitors every year.  Moreover, as a hub of adventure and outdoor activities, natural abundance, and biodiversity, Banff is a crown jewel in the tourism landscape of Canada.  However, Banff is not a popular choice for travelers who adhere to a shoestring budget.  On average, a one-week trip to Banff will cost you around $750-1000.  Having said that, it’s time to break the myth and explore Banff on a budget as a local.  In this Tour and Travel Blog, I will discuss how you can explore the charm of Banff on a fixed budget.  Our practical tips will help you plan your trip, find budget-friendly accommodation, and have the best adventure experience without overshooting your budget.  Banff On A Budget: Planning The Trip Right Exploring Banff on a budget starts with planning the travel itineraries and activities right. Planning involves knowing the right time to visit Banff, choosing the right transportation options, and knowing the free or budget-friendly attractions in the city.  Here you go!  Choose The Right Time To Visit Banff On A Budget  If you want to explore Banff on a budget, you have to choose the best time to visit. September to October and April to May are the ideal seasons to visit Banff, as travel costs and lodging expenses are usually lesser in these months.  Further, if you travel during these months, you can avoid the summer population or the surge of visitors to the natural sights in Banff.  Also, if you are visiting Banff in winter, you can schedule your trips during off-peak dates. Moreover, you will find affordable opportunities to enjoy Banff's ski areas if you secure lodging early and purchase the non-peak ski passes.    Transportation Options From Calgary To Banff   You must start your journey from Calgary to explore Banff on a budget. You can find the following economical transportation options from Calgary to Banff.  Banff Airporter It is perfect for Samesun Banff guests, and Banff Airporter offers 15% off on round-trip rides.  On-It Regional Transit It operates $10 one-way trips from downtown Calgary on weekends and public holidays.   Rider Express You can take a Rider Express direct bus from Calgary Airport for just $47.62 one way.  Moose Travel Network Moose Travel Network offers affordable day tours and transportation to popular spots like Lake Louise and Moraine Lake.   Things To Do In Banff On A Budget   The natural beauty of Banff will never disappoint you if you want to explore the town on a budget.  Further, Banff's hiking trails and wildlife offer you affordable recreational opportunities and service-free activities.    Take Part In The Budget-Friendly Outdoor Activities In Banff National Park   As I mentioned earlier, Banff National Park is at the epicenter of tourism in Banff. A UNESCO World Heritage Site, the first national park in Canada and third in the world, offers you many free attractions and activities.  The free hiking trails, like the ones leading to Johnston Canyon, Tunnel Mountain, and Sulphur Mountain, offer breathtaking vistas.  Further, you will meet Lake Louise here. You can walk along the lake's border or enjoy your aquatic pursuit in a rented canoe.  Moreover, Banff National Park is the hub of wild animals such as deer, bears, and elk. Watching them from a safe distance will be a lifetime experience.   Tour And Travel Note You will get food and drinks at the park kiosks. However, you must pack your drinks and snacks and bring reusable bottles because these items are pricey. Explore These Places To Visit In Banff On A Budget  Are you planning to explore Banff on a budget? These are the places you must visit.  Banff Park Museum Banff Park Museum is the best place to learn about the history and wildlife of the national park and the entire region.  Further, you will only have to pay $4.5 to enter the museum.   Cave And Basin National Historic Site Cave And Basin National Historic Site is another budget-friendly attraction in Banff. Here, you will learn about Banff's historical background, including the town and natural hot springs.  Downtown Stroll If you want to soak in the cultural vibrance of Banff, you can take a walk along Banff Avenue.  Here, you will find street performers on Banff Avenue. You can even enjoy the view of the mountains and indulge in shopping here.  Choose Affordable Dining Options Near Samesun Banff   Banff has many affordable dining options, such as the Samesun Banff in-house The Beaver Bar. Further, you can have coffee or grab quick bites at local cafes and eateries.  Some local places to eat in Banff are Wild Flour Bakery and Melissa’s Missteak.   Moreover, you can cook your meals in Samesun’s guest kitchen and dine picnic-style in nature to make your trip more budget-friendly.   Look For Discounts And Deals To Visit Banff On A Budget   Samesun Banff and many other hotels in Banff partner with local transit and tour operators to offer exclusive discounts to guests.  Ask the front desk for access to promotions, such as discounted shuttle services or free tourism perks like guided hikes to explore Banff on a budget.  Samesun Banff Hostel: Your Affordable Accommodation   The following aspects make Samesun Banff the ideal budget-friendly accommodation option:  Free Breakfast: Start every morning with a complimentary meal.   Affordable Bar & Restaurant: The Beaver Bar onsite offers cheap meals and drinks for hostel guests.   Free WiFi: Stay connected without any extra costs.   Fully Equipped Kitchen: Save on dining by prepping your meals in the shared guest kitchen.   Social Common Room: Meet fellow adventurers during your stay.   Laundry Facilities: Adding more value for backpackers and road trippers.    Making The Most Of Your Stay In Banff The goal of budget travel in Banff reaches beyond financial savings to achieve better experiences.  Tips for Saving Money While in Banff   During peak summer, use Banff's free public transport options, such as free shuttles, to access popular spots like Moraine Lake.   Further, you must bring your hiking gear, reusable utensils, and water bottles to avoid renting or purchasing these items.   Moreover, split tour costs with other travelers or join group activities organized by Samesun Banff to reduce your expenses.  Banff On A Budget: Book Your Stay at Samesun Banff Hostel   Banff remains among those must-visit destinations in Canada. Further, you can now explore Banff on a budget by following the tips I have shared here.  Moreover, you can plan a stay at Samesun Banff Hostel to save money on lodgings. Also, the hostel's central location ensures easy walking or shuttle access to Banff’s main attractions, reducing transportation costs. In addition, Banff delivers unlimited outdoor possibilities for those who want to explore the Rockies by hiking or socializing with other travelers.  So, what are you waiting for? Book your stay at Banff international hostel today and start planning your dream budget-friendly getaway!