Related
Cabo Beaches: A Practical Guide To The Coastlines Of Los Cabos
BY Sibashree Dec 16, 2025
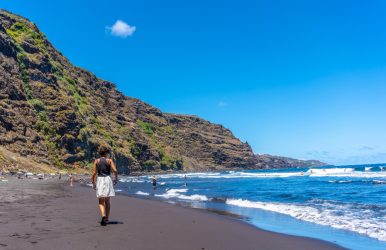
Located at the southern tip of the Baja California Peninsula of Mexico is the famous region of “Los Cabos.” This is recognized by the diverse coastline that separates the Pacific Ocean from the Sea of Cortez because of the two different towns that exist there: Cabo San Lucas and San José del Cabo that are joined by a corridor with many beaches and bays. The Cabo beaches have water characteristics, accessibility, and activities that differ from one another. There are those with calm water suitable for swimming, while others have strong currents ideal for walking, taking photos, or surfing. This is important for travelers visiting the area and have plans for activities at the beaches of Los Cabos. Geography Of Cabo Beaches The coast of Los Cabos is influenced by two bodies of water: Pacific Ocean (West-Facing beaches) Generally rougher water, bigger waves, and rip currents. Sea of Cortez (east-facing beaches) "More tranquil conditions, clearer water, and improved protection in bays." This is why swimming and snorkeling are recommended to be undertaken in particular spots. Beach Safety And Water Conditions Not all beaches in Cabo offer safe swimming. There are strong undertows and steep drops in many areas, most notably on the Pacific side. Beach Flag System The majority of the popular beaches have a flag system that indicates the conditions of the water: Green flag – Calm conditions Yellow flag – Moderate currents, caution advised Red flag – Hazardous conditions; do not swim Black flag – Beach closed Visitors should make sure to check flags and signs before entering the water. Beaches In Cabo San Lucas The different beaches of Cabo San Lucas. 1. Medano Beach Medano Beach can be found in the nearby marina area of Cabo San Lucas and represents one of the more developed spots along the coastline. The beach has relatively calm waters, unlike other Pacific-side beaches, and is thus often employed for swimming and aquatic sports. There are eating establishments and hotels along this coastline. 2. Lover’s Beach (Playa del Amor) Because it can only be reached by water, the Lover’s Beach is located close to the iconic rock formations at the famous “Land’s End.” One side of the beach is calm since it meets the Sea of Cortez, while the other lies adjacent to “Divorce Beach,” which meets the Pacific Ocean and has dramatic waves. 3. Divorce Beach (Playa del Divorcio) This is a beach that is parallel to Lover’s Beach on the Pacific side. The waves are not ideal for swimming, and there are rip currents. Beaches In San José del Cabo The different beaches of San Jose del Cabo. 1. Palmilla Beach Palmilla Beach is famous for its protected bay and quiet waters. It is among the beaches that have relatively stable swimming conditions, depending on the weather and the tide. 2. Costa Azul Beach Costa Azul has a number of breaks and is famous mainly for surfing. It has varying water conditions, making it not very suitable for swimming. 3. Hotel Zone Beaches In the hotel zone at San José del Cabo are long stretches of sandy beaches. While these are attractive, there are areas that have high currents and are not recommended for the inexperienced visitor. Swimmable Beaches In Los Cabos Swimming in Cabo should be restricted to beaches recognized for their calm conditions. These beaches are: Chileno Beach Santa Maria Beach Palmilla Beach Medano Beach (conditions vary) Even in such places, circumstances change on a daily basis due to tides, wind, and seasonal changes in weather. Snorkeling And Marine Life There are a few bays on the Sea of Cortez that offer snorkeling opportunities due to their protected location and clearer water. Common Snorkeling Areas Chileno Bay – Gradual entry, reef visible Santa Maria Bay - Horseshoe-shaped bay, calmer waters The kinds of marine life that might be found there include tropical fish, rays, and others that migrate during certain seasons. The best time for snorkeling is usually early in the morning Surfing Beaches Surfing in Cabo takes place mostly along open beaches, mainly around the area of San José del Cabo. Known Surf Areas Zippers Acapulquito Costa Azul Surf conditions are dominated by swell directions, varying according to season, and larger swells usually occur from late summer to winter. Beaches For Walking And Scenic Viewing The Mexico’s beaches are more suitable for walking, photographing, and enjoying the sunset. Pacific facing beaches around Cabo San Lucas Playa Las Viudas East Cape remote beaches Usually, these regions experience intense wave action and shoreline formations. . Family Considerations Families staying in Cabo and wanting to visit beaches should consider A calm water environment Easy access Availability of restrooms Lifeguards on duty when available Chileno, Santa Maria, and Palmilla are some varieties commonly used for these purposes. It is advisable that the conditions be checked, however. Seasonal Considerations Winter (Dec–Feb): Cooler water, Whale migration offshore Spring (Mar-May): Weather is stable; water conditions Summer (Jun-Sep): Stable weather, moderate water conditions Fall (October-November): Transitional weather, fewer crowds Ocean conditions can change rapidly, no matter what season it is. Public Access And Beach Use In Mexican law, every beach is public property even if it’s in front of a resort chain’s property. The access points to the beach might be an exposed pathway to the shore, but once you reach the shore, this is public property. Amenities vary widely Restrooms and parking are available at certain beach destinations There are others which are undeveloped The enforcement and laws concerning alcohol consumption and distribution might differ from one municipality to another. Planning A Beach Visit In Cabo When visiting beaches in Cabo, it is advisable to. Check water conditions every day Safety signs that are posted Don’t forget the sunscreen and water Do not swim at unattended Pacific beaches Compliance with local regulations and natural environments Many wellness retreat villas in Cabo region are carefully placed in or just off the more quiet areas of the coastline. Being in the beach environment affects the rhythm of life in the wellness retreats, ranging from the morning walks in the quiet bays to the practices conducted in the outdoors that make use of the beach breezes. The beach environment is often simply incorporated as a passive element of the wellness activities that provide seclusion or insulate the participants from the busy beach environment. To Sum Up! The beaches in Cabo have various conditions that result from the influence of geography and development. Knowledge on the suitability of various beaches for swimming, snorkeling, surfing, or sightseeing goes a long way in ensuring that one takes advantage of the experience while staying in Cabo. All one needs is the correct information.