


Galapagos Adventure: Top 3 Islands to Explore in the Enchanted Archipelago
BY Abdul Aziz Apr 15, 2023
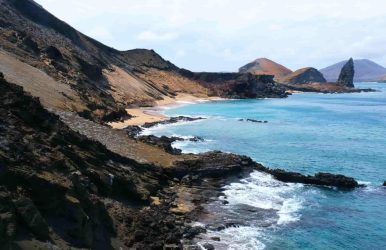
The Galápagos Archipelago, a remote group of islands in the Pacific Ocean situated more than a thousand kilometers from the coast of Ecuador, is one of the most interesting spots on the planet. There are many reasons why this is so, starting from its history and formation to its incredible diversity of wildlife and beautiful scenic spots. Created over many millennia, the Galápagos Archipelago was formed by the accumulation of magma from volcanic eruptions that broke through the seabed. Still to this day, the archipelago is considered to be one of the most volcanically active areas in the world, with 13 active volcanoes. What draws tourists to this place is not only the chance that they might witness a once-in-a-lifetime volcano eruption but the incredible diversity of flora and fauna, most of it endemic to the archipelago. If you are a biology buff, you might know that Charles Darwin visited the archipelago, and his research into the island’s finches, which are named in his honor, contributed greatly to the theory of evolution by natural selection. If you want to see the giant endemic Galápagos tortoises and sea lions, snorkel in the clear blue waters and sunbathe on the white sand beaches, or island-hop to explore hidden natural gems, you can do so on a Galapagos islands cruise. If you worry about the best time to visit this destination, fret not, as the Galapagos is a year-round destination with a stable climate and pleasant temperatures. Top Islands To Visit Although the archipelago consists of what seems like tiny specs of land in the vastness of the Pacific Ocean, there are plenty of options for travelers wishing to venture out on a journey through the islands. To make things easier when planning a trip to the Galápagos, we have picked out some of the islands that are definitely worth visiting. Santa Cruz Island For a place with a total population of a little more than 30,000, the Galápagos Archipelago boasts no large urban areas, and this is one of the appeals of the archipelago for many visitors. However, it would be amiss to say that the archipelago’s largest town is not worth visiting. Puerto Ayora combines both the comforts of civilization with many shops, bars, and restaurants and natural life, as the town is a great place to catch sight of brown pelicans, golden rays, marine iguanas, and blue-footed boobies. For the brave adventurers, there is a secluded turquoise-water cove where snorkeling might get you to face the white-tup reef sharks, rays, and a plethora of different fish. But if you want a more laid-back activity, you can visit Tortuga Bay, named after the black sea turtles that lay their eggs on the beach, and enjoy its long-stretching white sand beach and the inviting blue water. Isabela Island Approximately one million years old, the largest island of the archipelago is home to the Sierra Negra Volcano, which has the second-largest crater in the world. Isabela Island charms visitors with its six coalesced shield volcanoes that are still active to this day. Being one of the youngest islands of the archipelago, Isabela has retained some of its massive lava fields and arid volcanic peaks. The sea-horse-shaped island hosts many wildlife species, many of them endemic, including the redheaded lava lizard, the pink flamingo, five types of tortoise, and the flightless cormorant. On the western side of the island, there’s a chance that you will spot migrating humpbacks and other whales, especially during the cooler period from June through November. The archipelago presents rich feeding grounds that attract orcas, endangered blue whales, sperm whales, as well as humpbacks, and Bryde’s whales. Floreana Island One of the things that Floreana is most famous for is the Floreana mockingbird, which is nowadays considered to have become extinct from Floreana and only resides on two small islands off the coast: Champion and Gardner-by-Floreana. But besides this, Floreana holds a ton of historical value as it was the place where the first official resident made its home and where the first “post office”, which was, in fact, a wooden barrel, was established by whalers. Today, visitors can visit this interesting piece of history and even leave their own postcards. Life on the island has always proved tough for most inhabitants as the island lacks a consistent supply of fresh water, but there are about 150 people still managing to live off the land by farming. When visiting the island, you can start off at the port town, Puerto Velasco Ibarra, and maybe spend the night at the Pension Wittmer, which is the only tourist accommodation on the entire island. From there, you can travel to the highlands for sightseeing and get to know the plants of Floreana, with 48 different species identified, and one-third of them are endemic. Additionally, you can opt to see Devil's Crown, the volcanic crater that allows for snorkeling among an oasis of coral reefs and plenty of marine species. Forge Treasured Memories These are just some of the fabulous and fascinating islands you can visit if you want to enjoy unique experiences and forge treasured travel memories. Read Also: Top 10 Best Travel Apps To Use In 2019 6 Expert Packing Tips That Will Make Your Trips More Fun Top Places To Visit In Italy On Your Next Travel Escapade