





Grutas De Tolantongo – Location, Price And Ambience | Ultimate Guide

Jan 5, 2023

Last Updated on: Jul 22, 2026

Travel Blog

If you are planning an upcoming vacation to Mexico, then you must visit Tolantoongo, which is a box canyon, which is in the state of Hidalgo, Mexico. The canyon is 1.5 hours of northwest, Pachuca, and about 198 km which is about four hours from Mexico City. 

So if you wanna know more about this exceptional natural escape with beautiful hot water springs and natural pools and rivers with caves. To know more details about the Grutas de Tolantongo, then keep on scrolling down. 

How Will You Reach The Las Grutas De Tolantongo?

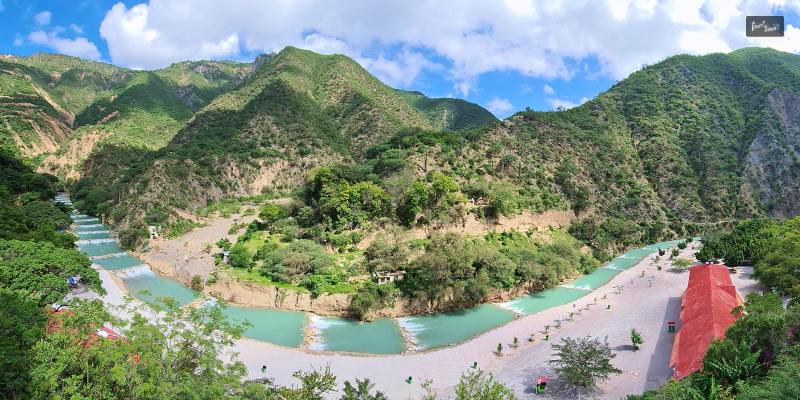
With diverse natural resources, Mexico is a haven for visitors and travelers. The Las Grutas de Tolantongo is a natural system of grottoes and caves. The beautiful water flows from the Grottos to the river of Tolantongo, which flows through the hot springs, which act like swimming pools like natural pools. 

If you don’t know what a grotto is, then it is a type of cave that is naturally made underground and flows through for thousands of years. Rainwater could easily seep down piercing calcareous rocks, which dissolved them. 

Then the result that formed was a mesmerizing aquatic heaven with rivers, waterfalls, and even hot springs, that became Tolantongo. 

How To Reach Las Grutas De Tolantongo?

Now that you know where this aquatic heaven is, you should be able to reach the place easily, as there are many options you can avail to reach the place. Here are the options you can select from. 

1. Renting A Car Service

One of the most popular choices of transportation from Mexico City to la Grutas de Tolantongo. Although a car service can be expensive, it is still one of the expensive options.

So if you have a hefty budget, then you can easily avail of a car service. Well if you love a long stretch of road, then you will love the surrounding atmosphere while traveling. 

2. Take The Bus

One of the cheapest forms of transportation is the bus service. The bus is public transportation that any tourist can avail of. The easiest way for you to get a bus service is through Mexico Terminal TAPO. 

From the ADO bus service, you can reach Pachuca. The journey is a 2 hours journey by bus, although the buses run every 3 hours, then plan your timing accordingly. 

You would have to take a bus again till Ixmiquilpan, the bus is about 2 hours journey which runs about five times a day. Then from Ixmiquipan, it is about a 14 minutes walk, from where you can get a bus to Tolantongo. 

The bus journey is very jarring and tiring and it might take you 6 hours to complete the whole journey. And it will cost you about $12 to about $22. Since this method is so tiring and long, it is not recommended for tourists, as it would take them a whole day. 

3. Join A Tour Group

Another possible transportation you can get to Las Grutas de Tolantongo is by organizing to join a tour group. If you are staying in Mexico City, for a few days, then the easiest way of traveling to Grutas de Tolantonga is with a tour group. 

What Are The Things To Do In Las Grutas De Tolantongo?

Upon reaching Grutas de tolantongo, there are a lot of places you can do there, and a few of these things that you can do. The area is divided between two areas, which are La Gruta Zone and El Paraiso Escondido. 

1. Tolantongo Hot Springs (El Paraiso Zone)

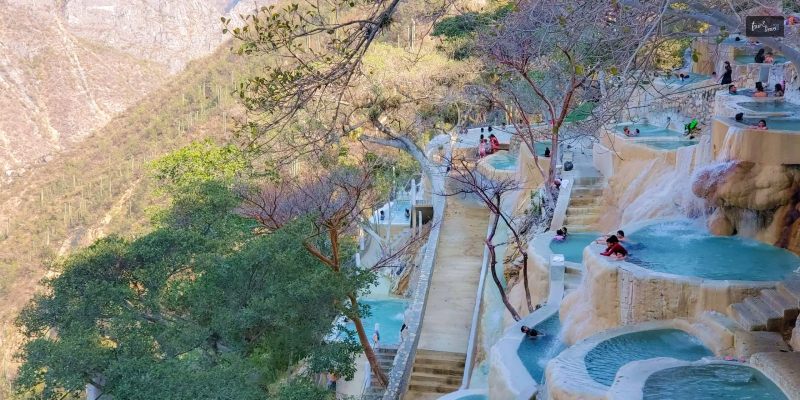
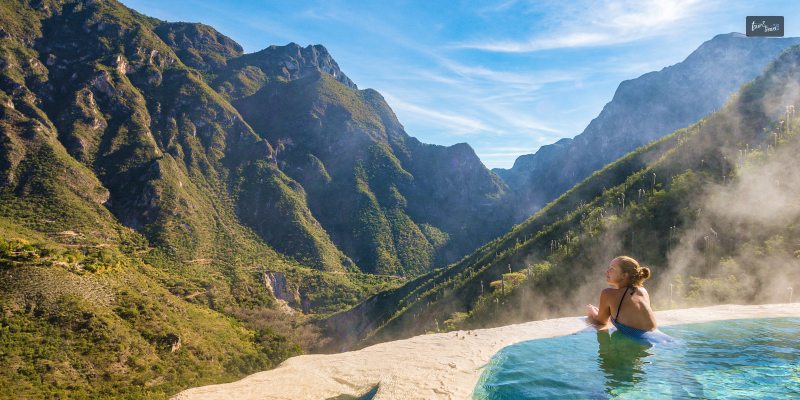
The hot springs of Tolantongo in the El Paraiso Zone are known as a stunning sight to see. There is a variety of hot springs, present here are mostly infinite pools, built on the side of grottos, cliffs, and swimming pools. 

The temperature is somewhere around 96F and 100F. The hot springs were very relaxing and very popular, which have people flock there for this relaxing activity, so having a swimsuit with yourself is a must if you wanna go to the hot springs.

Read More: Top 10 Hot Springs Near Denver You Can Visit In Winter

2. Tolantongo Cave & Tunnel (La Gruta)

There are beautiful dark and wet caves and tunnels that you can visit and explore by yourself. Since the walls of the caves and tunnels are wet, you should carry water shoes, to avoid slipping. You can also go swimming in the pools in the caves, where you will find beautiful waterfalls

3. Tolantongo River (La Gruta)

All of you who want to stay overnight at Tolantongo would mostly camp out near the Tolantongo river. The blue and warm Tolantongo river is a beautiful place to camp. There is more open space for people to gather and enjoy themselves. 

Read More: 7 Best Places For Free Camping Near Me In Las Vegas

4. Suspension Bridge (El Paraiso)

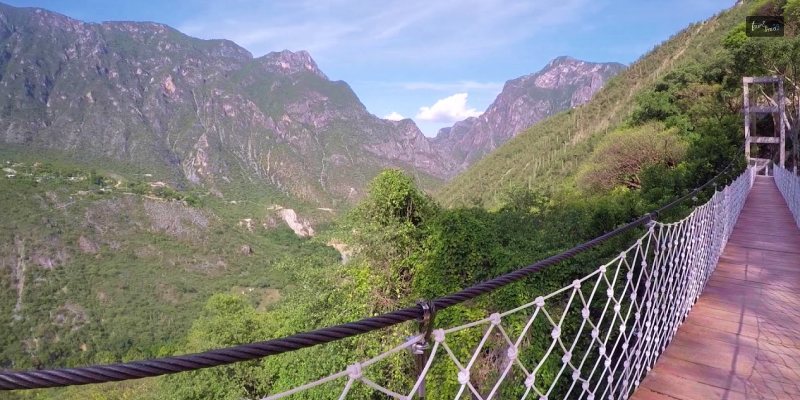
One of the famous places of Tolantongo is the swing bridge which allows visitors a beautiful and luscious green environment. 

The suspension bridge is an attractive tourist destination when you are visiting Grutas de Tolantongo. You should remember to wear comfortable shoes since you will be walking for a while. 

5. Zipline (El Paraiso)

If you are an adrenaline junky and love adventure sports, then you are going to love Ziplining through the greenery of Tolantongo. Although it is not free, the price for ziplining is not as much, only about $10. 

Wrapping Up!

Now that you know that Grutas de Tolantongo is a beautiful place state in Mexico. Then if you are visiting there you will find a comfortable grutas de tolantongo hotel. Or if you are staying there only for a night, then camping is the best option. 

So if you think this article helped you in knowing more about grutas de tolantongo, then give your own article a like and comment down below.

Read Also:

  • Explore These 5 Excellent Yacht Charter Destinations!
  • Top 10 Scenic Snowflake Cities In The U.S. To Travel To This Winter

Share on Social Media

Mashum Mollah is the feature writer of Search Engine Magazine and an SEO Analyst at Real Wealth Business. Over the last 3 years, He has successfully developed and implemented online marketing, SEO, and conversion campaigns for 50+ businesses of all sizes. He is the co-founder of Social Media Magazine.

Leave a Reply

Your email address will not be published. Required fields are marked *

title-img Related

READ MORE Las Vegas To Grand Canyon

The Ultimate Guide To Planning A Southwest Desert Adventure From Las Vegas

BY  Sibashree Jul 30, 2026

Many people think of Las Vegas as an entertainment capital for adults, but its true value lies in its location.  It is located in the heart of the most spectacular desert landscapes in the American Southwest.  It is easy to reach more natural beauties within a day's drive from here than from any other American city.  The dilemma is not whether to take advantage of this unique position, but how to organize your Las Vegas to Grand Canyon trip. This guide will tell you exactly that. Also, you will learn how to manage your time so you can see and do all that you came to do. Reframe Your Thinking: Las Vegas As Basecamp Most people consider Vegas the destination. But it's better to look at it as the hub. A 4-hour drive gets you to the Grand Canyon, Valley of Fire, Red Rock Canyon, Hoover Dam, Lake Mead, and territories of the Mojave most see only from an airplane.  The Strip, meanwhile, gives you world-class lodging, late-night food options, and every amenity you can think of needing after a day outside.  Rugged wilderness by day, comfort by night is a legitimately rare overlap. Vegas lets you have both. This "Basecamp Vegas" strategy works because Vegas' position in the low-lying Las Vegas Valley means you can drive to areas with: Vastly Different Altitudes Ecologies Geology  But, you can do it without dedicating an entire day to travel.  Unpack once. Everything else is a day trip or a managed half-day trip. Las Vegas To Grand Canyon: Why You Can't Pack For Just One Climate One thing that many people do not realize until they get there is how different these landscapes are, particularly when it comes to the weather.  Las Vegas sits right on the border of the Mojave Desert and has an elevation of about 2,000 feet.  The South Rim of the Grand Canyon is part of the high-desert Colorado Plateau and has an average elevation of 7,000 feet (National Park Service). That's not tough math - what you learn is that the "7,000 feet" part likely translates to daytime temperatures that are 15-20 degrees cooler than when you land on the Strip.  A verifiable oven in summer, Las Vegas in September might still be enduring triple-digit heat while the North Rim, perched 1,000 feet higher than the South Rim, is already seeing snow dust the topmost peaks of the Kaibab Plateau. In the shoulder seasons, however, the temperature divide can be a huge issue if you're not prepared for it.  A 90-degree day in southern Nevada can easily feel sub-arctic once the sun goes down at the rim.  That's a good 5,000 feet above sea level, meaning even the sun doesn't do much to warm things out there in March or November. The West Rim is warmer both day and night, and it sits at a lower elevation anyway. But bear in mind to pack accordingly. West Rim Vs. South Rim: The Logistics Breakdown The Grand Canyon experiences from Vegas aren't the same. Mixing them up complicates decision-making. The West Rim is closest, 130 miles from Las Vegas, and is owned and operated by the Hualapai Tribe.  Accessible for helicopter visits to the canyon floor and Skywalk, it's the option to pick for a day with lots of big-camera photo ops, and flying time is considerably less than at the South Rim.  The land borders Lake Mead and the Colorado River, which makes the helicopter rides offer the most varied sightseeing of the bunch.  The floor landing adds a layer of depth to the experience that's hard to get elsewhere. The South Rim is the longer helicopter flight (supremely scenic itself, especially if you're arriving from Vegas), coming in around 75 minutes one-way.  This is the one you want if you're making your choice based solely on the flight.  Plus, the South Rim offers exclusive views of the widest, most varied, and most dramatic part of the Grand Canyon.  Fully 10 miles across at its widest point, this is the area where you get those iconic western views that make you feel like you're within arm's reach of an otherworldly landscape. Make The Las Vegas To Grand Canyon Travel Efficient Booking Grand Canyon helicopter tours from Las Vegas significantly reduces the time required for either rim.  A flight-based tour compresses what would otherwise be a full lost day into a half-day experience - wheels down at the Strip by late afternoon, leaving evenings free for dinner reservations and whatever you originally came to Vegas for. The West Rim offers an eagle's-eye view, where you look down on the canyon as if from an airplane.  It's dramatic, but the interior depths and range of visual stimulation isn't as complete.  It's a matter of personal preference, but most travelers prefer the South Rim because it is much older and the river has carved more deeply into this amazing place. Red Rock Canyon Vs. Valley Of Fire: Picking The Right Day Trip Travelers who don't fancy spending a full day behind the wheel have a couple of options within an hour-and-a-half drive of the Strip. Red Rock Canyon National Conservation Area is administered by the Bureau of Land Management. Furthermore, its entrance is located 15 miles west of Las Vegas on Charleston Blvd.  The 13-mile scenic loop is open from dawn to dusk, and the visitor center is open daily until 4:30 p.m.  The landscape is dominated by the Keystone Thrust fault, a geological hinge where ancient ocean limestone was shoved up and over younger red sandstone. This is what created the two-tone cliff faces that are its most iconic feature.  Get out of your car and take in the view of Turtlehead Peak, a rocky summit at the edge of the fault, and you'll see why it's one of the most fascinating viewpoints in the region. The area does get busy, and parking is limited.  There are dozens of trails here, from short family-friendly strolls to technical climbs up the region's tallest peaks.  Someone in moderate shape who wants to do a solid half-day hike with time left to take it easy should consider the White Rock/La Madre Springs loop (6.9 miles) or First Creek/First Overlook/First Summit (7.1 miles). Working Hoover Dam And Lake Mead Into The Route If you're driving to the Grand Canyon rather than flying, Hoover Dam is a no-brainer addition to your trip. The dam is right at the Nevada-Arizona border on the Colorado River. This is about a 30-mile drive southeast of Vegas.  It's a major waypoint on the route to the West Rim. Moreover, even a 45-minute visit to see the dam should give you a good sense of its size.  They offer paid tours of the inside if enough interest is sparked. Lake Mead National Recreation Area is, more conveniently, the reservoir created by the dam, and it extends nearly all the way to the east of Vegas.  It's not a side trip - you'll drive past it no matter which way you go.  If you have some extra time, there are very accessible water views and a welcome reminder of the non-deserted desert.  In season, there are boat rentals and beaches, so it can make a nice contrast to either the dam itself or a Canyon detour. The smart way to do it is to combine Hoover Dam and Lake Mead into a single morning stop on a Canyon driving day. Therefore, you will have to leave Vegas fairly early. Then, you must spend 45 minutes at the dam. After that, you must head on to the West Rim and return in the late afternoon.  That's a full day without any long detours. Desert Safety: What The Terrain Actually Demands Desert environments are more unforgiving to the unprepared than most people assume.  The low humidity in Southwest heat makes us feel like we're not sweating as much.  In reality, our sweat is evaporating almost instantly.  Since it's not pooling on our skin, the brain doesn't sound the alarm that we desperately need to drink.  The warning signs of dehydration aren't as evident in the desert as they are elsewhere. With just about any serious outdoor activity, your minimum drinking-water requirement should be one gallon per person per day.  Doesn't seem like enough? Wait until you've needed every drop. Middle-of-the-day heat is uncomfortable and dangerous for summer hiking.  Aim for early morning or late afternoon excursions - starting no later than 7 a.m. and finishing before 10 a.m., or starting after 4 p.m.  The middle of the day is for siestas and car trips with the air conditioning cranking. Also easily overlooked: the living crusts that bind many desert soils together are particularly prevalent in the Four Corners region.  Biological soil crusts are fragile communities of living organisms, mainly cyanobacteria, fungi, lichens, and mosses.  They create a natural armor of sand, preventing erosion and helping hold the desert surface together so that it may someday become soil.  These characteristics are especially important in deserts, where any soil productivity is an invaluable resource. A 4-Day "Neon To Nature" Itinerary There is a detailed itinerary given below for the 4 days of your trip and how you can make the most of it: Day 1 Arrive in Vegas, settle in, walk the Strip.  Use the evening to orient yourself and plan the route for the days ahead. Dinner somewhere worth a reservation. Day 2 Early start to Valley of Fire. It will be about a fifty-mile drive and take about an hour.  Visit the park for two to three hours exploring the formations and petroglyphs.  Return to Vegas for lunch. Drive out to Red Rock Canyon - the visitor center is sixteen miles out.  Do the scenic loop or hike the Lost Creek trail. Drive back to Vegas for dinner. Day 3 Grand Canyon day.  If flying, book a morning helicopter tour to the West Rim or South Rim - a flight-based itinerary gets you canyon views, a landing on the canyon floor if you've chosen the West Rim, and returns you to Las Vegas by early afternoon.  If driving to the West Rim, add a stop at Hoover Dam on the way out. Full day, but manageable.  Use the evening for a nice dinner somewhere you've been wanting to try. Day 4 Use the morning for anything you missed - more hiking at Red Rock, a longer look at Lake Mead, or simply breakfast outside the hotel before heading to the airport.  Golden hour on the last morning is worth setting an alarm for, especially from a high point on the Spring Mountains west of the city. Plan An Efficient Trip From Las Vegas To Grand Canyon In 2026 The math works in your favor with this structure.  Vegas's central location, combined with thoughtful scheduling, gives you four distinct environments over four days. However, the trip is designed so that you won’t feel that any single day was spent entirely driving. The city earns its reputation for many reasons.  The one that gets undersold is this. Nowhere else in the country can you eat at a Michelin-recognized restaurant the same day you stand at the edge of one of the planet's most dramatic geological formations. Read Also: Desert Terrain Makes Preparation Part Of A Better Las Vegas ATV Experience Viva Las Vegas: Your Ultimate Itinerary for an Unforgettable Trip  Explore The Nightlife: 7 Best Things To Do In Las Vegas

READ MORE Creating Travel Memory Collages

Creating Travel Memory Collages: How To Transform Your Adventures Into Lasting Visual Stories

BY  Sibashree Jul 17, 2025

Each visitor reviews their trip and returns home with dozens of pictures spread out over their phone, camera, and cloud storage.  Those single photos record moments, but typically don't convey the complete story of your trip.  Creating travel memory collages offers an excellent solution to bring together these fragments into engaging narrative visual representations that capture not only what you saw, but also how you felt during your trip. Why Is Creating Travel Memory Collages Preferable To Conventional Photo Albums?  Classic photo albums display photographs linearly, but travel experiences are rarely neat stories.  The most memorable moment of your journey may come on day three of a seven-day trip, and the best meal on the final night. Memory collages enable you to value emotional resonance over sequence, designing a composition that reflects the truth of your experience. Think about how one collage can integrate the sunrise view from your hotel room window, the scrawled note from a local café, museum entry stickers, and photos of travel companions.  That layered approach is how we actually recall trips – as a web of experiences, not discrete events. Creating Travel Memory Collages: Keep These Practical Tips In Mind Creating travel memory collages involves planning and the use of digital tools for the execution of your creative ideas.  Here are the tips I keep in mind while creating travel memory collages.  1. Planning Your Travel Documentation Strategy Successful travel collages start even before you unpack your suitcase. Seasoned travelers have organized ways of collecting collage items as they travel along.  Begin by deciding what types of memories you wish to document, other than regular tourist snapshots. Consider gathering ephemera such as restaurant menus, maps with your routes marked, boarding passes, and even flowers pressed from viewpoints.  These physical pieces add texture and authenticity to your end product. Most travelers bring a small envelope in their daypack to collect these memory triggers. Your photographic approach must also move beyond landmarks and selfies. Take note of details such as the texture of old stone walls, the palette of markets, street signs in a foreign language, and the hands of craftspeople at work.  These contextual photographs are useful as dense, dimensional collages' valuable building blocks. 2. Use Digital Tools That Transform Your Travel Memories New technology has transformed how we make and share travel collages. An effective collage maker online offers point-and-click functionality for merging photos, text, and design elements into professional-looking layouts without requiring design expertise. These programs also come with travel-oriented templates that are designed for the particular requirements of adventure documentation.  For such features as map incorporation, timeline layouts, and portrait and landscape picture orientations, interspersed seamlessly, look for the best programs.  Top programs enable you to play around with the layout until you arrive at settings that best capture the spirit of your adventure. Cloud-based collage makers also eliminate the solo traveler's quandary of editing photos spread across different devices.  You can initiate a collage on your phone while on layover, edit it on your laptop at the hotel, and finalize it on your tablet on the return trip. 3. It’s About Storytelling Through Visual Composition Effective travel collages narrate through considered composition and visual flow. Begin by establishing the overall theme or mood you wish to express.  Was this a self-discovery journey, a reunion with long-time friends, or an adventure of cultural immersion? Your theme will inform all of your compositional choices. A solo trip might have more personal, reflective moments written in an intimate, diary-like style.  A family vacation can emphasize shared moments with overlapping images and dynamic arrangements. Cultural discovery themes are served by juxtaposing elements contrasting the home and the destination. Consider where your eye moves through the composition. Successful travel collages create visual journeys that lead viewers through with you.  You could start with departure photos in the upper left, move through destination highlights, which are centered, and conclude with return trip photos in the lower right. The most effective travel collages don't just show what you looked at, but the cultural context of what you looked at that made those things meaningful. Intersperse some of the local customs, the seasonal festivals, or the historical importance you learned during your travels. Street art, architectural details, vernacular dress, and community celebrations are cultural touchstones for your own photographs.  A collage of your temple visit has greater resonance if contrasted with photos of community rituals, traditional offerings, or temple daily life that you witnessed. Language resources inject an additional dose of cultural realism. Incorporate photos of signage, menus, newspapers, or handwritten letters in the local languages.  Even if the audience is not able to read them, they give instant cultural context and plunge viewers into the distinctive atmosphere of your destination. 4. Try Balancing Personal Moments With Iconic Destinations There are tourist sites for a reason – they represent something fundamental about the history or nature of a place. But collages made up only of famous landmarks never feel very personal.  The trick is to achieve a balance between iconic shots and intimate, close discoveries. Put that iconic cathedral shot in a frame with your photo of that quaint café where you dodged a rainy afternoon.  Set the mandatory sunset beach picture beside photos of the fishermen who explained tides to you. These personal touches turn ordinary vacation photographs into real travel anecdotes. Your own vision is the selling point.  Thousands of individuals shoot the same landmarks, yet only you had that specific interaction with a street vendor, found that secret vantage point, or saw that unintentional moment of local life. 5. Focus On Seasonal And Weather Storytelling Weather and seasons play a tremendous role in shaping travel experiences, yet most collages miss these critical storytelling elements.  A drizzly Parisian afternoon creates very different memories from a sunny day, and your collage should convey these atmospheric conditions. Welcome, weather shots as storytelling devices instead of photographic disappointments. Rain on windows, snow on landmarks, or the theatrical light of cloud storms bring emotional resonance to photographs.  They also evoke more memories than ideal shots of the weather. Seasonal setting also informs the viewer of the time and atmosphere of your experience. Cherry blossoms immediately conjure spring in Japan, and autumn foliage perfectly encapsulates European city breaks.  Summer festival throngs and winter market scenes each tell particular seasonal tales. 6. Creating Cohesive Visual Narratives Strong travel collages are visually unified without sacrificing varied experiences. This harmony takes some careful consideration of color palettes, continuity of lighting, and compositional harmony.  You are not attempting to make each image look the same, but you are establishing a common visual vocabulary that ties your story together. Think about how various places in your trip could have similar color schemes or light. Mediterranean locales will frequently feature warm, golden tones that will generally work together.  Northern European cities may have cooler, more subdued color schemes with varying but similarly consistent moods. Repetition of visual motifs also unifies. If you photographed local architecture extensively, utilize such structural motifs as unifying threads in your collage. Food shots, transportation shots, or nature images can be utilized for such unifying purposes. Sharing and Preserving Your Travel Stories By Creating Travel Memory Collages When completed, your travel collages are valuable personal documents and good sharing tools. Consider creating different versions for different audiences and uses.  A longer collage might be perfect for your personal record, but a shorter version is preferable for posting on social media. Prints offer tangible ways of preserving and sharing your travel memories. Lovely prints transform digital collages into physical keepsakes that friends and family can appreciate without screens.  Most travelers create annual travel books that highlight their year's best collages. Sharing online provides the possibility of reaching other travelers and impacting their travel.  Travelers' communities value personal, firsthand information over glossy guidebooks. Your collages have the power to shape the next person's adventure or encourage them to explore places they would otherwise not have thought of. Making Every Journey Count By Creating Travel Memory Collages Travel collages redefine the way we understand and remember our travels. Instead of letting valuable memories lie dormant digitally, such visual stories celebrate the depth and nuance of travel.  They tell us that every trip, be it a foreign adventure or a fast weekend in town, has tales worth keeping and passing on. The act of making travel collages also encourages slower, more reflective travel. When you know that at some point you will be distilling these events into visual narratives, you pay closer attention as you travel.  You notice the things that otherwise would pass you by and seek out flesh-and-blood experiences that will add depth to your story. Begin your next journey with collage construction in mind. Load that little envelope for the gathering of ephemera, snap pictures beyond the self-evident tourist's shots, and leave yourself open to serendipitous moments that may become the core of your narrative.  Your future self will appreciate the rich, layered memories constructed from your deliberate method of travel documentation. Read Also: 11+ Great Places To Take Pictures In London: Photography Tourism In London

READ MORE card-img

Splurge Or Save? Finding The Sweet Spot For Summer Wardrobe Costs Before Your Next Trip

BY  Ankita Nov 12, 2025

One of the many things that my husband keeps bugging me about is what to pack when we are going on a trip. It is still okay if it is a winter trip, as he knows all the jumpers and jackets he needs to pack. For summer trips or whenever we are traveling to a warmer city, he can never decide.  And with my son now all of 12, he acts like a carbon copy of his father. He never knows what to pack for his summer excursions or holidays.  Now, this may sound like a trivial issue. However, it is a serious concern, considering Travel+Leisure has dedicated an entire post to the ideal travel clothing in 2025.  Though the post is essentially for women, it has some great ideas about how to build the perfect summer wardrobe for men without compromising comfort.  Shopping for summer wardrobe essentials for a trip can be a real budget buster. One minute you're browsing for a simple t-shirt, and the next thing you know, your cart is loaded with designer everything.  But here's the reality check. You don't need to spend your rent money to look good when the temperature rises. The trick is knowing when to open your wallet wide and when to keep it firmly shut.  Invest In These Summer Essentials Some pieces are worth every penny you spend on them. Take polo shirts, for example. A cheap polo will pill after three washes and lose its shape faster than ice cream melts in July. But a man's quality designer polo?  That will look sharp season after season. The fabric stays crisp, the colors don't fade, and the fit doesn't go wonky after a trip through the washing machine. Swimwear is another no-brainer for spending more. Nobody wants their swim shorts to fall apart mid-vacation or turn see-through after one dip in the pool. Quality swim gear holds up to chlorine, salt water, and countless pool parties. Also, you have to be particular about your innerwear. This is the innermost layer of your clothing, and your personal hygiene or comfort depends on the lingerie you wear.  Skip The Splurge Here Trendy stuff that'll be out of style before Labor Day? Save your money. That neon tank top with the weird geometric print might look cool now, but it's probably heading straight to the back of your closet come fall. Basic tees are another place to be smart with your cash. Sure, an $80 plain white t-shirt might feel luxurious, but a $15 one from a decent brand will do the job just fine. Save the big bucks for pieces that really matter. The 70/30 Game Plan Think about your summer budget like this: put most of your money into the stuff you'll wear constantly. That means: A couple of great pairs of shorts that fit perfectly Solid polo shirts and casual button-downs One really good pair of swim shorts Comfortable shoes that won't fall apart Save about 30% of your budget for the fun stuff. Bright colors, bold patterns, and whatever trend is taking over social media this year. How To Spot Quality Worth Paying For Good summer clothes have a few telltale signs. Natural fabrics like cotton and linen keep you cooler than synthetic blends that trap heat and sweat. Check the seams, too. If they look like they were sewn by someone having a bad day, skip it. Fit matters more than the price tag sometimes. A $40 shirt that fits like it was made for you beats a $100 one that's too tight in weird places. Don't Fall For These Shopping Traps Store credit cards promising instant discounts sound tempting, but that 25% off today could cost you way more in interest later. And those "limited time only" sales? Half the time, the same deal pops up again next week.  Don't let pushy salespeople rush you into buying something just because it's marked down.  Sleep on big purchases, especially if you're already questioning whether you really need another pair of khaki shorts. Also watch out for: Bundle deals that make you buy stuff you don't actually want just to get a discount on what you do need. "Buy two, get one free" offers that trick you into spending more than you planned. Impulse buys at the checkout counter that are budget killers disguised as good deals. Smart Shopping Tricks Now, to begin with, my husband initially complains. But it is he who does the maximum shopping at the end-of-summer sales. Once he is inside the trial room, it’s like a never-ending wait as he will keep trying all that he has picked in turns.  Last August's leftover inventory becomes this May's wardrobe refresh at half the price. Yes, you have to plan ahead a bit, but your bank account will thank you. Also, think about how many different ways you can wear something. A plain navy shirt goes with everything. A shirt covered in flamingos? Not so much. Building Your Summer Collection The golden rule to have all the summer wardrobe essentials for your next trip? Start with the basics. When the basics are right, you have the chance to layer them or accessorize them according to the weather conditions and local etiquette.  Personality pieces are also important, especially if you are going on a business trip or have some specific events to catch up on. Get a few neutral-colored essentials that play well together, then throw in some color and pattern to keep things interesting. Don't feel like you need to replace everything at once, either. Maybe your shorts are still good, but your polos have seen better days. Replace what's actually worn out, not what's just boring you. In addition, I keep some budget aside for shopping for summer clothes at the new location we are visiting. In this way, I can also avoid excess baggage charges when flying.