


 Related
What Are The Best Great Barrier Island Travel Tips? Exploring New Zealand Sustainably
BY Sibashree Oct 22, 2025
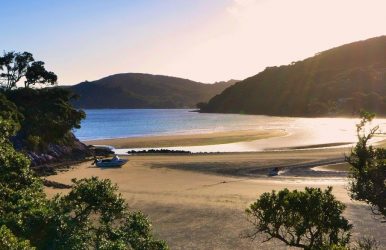
“Let’s go somewhere quiet,” he said! And being so elated that he was finally making a travel plan, I couldn't realize that he meant off-the-grid, solar-powered, rainwater-shower kind of quiet somewhere remote in New Zealand. It was the Great Barrier Island, and it turned out to be the breather spot for me, where you just relax and connect. With everything green, solar power, and local people considering themselves guardians of the land, the Great Barrier Island in New Zealand shows why sustainability is more than a buzzword. Furthermore, the conservation law governs 2/3rd of the Great Barrier Island. So, it is saved from development and commercialization. The result? In 2017, it became one of the 13 remote areas and the first island in the world to be recognized as a Dark Sky Sanctuary. Known as Te Motu o Aotea in the Maori language, it has also attracted people who move or travel to this part of New Zealand for a slow and meaningful way of living/traveling. And you won’t believe that it’s just a 30 to 40-minute flight from Auckland. You can even take the daily ferry to the island. So, getting there is easy, and you can move around easily thanks to the e-bikes, cars, taxis, and shuttles available. However, remaining respectful to the traditions and rich Maori heritage in the island is a challenge. Here, I will discuss sustainable travel tips for Great Barrier Island, provide a brief overview of the island, highlight the best activities, explain how to get there, and more. Where Is The Great Barrier Island, New Zealand? The Great Barrier Island is located in the Hauraki Gulf, around 100 kilometers northeast of Auckland. You will get flights and ferries from Auckland. Furthermore, if you are traveling from Wellington or Christchurch, you will first reach Auckland and then take a flight to the Great Barrier Island. An Overview Of Aotea, Great Barrier Island, New Zealand The Great Barrier Island is a pristine part of New Zealand, with Māori tribes as the original inhabitants. The Maori tribes gave it the name of Aotea, meaning “White Clouds.” Today, a pristine paradise located off the northeastern coast of New Zealand, the Great Barrier Island, is known for its rugged landscapes, rich biodiversity, and deep cultural heritage. It has diverse geological features such as rugged mountains, beaches, and forests. So, no wonder it is rich in biodiversity. With an area of 285 square kilometers, this island is home to dense native bush, manuka and kanuka trees, and coastal flora that thrive in its subtropical climate. Also, you will spot pāteke (brown teal), kākā (parrot), and the endangered black petrel here. And how can I forget the thundering flapping of kererū wings over our tents? Lesser-Known Facts About Great Barrier Island: Off-The-Grid Living Sustainable living is a choice on the Great Barrier Island. So, from the Aotea Arts & History Village to being run by solar power, there are a lot of things that make the Great Barrier Island stand out. Rare Facts and Sustainable PracticesDetailsOperated off the national power grid• Reliance on solar power• Rainwater harvesting• Composting toilets Minimalism and community reliance• No banks• No ATMs• No large supermarkets• Barter systems• Small general storesFirst Island in the world to become a Dark Sky Sanctuary• Least light-polluted• Clearest sky ideal for stargazingNo public rubbish bins• Pack in and pack out waste policy.• Banning of single-use cups• Mug libraries in cafes for takeaway drinksAncient Māori settlement sites• Archaeological sites such as pā fortifications, middens, and stone working areas, dating back 700-800 years. • Strong Māori connectionHome to the rare Chevron Skink• The only known habitat of the Chevron SkinkChevron Skink is one of the rarest and largest lizards of New Zealand. • Only found on the Great Barrier and Little Barrier IslandsForgotten Wharf at Blind Bay• A hidden historical site that once served as a key point for shipping kauri logs and suppliesShoal Bay Pottery’s Trust-Based Payment System• Buy handmade potteries and mugs, and just drop the money in a box.• This practice celebrates the community spirit of the island. Dual Coastline Personality• The East Coast has wild surf beaches like Awana and Medlands.• The West Coast is dotted with calm, sheltered coves ideal for diving and kayaking.Aotea Arts & History Village• Colonial cottages transformed into galleries and museums. • Explore historical artefacts, crafts, and more at the museums and galleries. Great Barrier Island Travel Tips: How To Reach There? There are four ways to travel to the Great Barrier Island. You can take a flight, a ferry, or opt for a flight+boat experience. Also, you can opt for chartered flight services. 1. How To Reach The Great Barrier Island By Flight? From Auckland: You can take a flight from Auckland to the Great Barrier Island. Barrier Air operates three to four flights daily. The flight departs from the Auckland Domestic Terminal and flies to the Claris Airport near the center of the island. For adults, a return ticket costs $396, and for a one-way trip, it is $208. For children aged 2 to 12 years, a return ticket will cost $383, and a one-way ticket is priced at $198. From Northshore: The ticket price for adults for a Northshore to the Great Barrier Island flight costs $406 (round trip) and $213 (one-way trip). For children, the ticket price of a round trip is $388, and a one-way ticket is $205. From Whitianga & Tauranga Sunair Aviation operates these flights to the Great Barrier Island. For adults, the one-way ticket is $290, and the ticket price for a round trip is $580. For children aged 2 to 11 years, it is $210 for a one-way trip and $420 for a return. 2. How To Reach The Great Barrier Island By Ferry? You will get a Sealink ferry from Auckland's Wynyard Wharf to Tryphena, the southernmost part of the Great Barrier Island. The ferries run daily in the summer and three times a week in the winter. This 4.5-hour journey is stunning, with dolphins, orcas, and whales making their appearances. The ticket prices range between $75.50 and $169 based on the age or category of the traveler and the season. Also, these ferries carry freight to the island, charging between $459 and $1028. 3. Traveling To The Great Barrier Island By Flight And Ferry It is the best travel combination to travel to and from the Great Barrier Island. Take a flight one way and return from the island by ferry. How To Move Around The Great Barrier Island? Car rentals, roof-top tent cars, e-bikes, taxis, and shuttles are the transportation modes to move around the Great Barrier Island. Mode of TransportPrice Details Car Rentals• $60-110 Per DayRoof Top Tent Car Rentals• $185/Night (Minimum booking for 2 Days)E-Bikes• $20/Hours• $75 for a Full Day• Contact: +64 (0) 22 344 0645Taxis and Shuttles • Wagon Taxis• 12 or 20 Seater Vans• Charges: $35 to $145 Moreover, like us, you can also book a shuttle or taxi service to Good Heavens Dark Sky in Medlands Beach. We reached Medlands Beach just before sunset, and we camped near the dunes. We padded down the beach barefoot, and the Sun going down the hills spread the last rays of the light on the water, vanished like the most treasured secret. With silence prevailing, it felt like sheer magic, and we waited with bated breath for the stargazing moments. How To Explore Aotea Great Barrier Island New Zealand Sustainably: Know The Best Activities From hiking to stargazing, the activities on the Great Barrier Island are diverse. Here is a brief overview. 1. Hiking The Aotea Track View this post on Instagram A post shared by Gus || NZ Hiking (@wanderinggus) It is the most challenging activity on the Great Barrier Island. The trekking route passes through the historic Kauri dam sites, amazing views, and forests. The route takes you to the highest peak of Mount Hobson, Hirakimata. You will get a panoramic view of the surroundings after reaching the highest point. 2. Exploring Kaitoke Hot Springs View this post on Instagram A post shared by Aotea Great Barrier Island (@greatbarrierislandofficial) Hiking to the Kaitoke Hot Springs was fun. We reach the hot springs after a short walk through the native bush. The pools beside the Kaitoke Stream are ideal for swimming and relaxing. 3. Stargazing With Good Heavens I have already mentioned that the Great Barrier Island is an international Dark Sky Sanctuary. We loved the guided tour with Good Heavens as they provided us with laser pointers and telescopes. It was great fun exploring the Southern celestial sphere and listening to the Māori and Greek stellar mythology. 4. Visiting Glenfern Sanctuary View this post on Instagram A post shared by Anna Sephton (@anna_sephton_) This sanctuary in Port FitzRoy is famous as the home for native species in a predator-free environment. I loved spotting rare native birds like the Kākā and Pateke (Brown Teal). 5. Kayaking In Whangaparapara Harbour The untouched coastline looked beautiful as we went kayaking in the Whangaparapara Harbour. Further, we visited the historic old Whaling Station. And the highlight of the trip? Spotting dolphins. 6. Snorkeling At Medlands Beach Medlands is more ideal for surfing. However, when the water and weather are calm, it becomes a haven for snorkeling enthusiasts. The underwaters here are rich in subtropical marine species. 7. Surfing At Awana Bay View this post on Instagram A post shared by Jack Simkin (@jacksimkin_) Surrounded by a long and golden sand beach, Awana on the eastern coast of the Great Barrier Island is a popular surfing spot. The consistent breaks here make it ideal for surfers of all expertise levels. 8. Birdwatching Native Species Rich in biodiversity, the Great Barrier Island is home to many rare and native birds of New Zealand. In the forests, wetlands, and coastal areas, you can spot Kākā, Black Petrel, and Pateke (Brown Teal). 9. Camping At Harataonga Bay View this post on Instagram A post shared by MOJA (@mojaonthemove) Harataonga Bay offers one of the most fulfilling camping experiences in the Great Barrier Island. It is on the northeastern coast of the island. The Harataonga coastal walkway is beautiful, and you can use it as the base for swimming, relaxing, and other water activities. 10. Fishing In Tryphena Harbour View this post on Instagram A post shared by Territory Boys (@territory.boys) It’s a Snapper! The Tryphena Harbour is a popular hub for recreational fishing. The Hauraki Gulf waters, especially, are rich in marine life. You can catch the fish from a rock or a wharf. Also, you can book a fishing charter boat. 11. Mountain Biking Trails Palmers Track Lookout is a popular biking trail on the Great Barrier Island. We loved the drive to Windy Canyon on the first day, and on the second day, we went for a short walk to the Palmers Track Lookout. However, this route to the Palmers Track Lookout is quite challenging for bikers, as the rock faces are very steep. 12. Visiting Local Art Galleries The Aotea Community Gallery was an eye opener for us, showing the rich heritage and art scene of the island. In fact, the entire Aotea Arts & History Village is a delight for art enthusiasts. The gallery hosts regular exhibitions and workshops, showcasing and teaching arts and crafts, which are important for the lifestyle of the island. You can even collect the souvenirs from the local gift shops. This art village is another example of how the people on the Great Barrier Island are sincere about preserving their local heritage. The Aotea Arts and History Village gained its current status and name in 2023. However, the journey began way back in 2001 when it was first registered as the Aotea Community Artz Charitable Trust in October. So, in October 2026, it will complete its 25th year. 13. Enjoying Local Cuisine View this post on Instagram A post shared by Eat What You Kill (@eatwhatyoukill.co.nz) Mānuka honey was yum, and we also enjoyed the gin and craft beer here. Also, whatever we ordered, we did not give the signature fish and chips a miss during even a single meal. 14. Attending Cultural Events The local festivals and cultural events of the Great Barrier Island are a great way to get to know people here. The Wharf2Wharf sporting challenge and the FitzRoy Mussel Fest are some of the most popular cultural events here. 15. Relaxing At Secluded Beaches View this post on Instagram A post shared by anapau la (@anapau.crw) The Blind Bay beach at Okupu, North of Tryphena, is a beautiful beach on the west coast of the island. The vibe is pretty relaxed here, and I found the locals picnicking. Furthermore, the ancient pohutukawa trees were the main attractions for me. Gooseberry is another beach where we enjoyed a relaxing vibe. It is in the heart of the Tryphena Harbour. The purple caves between the Gooseberry Flat and the Pa Beach are a surreal sight to behold. Great Barrier Island Travel Tips To Choose The Most Eco-Friendly Accommodation Options: Camping And Ecopods View this post on Instagram A post shared by Jacks Sanctuary (@jacks.sanctuary) Lodges, cabins, beach houses, tree houses, cottages, and more! There are diverse accommodation options on the Great Barrier Island. However, as backpackers, we chose camping. Medlands Beach campsite by the Medlands Stream was our base for the Great Barrier Island trip. It is a well-sheltered campsite. However, booking needs to be done in advance. Akapoua Bay campsite near the Port Fitzroy waterside, Awana Beach campsite near the Awana Surf Beach, Harataonga campsite, and Whangapoua campsite are the other popular camping grounds in the Great Barrier Island. Moreover, Whangaparapara has Island Ecopods near the Whangaparapara Wharf and the edge of the Department of Conservation Forest Estate. These ecodpods can accommodate one to four guests, and for each extra guest, you will have to pay $25 extra. The one sleeping pod for two guests costs $200 per night, and the two sleeping pods for four guests cost $400 per night. Go Great Barrier Island Tourism Package With How Other Tour And Travel Companies Offering Sustainable Experiences View this post on Instagram A post shared by Aotea Great Barrier Island (@greatbarrierislandofficial) The Great Barrier Island Tourism offers many packages for every kind of travel experience. You can choose a dedicated sun and surfing package, a hiker’s package, or something suitable for adventure lovers. There are even packages for romantic getaways, such as Alice’s Seaside Cottages, Heaven’s Above, and Medland Magic. Furthermore, they have curated their top 10 travel packages in their Top 10 section so that you can quickly find their all-inclusive packages. The travel packages are well within $1000 per person, and you can build your own package by selecting the number of people in your group, your accommodation, transport options, and any other special experiences like Dark Sky experience, fishing charter, etc. Moreover, reputable tour companies such as Good Heavens, Motu Trails, and Aotea Eco Tours offer curated experiences on the island. These companies provide guided tours, accommodation packages, and sustainable travel options. They are highly rated for their knowledgeable guides, eco-friendly practices, and personalized itineraries. Booking through these companies ensures a hassle-free and enriching travel experience. Great Barrier Island Travel Tips For Your Next Trip The Great Barrier Island is a lot of fun. However, you have to keep this checklist and things to avoid in your mind for the most seamless experience. Things to Keep in MindThings to Avoid • Book flights or a ferry in advance• Reserve accommodations early• Arrange local transportation• Pack eco-friendly travel gear.• Confirm tour bookings• Carry health essentials• Download offline maps• Inform emergency contacts• Check weather forecasts• Respect local customs and environment.• Carry insect repellent, sunscreen, and sufficient drinking water• Not booking transportation early• Ignoring weather conditions• Overpacking non-essential items• Disregarding local regulations• Not preparing for limited connectivity.• Forgetting to carry cash• Underestimating travel time• Not researching activities• Skipping travel insurance• Neglecting sustainable travel practices Is The Great Barrier Island Travel Worth It? View this post on Instagram A post shared by Charlotte Spratt (@charlotte.spratt) Yes, a trip to the Great Barrier Island is absolutely worth it. Sustainability, romance, heritage, and scenic appeal go hand in hand in this beautiful, remote location of New Zealand. Furthermore, the dark sky experience here is matchless, and authorities such as Discovery Travel talk about its Dark Sky Sanctuary status and stargazing potential. Nat Geo, on the other hand, is all praises for the conservation efforts on the island and how it practices sustainability. So, whether you’re a nature enthusiast, a cultural explorer, or a sustainability advocate, the island promises unforgettable experiences. 5-Day In Great Barrier Island: This Is How Our Itinerary Was… View this post on Instagram A post shared by Paul Michael | Travel photography (@paulmichael) Our five days on the Great Barrier Island were about digital detox. The limited network connectivity was a blessing. Also, we watched the stars every night, and we got enough time for journaling. Nevertheless, this is how we spent our five days on the Great Barrier Island. DaysActivities Day 1• Reaching Great Barrier Island• Lunch at My Fat Puku Café• Drive to Medlands Beach and sunset walk.• Stargazing• Tipi & Bob's Waterfront Lodge RestaurantDay 2• Breakfast• Bush walk to Kaitoke Hot Springs• Visit to Awana Beach• Lunch at Wild Rose Café• A short walk to Palmers Track LookoutRomantic private dinnerDay 3• Kayaking or paddleboarding in Tryphena• Lunch at Currach Irish Pub• Relaxing at Gooseberry Flat Beach• Drive to Windy Canyon• Sunset viewing and stargazingDay 4• Couple spa treatment• Light brunch• A visit to the Aotea Community Gallery• Exploring Port FitzRoyDay 5• Watching sunrise at Medlands or Awana Beach• Having breakfast and taking a stroll• Dip at Kaitoke Hot Springs• Swimming at Okupu Beach• Flight to Auckland Great Barrier Island Travel Tips: Frequently Asked Questions (FAQs) Here are the frequently asked questions and answers about the Great Barrier Island travel tips. 1. Why Is It Called The Great Barrier Island? Captain James Cook started an expedition from 1768 to 1771 to see how Venus transits across the Sun. On his way, he reached the New Zealand Coast and mapped the Great Barrier Island. In 1769, he mapped and named this part of the New Zealand Coast as the Great Barrier Island, as it offered protection and shelter to the Hauraki Gulf. 2. What To Pack For The Great Barrier Island? The Great Barrier Island is an off-the-grid space. So, you will not find streetlights here. So, you will have to pack a torch. Furthermore, warm clothes, a car charger for your phone, and towels are the things you need to pack for a trip to the Great Barrier Island. 3. What Is The Great Barrier Island Population? The population of the Great Barrier Island in 2023 is the latest information I have. The Census Report of 2023 says that the island had 1251 permanent residents in 2023. In 2018, the population of the island was 936. So, the journey from 936 to 1251 was a sharp 34% increase. 4. Is Driving In The Great Barrier Island Safe? Driving on the roads of the Great Barrier Island needs skill and patience. The winding roadways are often unsealed and without any central line. Furthermore, there will be horses, bikes, and pedestrians on the road. So, you will have to keep to the left while driving. 5. What Are The Emergency And Safety Contact For The Great Barrier Island? Keep these phone numbers handy if you are traveling to the Great Barrier Island. • Department of Conservation: 0800 ASK DOC (0800 275 362)• Claris Medical Centre: 09 429 0356• Auckland City Service Centre: 09 429 0258• Police, Fire or Emergencies: 111 or 429 0343However, cellphone coverage remains a concern here, especially on the eastern coast of the island. Read Also: Interesting Facts about Australia that will surprise you! Easiest Countries To Get Citizenship In 2025: Let’s Know The Names Australia’s Best-Kept Secret: Tailored Travel Experiences In The High Country