


 Related
What Is The Best Time To Visit Ladakh? – Travel Guide
BY Sibashree Oct 19, 2022
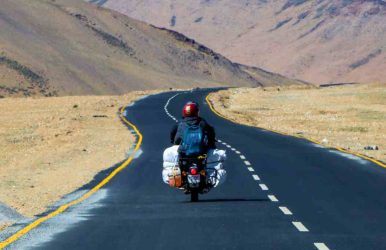
Known as a “Barren Beauty,” Ladakh has one of the, if not the most beautiful landscapes in India. Here in Ladakh, you will find one of a kind landscapes that are breathtaking and definitely one of a kind. With beautiful Buddhist cultural festivals, activities, and monasteries, Ladakh has the highest mountain passes in the country. But being situated at such great heights, Ladakh has some travel restrictions in certain months, so which is the best time to visit Ladakh? Keep on scrolling through all the details about the best time to visit Ladakh. Welcome To Ladakh! Before beginning with the best time to visit Ladakh, let’s get to know this place a little, shall we? Ladakh is a union territory of India located in the state of Jammu & Kashmir, in the extreme northern parts of India. Ladakh is known as a cold desert, the only one in India. Additionally, it is known as a cold desert, the only one in India. There also located the highest saltwater lake in the World, the Pangong Lake. Situated in the Trans-Himalayas and surrounded by the Karakoram and the Great Himalayan mountain ranges, the region's altitude ranges from as low as 2,750 m in Kargil to as high as 7,600 m at Saser Kangri. Moreover, the region is geographically split between the districts of Leh and Kargil, with the Indus River running centrally through it. Coordinates Of Ladakh:Latitude: 32°N to 36°NLongitude: 75°E to 80°E Ladakh is popular among tourists as it provides the best road trip opportunities in India. Experiencing a cross-country road trip to Ladakh is something of a dream for most travel enthusiasts. Best Time To Visit Ladakh Ladakh is a bucket-list-worthy place for most adventurers, but being such a dreamy place, you should know which is the best time to visit Ladakh. Being located at such great heights, it is not possible to travel there whenever you want to. April - JuneJuly - SeptemberOctober - March21c to -1c25c to 5c14c to -11c 1. April - June For most adventurers who want to explore the place, and see the raw landscape of the place, the best time to visit Ladakh would be during the summer. Although it’s the summer months, don’t expect the weather to be warm and sunny. It is rather cold, even during the winter months, as well. You will be able to see the snow melting under the bright sun. But you will be getting a crystal clear blue sky, amazing views, wild blooming flora, and clear fauna. These are the things why Ladakh from the months of April and June is the ideal time to travel. 2. July - September From July, the monsoon season begins in Ladakh. With irregular heavy rainfall, you can really enjoy the rain in Ladakh if you are into it. Although there are a lot of ways you can enjoy Ladakh during the monsoon season, a few of the most exciting activities there are bike tours and trekking routes. It is mostly closed or blocked due to the occasional snow slides, landslides, and even cloud bursts. There are few areas that fall under the rain shadow area and hence receive more rain, and it is very difficult to reach there. These particular areas are Leh on the Manali side, Baralacha La Pass, Leh from Srinagar, and also Zoji La Pass. 3. October - March From October to March is considered yet another best time to visit Leh Ladakh. It is the perfect weather for road trips without the fear of any rain or landslides. But make sure that the atmosphere is quite chilly, so be ready to feel the cold and chill in your bones. So be sure to pack enough warm clothes to help you actually enjoy the adventure. The beauty of Ladakh during these months is something different. The snow-covered landscape with frozen lakes and a beautiful clear sky. You will have to witness it to actually experience it. Different Climates In Ladakh If you are planning to visit Ladakh, you can choose the season you want to experience. The summer, monsoon, and winter moths are quite distinct here in Ladakh. So depending on your preference, you can easily choose the best time to visit Ladakh for you. 1. Summer In Ladakh The summertime in Ladakh is when it generates the most number of tourists. There is hardly any snow now, or it is melting away for the season. And during the summertime, you can enjoy a lot of outdoor activities such as biking, trekking, camping, mountain climbing, and many more. During summer, there are quite a lot of activities you can do in Ladakh, and they are, going for a camel safari on the double humped camels called Bactrian camels. You can even witness the summer festivals that take place here in the monasteries. There are a number of festivals that take place during the summer, and they are Saka Dawa Sindhu Darshan, Yuru Kabygyat, Phyang Tsedup, Hemis Festival, and also Matho Nagrang. There are many adventure sports that you can enjoy during the summertime, which are mountain biking on the Zanskar &Karakoram ranges, Jeep safari on the Zanskar valley, and even River rafting in the Zanskar stream. 2. Monsoon In Ladakh Even though it rains irregularly during the monsoon season in Ladakh, that doesn’t mean you can’t enjoy that experience. Although the monsoon season may not be the best time to visit Ladakh by bike or in general, it still can be very picturesque. Some of the exciting activities that you can take part in Ladakh during the monsoon season are adventure sports like white water rafting. You should also you should experience the monsoon festivals here like Phyang, Dakthok, Karsh Gustot, Karzok, and Sani Nasjal. Other than these festivals and sports, you can really enjoy a hot bowl of Thukpa, steamed momos, and a delicious cup of butter tea when you are sitting in a warm room, and it is raining outside. It doesn’t get better than that. 3. Winter In Ladakh The winter months in Leh Ladakh best time to visit for its picturesque scenic beauty and the pleasant chill and snow-covered valleys. Even though the cold weather may not be for everyone, there are a lot of activities that you can do here during the winter months. Some of these activities are like taking part in winter treks for experienced trekkers, even campings are available during the winter months. Similarly to the summer and monsoon festivals, there are many winter festivals too that is a unique experience to witness. A few of these festivals are such as Spituk Gustor, Dosmoche, Stok MOnastery festivals, Ladakhi Losar, and even Thiksay Gustor. And as a matter of fact, the winter months are the best to witness the wildlife here in Ladakh. Animals like snow leopards, mountain wolves, magpies, blue sheep, and even wild hares are a few of the animals you can witness. Frequently Asked Questions (FAQs): If you have any more doubts about the best time to visit Ladakh, then here are a few queries that others have had. 1. What Is The Best Time To Visit Ladakh For Sightseeing? The best time to visit Ladakh for sightseeing is from May to September. During these months, the weather is relatively mild, roads from Manali and Srinagar are open, and popular attractions like Pangong Lake, Nubra Valley, and monasteries are easily accessible. 2. Is Ladakh Open To Tourists Throughout The Year? Yes, Ladakh is technically open all year, but winter travel (October to April) is challenging due to extreme cold, heavy snowfall, and road closures. Flights to Leh operate year-round, but outdoor sightseeing options are limited in winter. 3. Which Month Is Best To Visit Ladakh For Snow Lovers? If you want to experience snowfall and frozen landscapes, January and February are ideal. These months are also perfect for adventure enthusiasts interested in the Chadar Trek and experiencing Ladakh’s winter culture. 4. What Is The Best Time To Visit Ladakh For Adventure Activities? The best time for adventure activities like biking, trekking, river rafting, and camping is June to August.The weather is stable, mountain passes remain open, and most trekking routes are safe and operational. 5. Is Monsoon A Good Time To Visit Ladakh? Yes, July and August fall in the monsoon season, but Ladakh lies in a rain-shadow region, so rainfall is minimal.However, occasional landslides on access roads may occur, so travelers should stay updated on weather and road conditions. 6. Which Is The Best Time To Visit Ladakh On A Budget? For budget travelers, April–May and September–October are good options. During these shoulder seasons, flight prices and accommodation costs are lower, and tourist crowds are thinner. 7. When Should First-Time Visitors Plan Their Ladakh Trip? First-time visitors should plan their trip between June and September. This period offers comfortable temperatures, better oxygen levels for acclimatization, and full access to major tourist spots. Visit Now! Ladakh is a destination you should travel to at once in your lifetime, it is an experience that you will always remember. The landscape, the mountains, the valley, the beautiful traditions of the Buddhist culture, and everything in totality makes Ladakh a worthwhile place to visit. If you find this article helpful, then let us know in the comment section when you are planning to book a trip to Ladakh. Read Also: Which Is The Best Time To Visit Mussoorie? Which Is The Best Time To Visit Sikkim?