


 Related
Coastal Bliss: Top Things To Do In Bournemouth
BY Abdul Aziz Nov 7, 2023
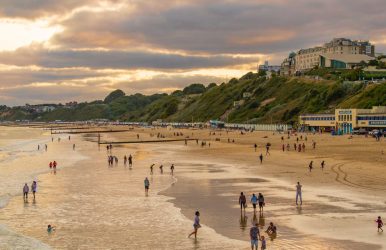
If you're looking for a perfect family-friendly beach getaway, Bournemouth should definitely be on your list. You can explore the coastline and visit the famous Boscombe Pier by joining a hop-on-hop-off bus tour. For nature lovers, a trip to Hengistbury Head nature reserve can be a great experience. If you love being on the water, you can take a cruise around Poole Harbor and its islands, which can be a memorable afternoon excursion. And last but not least, enjoying fish and chips on the beach is a must-try experience. This destination is ideal for families with kids who enjoy spending time around boats. There are two Blue Flag beaches in the area, Durley Chine and Alum Chine, which are perfect for children. They have soft white sand, beach huts, and playgrounds, making it an exciting place for them to explore. In this article, we will explain some of the most exciting things to do in Bournemouth. Bournemouth: An Overview Although there is something magical about escaping to the British coast in autumn. Of course, the obvious time to visit is summer. But the peak months offer a more relaxed pace away from the busy crowds. It has unobstructed sea views, refreshing freshness in the air, and plenty of activities and events to enjoy. If you're looking for something away from the coastline, why not check out the Bournemouth Arts Festival? It runs from October 14th to 21st and features a variety of performances in dance, music, film, theater, literature, and visual arts. One of the highlights is Hydromania, a show that promises to be both surprising and delightful. With over 50 events taking place throughout the city's unique locations, the 'Indian Summer' offers an exciting artistic experience. For those seeking more active activities, Boscombe Pier is a great spot for mini-golf. And for the thrill-seekers, zip-lining from Bournemouth Pier to the beach is a must-try adventure. During New Year's Eve, the coastal and woodland walks in Dorset are perfect for relaxation. You can enjoy strolls along the beautiful beaches or wander through the 3km of Grade II listed Victorian gardens in the city center, which turn into a kaleidoscope of autumn colors. There's even a guided Tree Trail sheet to help you learn more about each species as you explore the gardens. This seaside escape is affordable, starting at just £450 for 4 midweek nights on the beach. Top Things To Do In Bournemouth Whether you're traveling with young children or older kids, seaside destinations in the UK offer something for everyone. Bournemouth is rich in local culture, history, adventure, and breathtaking sea views. Check out our top picks for a fun-filled beachy getaway. 1. Bournemouth Beach Experience the epitome of nautical bliss at Bournemouth Beach, where golden sand stretches for miles, inviting you to relax, sunbathe, and enjoy a refreshing dip in the glistening waters of the English Channel. “Beautiful beach easily accessible, fantastically clean, good facilities. Great beach. Plenty of things to do amusements, oceanarium, Bournemouth wheel. Plenty of places to eat can recommend Aruba bar serves food all day, reasonably priced.” - Deb 2. Stroll Through Bournemouth Gardens Immerse yourself in the peaceful beauty of Bournemouth Gardens as you stroll along winding paths surrounded by lush greenery, vibrant flower beds, and tranquil ponds, offering a peaceful escape from the busy city. “A lovely area of grass and shade that separates the Bournemouth beach from the shops. It goes along the back of the Pavillion and BH2 is just off it. Some nice live music was playing one evening. A relaxing place to people watch.” - ADPW62 3. Oceanarium Immerse yourself in a world of aquatic wonders at the Oceanarium, where you can admire fascinating marine life, meet fascinating creatures from around the world, and learn about the importance of protecting the oceans. “We had such a fantastic day at Oceanarium! There are so many different things to see and the areas are set up really well. Lunch was also really good in the cafe and a fair price. We would definitely return to Oceanarium in a few months.” - Georgie James 4. Russell-Cotes Art Gallery And Museum Step into the treasure trove of art and history at the Russell-Cotes Art Gallery and Museum. Admire stunning artwork, explore fascinating exhibits, and dive into the lives of the Victorian collectors who once called this enchanting mansion home. “Really interesting and cultural place to visit whilst in Bournemouth. The volunteer guide was very knowledgeable and friendly. Good value at £7.50 entrance, you would need an hour or two to see all the rooms and gardens. Perhaps not that interesting for young children. There is a nice cafe inside for coffee after your visit.” - gurux101 5. RockReef Pier Zip Line Feel the adrenaline rush as you float over the waves from RockReef's exciting pier. Enjoy panoramic views of the coast and enjoy the thrill of this unique and unforgettable experience. “Highly recommend this as part of a family day out, we participated in climbing with our kids (7 & 9). Had much longer than our session because they were not fully booked. Young staff team were really good.” -- Experience154700 6. BIC (Bournemouth International Centre) Enjoy entertainment at the Bournemouth International Center (BIC), a premier venue for a variety of events, including concerts, conferences, and exhibitions, ensuring there is always something exciting going on. “We went to see The War of the Worlds. Oh what a show, it was fantastic. The BIC is a brilliant place to watch a show. We were lucky to have good seats near the front, but if you were to sit anywhere in the theatre you would have a good view of the stage.” - Geraldineoz 7. Smugglers Cove Adventure Golf Go on a pirate-themed adventure at Smugglers Cove Adventure Golf. Go through challenging paths full of obstacles, caves, and waterways and create a fun experience for all ages. “A brilliant way to spend some time. Beautiful views of the sea whilst you play crazy golf. We, two adults, enjoyed ourselves thoroughly and it was lovely to see families also having a huge amount of fun.” - Emily S 8. City Sightseeing Bournemouth Hop On Hop Off Tour Discover the city's highlights on a Bournemouth City Sightseeing Tower Tour. Explore at your own pace, hopping on and off the iconic red buses to visit attractions, landmarks, and scenic viewpoints. “Booked bus tour and boat cruise, was looked after by staff on both the bus and boat. Not the best weather but really enjoyed. Good local knowledge via commentary.” - SimonMLincoln 9. VR Center Immerse yourself in the exciting world of virtual reality at Center VR. From epic gaming experiences to mind-blowing simulations, this state-of-the-art attraction offers tech lovers a unique and immersive adventure. “Firstly we were very impressed with the service we received from the staff throughout. From booking the experience over the phone, to arrival and starting the game, even chatting to staff after the game they were friendly, knowledgeable, helpful and generally a pleasure to deal with.” - Paul T 10. Mr. Mulligans Unleash your competitive spirit with Mr. At Mulligans, a fantastic venue offering indoor adventure golf, interactive games, and a lively atmosphere. Perfect for a fun day out with friends or family. “Booking was easy and, I think, reasonably priced. Staff very friendly and it was very clean. We were lucky it was very quiet when we went so we didn't feel rushed or crowded. Fun and imaginative courses.” - Mandy W Wrapping Up Immerse yourself in the enchanting beauty of Bournemouth, an enchanting seaside town on the edge of Dorset. Its amazing beaches, thriving nightlife, and endless charm make it worth a visit. If you have thoughts to share or questions to ask on things to do in Bournemouth, please leave a comment below. We would love to hear from you! Read Also: These Are The 30+ Things To Do In Mexico City That You Must Try! Some Of The Best Things To Do In Navarre Beach, Florida You Won’t Believe The Best Things To Do When In Fiji!