


 Related
Vietnam Vistas: A Seasonal Guide To Crafting Your Vietnamese Adventure
BY Abdul Aziz Nov 7, 2023
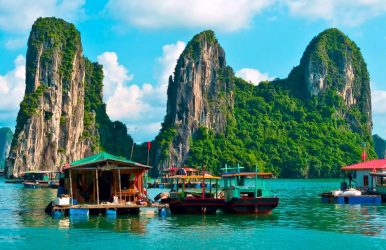
A blend of natural beauty, a rich history, and a dynamic culture make Vietnam in southeast Asia perhaps one of the most attractive nations on the continent. It has become a popular travel destination. Vietnam offers a really unique experience with its broad range of scenery. You will find breathtaking coasts, towering mountains, lush deltas, and dynamic towns in Vietnam. Vietnam is a land of contrasts. It is the site of some of the world's most stunning beach locations, including Da Nang, Nha Trang, and Phu Quoc Island. Crystal-clear waters and white sands form a tropical paradise abound on these beaches. On the other hand, energetic hubs with bustling marketplaces, active street life, and a vibrant food scene, Vietnam's cities like Ho Chi Minh City and Hanoi provide a vivid fusion of modernity and tradition. If you want to know the best time to visit Vietnam, we are spilling all the details here. Best Time To Visit Vietnam Image Source: onewanderatatime.com Your best bet to visit this beautiful country is between November and April. From Sapa's verdant rice terraces to Ha Long Bay's spectacular limestone karsts, Vietnam is home to some breathtaking vistas. For those who enjoy being outside, it offers plenty of chances. Adventure seekers have a variety of activities. It includes trekking in the northern mountains, visiting caverns in Phong Nha-Ke Bang National Park, or sailing the Mekong Delta. In coastal regions, water sports like kayaking, diving, and snorkeling are also very popular. Vietnam has a rich past that is evident in its many historical sites and is firmly anchored in ancient traditions. The Complex of Hue Monuments, Hoi An Ancient Town, My Son Sanctuary, and the Citadel of the Ho Dynasty. These are some of the UNESCO World Heritage Sites. Hue, an imperial city that has a Citadel and other royal tombs, also preserves the splendor of earlier Vietnamese eras. Vietnam now is a far cry from its turbulent and war-torn past. Its cities and towns are bursting with tall and imposing skyscrapers. It also has charming floating markets and mopeds zipping through the streets. You may complete the experience with the consistently delicious traditional Vietnamese cuisine. Vietnam is becoming more and more well-known on a global scale. Try well-known meals such as pho (noodle soup), banh mi (baguette sandwich), fresh spring rolls, and mouthwatering seafood. Vietnam is unique in that it offers a wide range of experiences. It offers a range from the craggy peaks of Ha Giang to the Mekong Delta's backwaters. Chase dragons in Hue join the crowd inside the canary-yellow walls of Hoi An's UNESCO Ancient Town. Finally, find space to breathe in a remote northern Vietnamese village. There are sand dunes in Mui Ne, tea fields in Thai Nguyen, waterwheels in Pu Luong, and hundreds of charming hamlets and intriguing little cities. The small villages dot the velvety rice terraces of Sapa and Mu Cang Chai. They also abound in the spiky limestone karsts of Halong Bay and Ninh Binh. Things To Do In Vietnam Image Source: www.travelinsurancedirect.com.au Now that you know when is the best time to visit Vietnam, here are some things you can try out when you visit: Learn To Prepare Vietnamese Cuisine- It's one thing to enjoy great Vietnamese cuisine. Consuming it after learning how to prepare it is another! Dive Underwater At Nha Trang- Although Nha Trang offers some fantastic diving, you would not think of Vietnam as a major dive destination. Visit The Canyons In Dalat- Climb, slide, leap, and rappel your way across canyons in this breathtaking location! Visit Da Nang's Marble Mountains- These stunning mountains have amazing vistas and temples to stop at along the trip. They have been quarried for marble for years. Sandboard Along Mui Ne's Sand Dunes- Similar to snowboarding, but you will go down enormous sand dunes! Embrace the rush! Go To Ghan Da Dia's Giants Causeway- Located in Northern Ireland, half a world from the Giant's Causeway, be awed by this extraordinary geological formation. Outside Of Ho Chi Minh City, See The Cu Chi Tunnels- Without visiting these famous tunnels that were utilized during the war, no vacation to HCMC is complete. Ride A Bike Over The Hoi An Pass- This is regarded as one of the most stunning stretches of road in the entire globe. Enjoy! Read More: Walking On Sunshine: Exploring The Magic Of Vietnam’s Golden Hand Bridge! Where To Stay Image Source: images.squarespace-cdn.com Vietnam is currently home to a wide variety of lodgings thanks to the country's construction boom. It includes glitzy sky pads in Ho Chi Minh City and rustic mountain retreats with nearby hill tribes. For the extravagant, there are opulent beach resorts with world-class spas. Whether you're on a tight budget or can afford to splurge, Vietnam excels in providing quality lodging at affordable prices. You can discover family guesthouses, flashpacker hostels, and fantastic local businesses. Wink Hotels, which recently launched in Ho Chi Minh City's hip District 3 with fusion cuisine and artsy rooms, starts at £30 per night. The most expensive option is to book a night at a landmark hotel like the Park Hyatt Saigon or Sofitel Legend Metropole Hanoi. Boutique hotels abound in this region of Southeast Asia, so you won't have to travel far when looking for something more design-focused. The InterContinental Sun Peninsula Resort Danang, Hotel de la Coupole Mgallery Sapa, JW Marriott Phu Quoc Bay, and Capella Hanoi are some of the hotels. They were created by hotel designer Bill Bensley. Labels like An Lam, Fusion, Azerai, and Zannier promote a more eco-chic look. Wrapping Up Despite having one of the longest wars of any country, a third of Vietnam's 97 million residents are under 30. This vibrant fusion of the ancient and new is what has propelled the nation from post-war destitution. It has become one of Asia's fastest-growing economies and one of the most popular tourist destinations. Vietnam has over 2,000 miles of majestic coastline, a profusion of golden beaches, fishing villages, and idyllic tropical islands. It has national parks and mind-boggling biodiversity. Its spectacular inland waterways stretch from its northern border with China to the Gulf of Thailand in the southwest. Halong Bay is one of Vietnam's most famous spectacular inland waterways. Vietnam has a patchwork of undulating mountains, dizzying rice terraces, and 1,000-year-old temples. Its vibrant cities, and life-giving rivers, most notably the Mekong, help dazzle its interiors. Along the way, you can munch your way through the trip. You can choose between mountains of zingy fresh food. There are meaty banh mi sandwiches, prawn-filled spring rolls, and sizzling banh xeo pancakes. You can pick up a whole new wardrobe from cheap-as-chips tailors. Or you could immerse yourself in a variety of historical treasures. If you have thoughts to share or questions to ask on when is the best time to visit Vietnam, please leave a comment. We would love to hear from you! Read Also: THIS Is When You Should Visit Maldives! Island Paradise Unveiled: Best Time To Visit The Philippines This Is The Best Time To Visit The Seven Magic Mountains In Vegas! Singaporean Expert Says Vietnam Tourism Needs Better Destination Management: Report