Top 5 Best Camping Spots In The United States
BY Abdul Aziz May 16, 2023
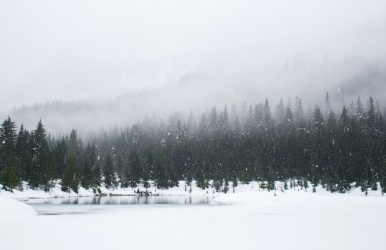
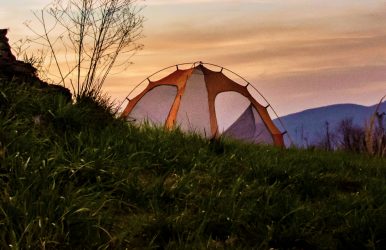
Camping is a perfect way to reconnect with nature and find yourself. If you have packed your all-weather great, your habanero beef jerky, and your sense of adventure, all you need is a place to pitch your tent. Lucky for us, the United States offers some of the most breathtaking campsites in the world. Some of them have great trails to hike, while others offer serene lakes for swimming or fishing. Here are the top five destinations well worth considering for your next outdoor getaway. You Cannot Miss These Camping Spots In The United States: Into The Wilderness For many tourists, camping is an alternative method of tourism and it is a more flexible option to explore nature and the best of wildlife. Further, Americans prefer camping to make their vacations more meaningful. Like the local homestays in remote regions, camping in parks or wilderness is a great way to know about local people and culture. Also, so many camping spots in the United States, especially the national parks, have fuelled the love of Americans for camping. Especially millennials in America love camping the most as a traveling or outdoor activity. The popularity of camping in America also shows in the market data. Here is a quick excerpt. The CAGR of camping in the USA is expected to be 6.11% between 2024 and 2029.By 2029, the camping market in the USA is about to have 80.88 million consumers.Online sales will be the primary channel, with 61% of the business happening through it by 2029. So, do you also want to explore the best camping spots in the United States? Here is a Tour and Travel list curated for you. 1. Yosemite National Park, California Yosemite National Park, likely the most famous park in the American park system, spans nearly 1,200 square miles of jaw-dropping wilderness in California's Sierra Nevada mountains. The park's granite cliffs, including the world-renowned El Capitan and Half Dome, inspire awe in even the most experienced outdoors enthusiasts. The park has 13 campgrounds, some of which accommodate RVs and others that are accessible only on foot. The Valley campgrounds like Upper Pines and North Pines are hugely popular due to their proximity to Yosemite Valley's major attractions. However, for a more tranquil and immersive experience, consider camping in the high country at Tuolumne Meadows, but check on the National Park Service site to ensure that camping in these areas is currently allowed. Seasoned campers can also head to the backcountry of Little Yosemite Valley and remote wilderness sites like Glen Aulin or Merced Lake, but be sure to secure the proper wilderness permits before you set off. 2. Glacier National Park, Montana Often called the "Crown of the Continent," Glacier National Park's rugged peaks, crystal-clear lakes, and vast meadows offer a camping experience that feels truly wild. With over a thousand campsites spread across 13 campgrounds, you have numerous options for where to pitch your tent. Many Glacier Campground is a top pick for its stunning views of Swiftcurrent Lake and the park's signature rugged peaks. The park's namesake glaciers, while receding, are a sight to behold, especially from the iconic Going-to-the-Sun Road. If you want to escape the crowds, backcountry camping permits allow you to explore the park's more rugged areas. 3. Shenandoah National Park, Virginia For those based on the East Coast, Shenandoah National Park offers an amazing wilderness escape. This park, stretching along the Blue Ridge Mountains, has over 500 miles of trails, including a portion of the famous Appalachian Trail. The Big Meadows Campground is a favorite among campers for its spacious sites, convenient facilities, and proximity to hiking trails. For wildlife lovers, the park is home to a healthy population of black bears, white-tailed deer, red foxes, diverse bird species, and the rare Shenandoah salamander—found only on the mountain peaks within the park. Visit in the autumn to witness the spectacular display of fall colors, or in spring to see the forest burst into life with blooming wildflowers. 4. Olympic National Park, Washington Olympic National Park, situated in the Pacific Northwest, offers another incredibly diverse camping experience. The park is home to several unique ecosystems, including glacier-capped mountains, over 70 miles of wild coastline, and verdant rainforests. For beach lovers, the park offers the unique opportunity to camp right on the sand at places like Second Beach, where you can dose to the sound of lapping waves. Forest campers will be enchanted by the Hoh Rain Forest Campground, nestled amongst towering Sitka spruces and western hemlocks. If you prefer higher altitudes, Deer Park Campground offers unparalleled views of the Olympic Mountains and the Strait of Juan de Fuca. 5. Acadia National Park, Maine Acadia National Park, located on Maine's rugged Atlantic coast, offers a unique blend of mountain and sea. The park's Blackwoods Campground is just a stone's throw from the ocean and offers easy access to over 120 miles of hiking trails. The park is renowned for its rocky headlands, like the Otter Cliffs, which provide vast turquoise ocean vistas. No matter what time of year you visit, Acadia offers a memorable camping experience. A must-do in Acadia is watching the sunrise from Cadillac Mountain; from October to March, this is the first place in the United States to see the morning light. Make sure you plan ahead as this popular park can get quite crowded during peak season and there are a limited number of permits issued for the sunrise visitors each day. 6. Dry Tortugas National Park, Florida Dry Tortugas National Park, one of the topmost camping spots in the United States, is a hub of stargazing, snorkeling, and sunset viewing. Further, as you camp in the Dry Tortugas National Park of Florida, you feel the proximity to a 19th-century Fort Jefferson and the crystal clear water. You have to take a Yankee Freedom ferry, a private boat, or a charter seaplane to reach Dry Tortugas National Park. Further, you have to set the itinerary right to make the most of your camping experience here. Here is a tentative itinerary of camping at Dry Tortugas National Park. Day 1Securing the campsiteWalking through the parkVisiting the Park Gift ShopClicking photosSnorkeling to see beautiful corals and fishSunset viewingRelaxing on the beachStargazingDay 2Sunrise viewingPacking up your gearLunch on the ferryExploring the Jefferson FortBack to Key West While camping at Dry Tortugas, you will have bugs and lizards as your visitors. Keep your camping zone clean and use repellants (only when needed) to keep them at bay. Tour And Travel Tips As You Visit The Best Camping Spots In The United States Preparing for the best camping spots in the USA needs careful planning and thoughtful packing. One of the most important aspects is planning your meals and packing enough food and water. Cooking equipment, such as a portable camping stove, can be very helpful. Consider convenient food items like jerky, canned goods, or pasta. Do not forget essential items like a can opener and utensils. In many camping spots in the United States, wildlife such as bears can be attracted to food. So, pack a bear canister to store food securely. Research your chosen campsite to understand the specific rules, available amenities, and local weather conditions. Temperatures can drop significantly at night, even in warmer climates. So you should have the best tent and appropriate sleeping gear. Popular campsites can book up quickly, so always check the relevant park websites for up-to-date information and availability. Lastly, remember to follow the principles of Leave No Trace to preserve these precious environments for other nature lovers. Read Also: Best Restaurants In Honduras To Visit While Traveling Indian Buffet Near Me In Florida – Best Buffets For You Top 15 Restaurants In Colombia You Must Visit While Traveling