


 Related
Making The Most Of The Gold Coast’s Whale Watching Season
BY Shahnawaz Aug 23, 2024
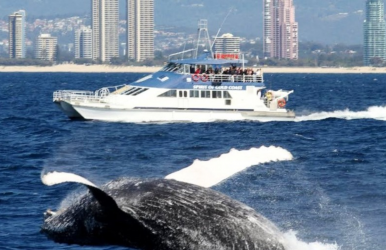
The Gold Coast isn’t just a paradise for sun-seekers and surfers. It’s also one of the best places in the world to witness the annual migration of majestic humpback whales. Yes, we are talking about the whale watching season. From June to November, these gentle giants make their way along the eastern coast of Australia, captivating locals and tourists alike. But did you know that this natural spectacle can be the perfect backdrop for a culinary adventure? For foodies, the whale-watching season on the Gold Coast offers a unique blend of breathtaking marine views and mouth-watering gastronomic experiences. In this blog, we’ll guide you through the best spots to watch whales, responsible whale-watching practices, and the finest dining options to complement your day out. Where to Watch the Best Spots and Timing Whether you want to watch the whales during your time on the water or from the land, Gold Coast is a great place of choice. But always go there during the whale watching season. There are some prime viewing locations to consider if you want to catch a glimpse of these beautiful and magnificent creatures. Best Spots If you’re eager to catch a glimpse of these magnificent creatures, the Gold Coast offers several prime viewing locations. Point Danger: Head to Point Danger. Look out for panoramic views of the coastline, which are perfect for spotting whales in the distance. The sweeping ocean views are the prime location if you want to see the migrating whales from a close distance. Burleigh Heads National Park: This is another fantastic option, as it provides elevated viewpoints along scenic walking trails. For an even closer look, consider booking a whale-watching tour from the Gold Coast Seaway, where experienced guides take you out into the open ocean. Greenmount Bay: Located between Coolangatta and Rainbow Bay, Greenmount Bay is another headland on the Gold Coast with many viewing points. Yes, there are many viewing points for whale watching, and the green foliage just compliments the scenic beauty of Greenmount Bay. Best Timing Timing is crucial to maximize your chances of seeing humpback whales. The peak season typically runs from late June to early November. Early morning and late afternoon are often the best times for sightings, as the whales are more active during these periods. To stay updated on whale activity, check local whale-watching reports or download a specialized app like 'Whale Report,' which gives real-time updates and sighting locations. Eco-Friendly Whale-Watching Tips and Practices While watching whales is fun, you must also keep safety in mind. A safe practice is to watch them from at least 100 meters. There are other practices to follow to keep the entire process eco-friendly. Respect Marine Life When engaging in whale watching, it’s essential to follow eco-friendly practices. Maintain a safe distance of at least 100 meters from the whales to avoid disturbing them. Turn off boat engines when nearby to reduce noise pollution and minimize the risk of injury to the animals. Choose Sustainable Tours Opt for whale-watching tours that prioritize sustainability. Companies like 'Whale Watching Gold Coast' and 'Spirit of Gold Coast' are renowned for their responsible practices, including using eco-friendly boats and educating guests on marine conservation. Leave No Trace Whether you’re on a boat or watching from the shore, always clean up after yourself. Dispose of any rubbish properly and avoid using single-use plastics. By keeping the environment pristine, you’re helping to ensure that future generations can enjoy whale watching, too. Ideas for a Post-Whale-Watching Meal Give your heart all the taste it desires. A wonderful day spent watching whales should be followed by a healthy and tasty meal. If you were wondering about ideas, here’s a list you should remember – Seaside Dining After a thrilling day of whale watching, reward yourself with a delectable meal at one of the Gold Coast’s top restaurants. Many restaurants in Burleigh Heads offer a stunning oceanfront setting and a menu brimming with fresh, locally sourced seafood. Casual Eateries For a more relaxed vibe, try out a Gold Coast restaurant with a view. You’ll be spoiled for food options, and you’ll have the best views on the coast. Another great spot is a night market - they feature an array of food stalls, live music, and a vibrant atmosphere! Hidden Gems Don’t miss out on hidden culinary gems in Mermaid Beach, or for a taste of local produce, visit one of the many bakeries in Miami, where you can enjoy artisanal bread, pastries, and gourmet coffee in a charming setting. Dishes to Try at Gold Coast During the Season From freshly caught fish and other marine delicacies to a gourmet experience, it’s best to try everything a little. Here’s a guide if you want directions – Fresh Catches The Gold Coast boasts an abundance of fresh seafood, making it a haven for foodies during whale watching season. Sample local favorites like Moreton Bay bugs, a type of slipper lobster, or indulge in freshly shucked oysters from Stradbroke Island. Pippies, a local shellfish, are often served with delectable garlic and chili sauce. Gourmet Experiences For a more gourmet experience, try dishes like pan-seared barramundi or grilled snapper, typically accompanied by seasonal vegetables and aromatic herbs. Many upscale restaurants on the Gold Coast also offer degustation menus, allowing you to savor a variety of flavors in one meal. Street Food If you prefer street food, don’t miss the chance to try fish tacos or prawn skewers from local food trucks and markets. These quick bites are perfect for enjoying as you stroll along the beachfront or explore local attractions. Economic Impact of the Whale Watching Season & Local Food Scene Whale watching seasons welcome people from different places to the Gold Coast. Not only is it a great time for visitors, but it’s also important for the place thanks to the jobs and businesses the seasons create. Tourist Attraction Whale watching significantly boosts the local economy, attracting thousands of visitors each year. This influx of tourists, in turn, benefits local restaurants, cafes, and food markets. Many eateries offer special promotions and seasonal menus to cater to the increased demand during whale watching season. Job Creation The tourism surge also creates job opportunities in the hospitality and service industries, from chefs and waitstaff to tour guides and hotel employees. This economic boost helps sustain the local community and ensures the continued success of the Gold Coast’s vibrant food scene. Community Engagement Finally, whale watching fosters a sense of community engagement and pride. Local businesses often collaborate on events and promotions, creating a cohesive and welcoming atmosphere for visitors. This sense of community enhances the overall experience for tourists and locals alike, making the Gold Coast a top destination for both whale watching and culinary delights. Encouraging Sustainable Tourism and Appreciation In conclusion, the Gold Coast’s whale-watching season offers more than just the chance to see magnificent marine mammals. It’s an opportunity to explore the region’s rich culinary landscape, support local businesses, and practice sustainable tourism. By following eco-friendly whale-watching practices and indulging in the area’s exceptional dining options, you’re contributing to the preservation of this beautiful destination for future generations. Ready to make the most of your whale-watching adventure? Book a tour, discover new restaurants, and immerse yourself in the Gold Coast’s vibrant food scene. And remember, every bite and every whale sighting is a step towards appreciating and protecting our natural world. Happy whale watching and bon appétit! Also read Beginner Tips For Your First Camino de Santiago. Ultimate Guide to Your Next Family Vacation in Israel. Boat Charter Miami: Essential Tips for a Great Experience.