


 Related
What Are The Top Things To Do In Glasgow? Know The Best Attractions
BY Sibashree Nov 22, 2023
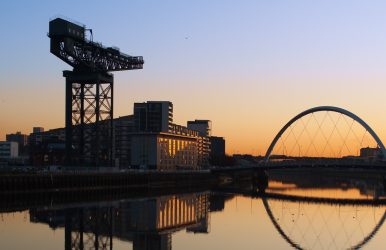
Scotland's second city, long eclipsed by sophisticated, tourist-heavy Edinburgh, has been quietly demonstrating that it's anything but second best. Glasgow has won many accolades for its culture. From the street art-filled east end to Rennie Mackintosh's architectural achievements (except for the tragically destroyed School of Art). Are you eager to visit the hippest city in Scotland? Everything you need to know is right here. Here are the mandatory things to do in Glasgow. What Are The Things To Do In Glasgow? Glasgow in Gaelic stands for “dear green place.” And to no surprise, Glasgow is as green as it gets. It houses more than 90 parks and gardens that are woven through the city’s landscape. The Glasgow Botanical Garden is home to the largest plant collection in the UK. Here are some of the best things to do in Glasgow. Don’t miss out on your next trip. George Square George Square awaits everyone landing at Queen Street Station. It aids in the orientation of newcomers in the city center and is a constant site of protest and joy. George III is absent from the square. Enraged cotton and tobacco lords had monuments of him pulled down one after another. It happened ever since he lost their lands in the American War of Independence. Instead, the adjacent area known as Merchant City is booming these days, offering a ton of Glasgow activities. It also has a vibrant nightlife and boutique shopping. From that point on, Sauchiehall, Buchanan, and Argyle streets come together to form the Style Mile, a retail district. West End The city's famed West End houses opulent parks, incredibly elaborate Glasgow University buildings, and the ever-popular Kelvingrove Museum. It has everything from Salvador Dali's artwork to Glasgow's master architect and polymath Charles Rennie Mackintosh. The artwork feels like it belongs in a different universe. River Clyde It is difficult to visit Glasgow without spending some time on the banks of the River Clyde. It is where the superb Riverside Museum and the restored Tall Ship Glenlee are located. The SSE Hydro is close, but you can check out King Tut's Wah Wah Hut or the storied Barrowlands Ballroom. It is where Oasis first appeared. Art Museums The legacy of Rennie Mackintosh, Glasgow's poster child, is deeply ingrained in the city. You might spend an entire vacation simply strolling down a path of his creations. Many additional Mackintosh artifacts can still be seen. However, the beloved Glasgow School of Art is now recuperating from a series of devastating fires. Visit the House for an Art Lover, have tea at Mackintosh at the Willow, or go to The Lighthouse. The Mackintosh Interpretation Centre honors the life and career of the architect. Don't miss the opportunity to see the expansive city views from the observatory of the Water Tower from The Lighthouse. When the tower was first constructed, it had a functional dovecot. The carrier pigeons were employed to bring the Glasgow Herald journalists the afternoon sports scores. If you can escape Mackintosh’s hold, there are still a lot of other cultural boxes to check. Behind an outstanding neoclassical façade, the Gallery of Modern Art (GOMA) houses works by Andy Warhol and David Hockney. Of particular note is the statue of the Duke of Wellington outside the entrance, posing with an orange traffic cone happily placed on his head. Explore the East End’s mural trail for a gritty perspective on art, where enormous pieces of art loom around corners and look down from office buildings. Bars And Restaurants The Merchant City offers a variety of cuisines. Highlights include the amazing, enduring Café Gandolfi fish bar, Obsession of India, and the insanely popular Paesano Pizza. The bars are extremely busy, even though they are a little forgettable. Head to the freshly reopened Babbity Bowster for a more sedate pint. In the West End, things are, maybe unsurprisingly, considerably more upscale. A longtime favorite in the area near Glasgow University is Stravaigin. Glasgow's 17-year drought for a Michelin star was just ended when Cail Bruich was included in the 2021 guide. It is located nearby on Great Western Road. Ashton Lane, a short stroll south, offers a night out unto itself with its jam-packed bar and restaurant scene. The cobblestone includes the always-popular Ubiquitous Chip. Are you thinking of going south of Clyde? Admirers of Malaysian cuisine are gushing about Julie's Kopitiam. In the much-maligned Govanhill neighborhood, Nanika is a fantastic tiny Asian fusion restaurant. Over a hundred different rums are available at the nearby Rum Shack, but if you'd rather keep things classy, stop by the Gnom café, which is next to Queen's Park. The Necropolis The Necropolis, an exquisitely decaying cemetery with a spectacular location, is located in Glasgow's east as well. Paths wind among a variety of tall-spired mausoleums and weathered burial stones stacked up on a hill behind the historic cathedral in the heart of the city. When you reach the top of the trail, you'll be treated to breathtaking views over the city. Food And Cuisine In Glasgow Glasgow is a city that truly knows how to feed you; forget stories of deep-fried Mar Bars coupled with Irn Bru, and discover one of Scotland's most lively culinary scenes instead. Glasgow has an abundance of excellent places to stay, a thriving entertainment scene, and everything you could possibly need for a weekend getaway. Good cuisine, in fact, is a source of pride for the city's residents and a constant topic of conversation. Ask a Glaswegian where to eat, and you'll never receive a straight answer. But one thing you'll hear a lot is that the city's culinary center is located in Finnieston. The neighborhood that’s been named the hippest place to live in the UK. Of all the options, Crabshakk is unquestionably a must-see. This wonderful restaurant specializes in delicious Scottish seafood offering a rotating menu of specials and some amazing house specialties. The sizzling pan of scallops with caramelized anchovy sauce is a must-try. In addition to supporting Scottish food, The West End's enduringly well-liked Ubiquitous Chip has been setting the standard. It has been offering upscale, contemporary Scottish cuisine since 1971. One of Glasgow's most exciting culinary endeavors, Dockyard Social, is located in Finnieston as well. It is a street food market housed in a large industrial warehouse with three inspiring goals. It aims to highlight the best of the city's culinary scene, assist start-up food businesses, and support the neighborhood. This provides the most impoverished residents with professional culinary training. There are still foods to try throughout the entire city if you venture outside of Finnieston. A’Challtainn is located east of BAaD (Barras Art and Design), a hip urban area in the Barras Market. With a focus on sustainably sourced seafood from Scotland, this stunning restaurant has already won a few accolades in its brief existence. It won Best Rookie in the Glasgow culinary scene. While you're in the center, make sure to check out Paesano for their exceptional pizzas. They are masterfully charred in wood-fired ovens built in Naples using only the finest Italian ingredients. Sustainable And Green Initiatives In Glasgow In line with its Gaelic name meaning "Dear Green Place," Glasgow has pivoted toward a future defined by environmental innovation and sustainable urban spaces. By integrating technology with its historic infrastructure, the city has become a pioneer in eco-conscious tourism. The Smart Canal: A European First A cornerstone of Glasgow’s green revolution is the North Glasgow Integrated Water Management System, better known as the "Smart Canal." This "Europe-first" project uses sensors and cloud technology to manage water levels in the 250-year-old Forth & Clyde Canal. Beyond preventing floods, this initiative has revitalized the northern districts, transforming the waterway into a vibrant blue-green corridor. Today, it serves as a premier hub for low-carbon recreation, including cycling, walking, and even urban paddleboarding, effectively reconnecting the city center with its natural outskirts. The Mural Trail: Art with A Purpose Sustainability also extends to cultural preservation through the City Centre Mural Trail. This initiative breathes new life into weathered buildings, reducing the need for intrusive construction while boosting "foot-traffic" tourism. Must-see highlights include the towering "St. Mungo" mural by Smug, which depicts the city’s patron saint in modern clothes, and the celebrated Billy Connolly murals. These vibrant displays have become iconic symbols of Glasgow’s digital-first tourism, encouraging visitors to explore the city’s stories entirely on foot. The New Cultural Landmarks Of Glasgow In 2026 Glasgow continues to reinvent its cultural landscape, blending historic preservation with high-energy modernism. From the tranquil outskirts of the Southside to the industrial pulse of the West End, these landmarks represent the city’s evolving identity in 2026. The Burrell Collection: A Sustainable Masterpiece Located within the lush expanses of Pollok Country Park, the Burrell Collection has reclaimed its status as a world-class destination following a massive, multi-year refurbishment. The museum’s award-winning glass-and-stone building is now a marvel of sustainability, designed to maximize natural light while housing over 9,000 priceless objects. Visitors can explore an eclectic range of treasures, from ancient Chinese terracottas and Islamic carpets to evocative sculptures by Auguste Rodin. It is a rare space where fine art and environmental design coexist in perfect harmony. SWG3: The Heart Of Modern Nightlife In the gritty-meets-glamorous district of Finnieston, SWG3 stands as the beating heart of Glasgow’s contemporary arts scene. This sprawling industrial warehouse complex has transcended its origins to become a multidisciplinary powerhouse. By day, it hosts "Yardworks," one of Europe’s most prestigious international graffiti festivals, turning the surrounding walls into an ever-changing outdoor gallery. By night, it transforms into a premier music venue, hosting global DJs and underground acts that solidify Glasgow’s reputation as a UNESCO City of Music. Enjoy The Best Things To In Glasgow On Foot And Through The Oldest Underground Train System Glasgow is home to the third-oldest underground train system in the world. The majority of the city's attractions, however, are easily accessible on foot. One single loop that revolves around the inner or outer line makes it impossible to misunderstand. In 2026, the 100-year-old "Clockwork Orange" (The Subway) has recently introduced fully automated, driverless trains. It is the first of its kind in the UK. Moreover, carrying the COP26 Legacy, the city has become more pedestrian-friendly and eco-conscious following its hosting of the UN Climate Change Conference. When Celtic and Rangers, the city's Old Firm rivals, play, it's advisable to stay away from Celtic Park. It is located in the east of the city and Ibrox in the south. Almost 130 years later, one of the most bitter rivalries in sports is still incredibly bitter. If you have thoughts to share or questions to ask about things to do in Glasgow, please leave a comment below. We would love to hear from you!