The Great Barrier Island Beach Guide: What Are The Best Beaches On The Great Barrier Island, New Zealand?
BY
Sibashree
Nov 17, 2025
The beaches add to the laid-back vibe and off-the-grid living of the Great Barrier Island, New Zealand. Surfing breaks, boating, canoeing, or just relaxing by the sea, the beaches are ideal for families, surfers, couples, nature seekers, and solo travelers.
Furthermore, it is the largest island of the Hauraki Gulf in the Auckland region, and it has protected the Auckland Harbour from the rampage of the Pacific Ocean and storms. It is now a Dark Sky Sanctuary and a boating paradise.
Also, while exploring the beaches of the Great Barrier Island, I saw a remarkable difference between the eastern and western beaches. The beaches on the eastern side have long white surf beaches and high cliffs. On the other hand, the beaches on the western side are way calmer and have deep, sheltered harbors.
Tryphena, on the southwestern side of the Great Barrier Island, is the largest settlement. The calmer and picturesque beaches of Tryphena are ideal for families. These are also ideal for spotting dolphins.
Whangaparapara Harbour, on the southeastern side, is another important beach location on the Great Barrier Island. I was fortunate enough to meet Tony & Carol Litherland, who have been living on a catamaran here since October 1979.
So, the top beaches to visit on Great Barrier Island, New Zealand, are beyond water and sand. They are the telltales of human history and home to distinct ecosystems.
In this article, I will share the Great Barrier Island beach guide, which will include the top beaches to visit on Great Barrier Island, including hidden gems, pet-friendly spots, and insider tips.
What Are The Top Beaches To Visit On The Great Barrier Island?
The beaches of the Great Barrier Island get transformed into a planetarium after sundown. Being a dark sky sanctuary, it allows us to see the luminous arch of the Milky Way and the constellations.
While Medlands, Awana, and Kaitoke draw the crowds, the secluded beaches are the best for soaking in the real vibe of this nature-first island.
Nevertheless, let’s slip into a kayak and explore secluded coves, surfing beaches, and spot the most fascinating wildlife.
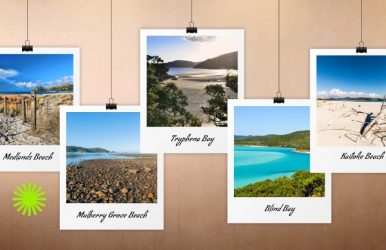
1. Medlands Beach
Medlands Beach is also called Oruawharo Beach, named after the early settler family. It is ideal for surfers, and the Medlands Beach campground is one of the best camping spots on the Great Barrier Island. This campground is maintained by the Department of Conservation (DoC).
It is also home to Oyster catchers and Dotterels. The Medlands ecovision community group works hard to preserve the nesting community of birds here.
Furthermore, I saw many pet parents taking their dogs for a walk along Medlands Beach. The dogs are allowed off-leash at 100 meters south of the Lane Walkway. However, they have to stop at 100 meters north of the creek.
However, for me, the biggest attraction of the Medlands Beach has been the Good Heavens Dark Sky. In my Great Barrier Island travel tips, I have mentioned how the sunset moments were magical, adding to our anticipation for the stargazing moments.
2. Awana Beach
The Awana Beach, on the eastern coast of the Great Barrier Island, is a popular surfing destination. The DoC campground on the northern end is a favorite spot for watching wetland birds.
Awana Beach is also a prominent location for wildlife tours in the Great Barrier Island for spotting marine life.
3. Kaitoke Beach
On our way from Auckland to the Great Barrier Island, we met the long sandy stretch of Kaitoke Beach. Our flight overlooked the Kaitoke beach on its way to the runway.
It is a popular spot for watching hammerhead sharks and sting rays.
4. Whangapoua Beach
Whangapoua Beach is a popular surfing spot, and it stands out thanks to the wonderful views of Rakitu Island and Hirakimata. Furthermore, the Whangapoua DOC campground, on the southern end of the beach, is a favorite of fishing and surfing enthusiasts.
In addition, the Northern end of the beach has the SS Wairaapa grave walkway. The grave has a white picket fence. Another major attraction of the beach is the Whangapoua to Harataonga coastal walkway.
5. Harataonga Beach
Harataonga Beach has one of the most family-friendly hiking trails on the Great Barrier Island. It is a favorite spot for rock fishing and snorkeling.
You can reach the beach after a walk through the DoC campground. However, camping here is a little difficult, considering the gravel road leading to the campsite is quite bumpy for RVs and campervans.
6. Blind Bay
Blind Bay, located on the western coast of the Great Barrier Island, is a lot calmer, and it is ideal for family vacations. Located in Okupu, this bay looks beautiful with the presence of magnificent pohutukawa trees.
What I loved the most about Blind Bay was how the dolphins came to the shore of the Okupu. You just need to get into a kayak and take a ride to spot the dolphins.
Furthermore, September to March is the ideal time for spotting Dotterel nests along the shoreline. Dogs are allowed on the Blind Bay. However, you have to keep them on the leash and ensure they only stick to the marked routes.
7. Gooseberry Flat & Pa Beach
The Gooseberry Flat Beach is in the heart of the Great Barrier Island. It is around the corner from the Stonewall Village and the Pa Beach, below the Stonewall Village, is an ideal destination for a quaint boat ride.
However, the headland between these two beaches, featuring the most unique purple stone, is the highlight of this Gooseberry Flat & Pa Beach exploration.
Another fascinating thing on the beach is how sandbars have formed warm pools of water. Kids love to splash around these pools when the tide goes away.
From here, you can go to the southern end and take the walkway over to Mulberry Grove.
8. Mulberry Grove Beach
The Mulberry Grove Beach on the Tryphena harbour is easily accessible. It is ideal for snorkeling, swimming, and boat launching.
Furthermore, the Mulberry Grove store behind the beach, a playground for young children, and the half pipe for skaters are some of the popular attractions of Mulberry Grove Beach.
You can also spot nesting native birds here. Moreover, indulging in an ice cream or fish and chips and watching the Sun go down with your family will be the most delightful moments on the Mulberry Grove Beach.
Camping And Eco Stays Near These Popular Camping Sites In Great Barrier Island, New Zealand
The DoC campsites and eco-friendly lodges are the best options for staying near these beaches.
BeachesNearby AccommodationsMedlands Beach Campsite, Harataonga Beach Campsite, Awana Beach CampsiteDoC CampsitesMedlands BeachMedlands Beach Lodge• Address: Medlands Beach 149 Sandhills Road, Medlands, Tryphena 0961, New Zealand• Contact No: +64 9 429 0335
What Are The Best Beaches For Photography And Drone Footage?
Kaitoke Beach is the ideal destination for sunrise photography. The beaches suitable for sunset photography are Blind Bay, Tryphena Bay, and Medlands Beach.
For drone photography during golden hours, use ND filters. Also, respect the privacy of the designated zones and ensure that flying birds are not harmed by flying drones.
What Is The Family-Friendly Beach Guide?
Harataonga and Gooseberry Flat are the best options if you are on holiday on the Great Barrier Island with your family. These have shared areas, picnic tables, and toilets.
When exploring the family-friendly beaches of the Great Barrier Island, you will have to bring reef shoes, especially for hiking in the rocky areas. Moreover, determine the child safety zones by monitoring the tides.
What Are The Hidden Beaches And Local Secrets Of The Great Barrier Island?
Yes, Kaitoke, Medlands, and Awana are the best crowd pullers of the Great Barrier Island. However, as I talked to the locals, they suggested some really cool hidden gems. These, with their unkempt beauty, helped us connect to the wild spirit of Aotea.
1. Puriri Bay
North of the Tryphena Harbour, Puriri Bay is a quiet beach with a rocky shoreline. The low tide makes pockets of dark sand on the shore.
Puriri Bay is also famous for spotting dolphins in the summer season.
2. Schooner Bay
Schooner Bay is another hidden gem near Tryphena. Visiting Schooner Bay is a bit of adventure and fun at the same time. You have to pass through a winding road to reach this spot.
It is a favorite for stargazers and couples, and with a cliffside landscape, it is one of the quietest beaches in the Great Barrier Island, New Zealand. The silence here is so powerful that the experience is almost spiritual.
3. Nagle’s Cove
Nagle’s Cove is on the Northwest coast near Orama and Kawa. Framed by native bush and volcanic ridges, it exudes a remote and pristine vibe. You have to access it via a kayak or a boat, as there is no marked trail.
In addition, Motairehe Marae, affiliated with Ngātiwai Ki Aotea, is an important community center for weddings, social celebrations, and funerals.
Why These Hidden Beaches Are The Attractions You Must Not Miss?
The hidden beaches of Great Barrier Island are beyond scenic. As cultural treasures or cultural taonga of the Great Barrier Island, New Zealand, they stand for the off-the-grid lifestyle.
They are also the telltale signs of the Māori heritage, and community spirit. To respect the local heritage and culture, you must stick to the following practices.
Avoiding Nesting Bird Zones
Leaving No Trace
Staying on the Marked Path
Cooperating with Biosecurity Measures
How To Explore These Hidden Beaches On The Great Barrier Island?
Renting an electric bike or a 4WD is the best way to explore the hidden beaches on the Great Barrier Island. Also, as always, it is best to take suggestions from the locals and cafe owners.
They can guide you to the best unnamed spots and directions where Google Maps fails or the network is unavailable.
Also, it’s unfortunate that we could not meet Benny Bellerby during our trip. But, he is like a wizard of the conservation process and stargazing on the Great Barrier Island. He is the adventure operator of Star Treks and is the most passionate about protecting the cultural and natural heritage of the island.
In addition, I have already mentioned Tony & Carol Litherland, who live on a catamaran on the Whangaparapara Harbour, epitomizing the signature hospitality of Great Barrier Island, New Zealand.
What Are The Adventure Add-Ons Near These Beaches Of The Great Barrier Island?
Glenfern Sanctuary, Windy Canyon, and the Kaitoke Hot Spring are the attractions near the beaches of the Great Barrier Island.
1. Glenfern Sanctuary
Glenfern Sanctuary opens your door to the Kotuku Peninsula. It is located in the northwest of Great Barrier Island, and it takes us through nearby walking tracks such as the Cooper’s Castle Track. Aotea Track and Old Lady Track.
Furthermore, it is a must-visit to experience how biosecurity and the endeavors to protect the endangered plants, animals, and birds are essential for the Great Barrier Island.
2. Windy Canyon
Windy Canyon and the Palmers Track, which continued from there, is one of the most picturesque hiking routes on the Great Barrier Island.
Along with being the route to Mount Hobson, it is also home to many rare species, such as black petrel and tomtit. Moreover, North Island robins are being reintroduced on this route. So, it is a wholesome hiking and birdwatching experience.
3. Kaitoke Hot Springs
The walk to the sulphurous Kaitoke Hot Springs continues along the edge of the Kaitoke Swamp. It is one of the most accessible tracks with pushchairs, and the walk through the ancient shoreline continues through the Kaitoke wetlands and kānuka forest.
Furthermore, the umbrella fern and orchids near the creek keep the path filled with colors. Also, a nature soak after a long beach day feels very refreshing.
What Are The Best Conservation And Safety Tips?
Aotea is not just a scenic destination. It’s a culturally rich and ecologically sensitive island with deep Māori heritage and a close-knit community. Respecting local customs and beach etiquette is essential for a positive experience and responsible tourism.
1. Respecting The Maori Heritage And Sacred Sites
Avoid trespassing on private land or areas marked as tapu (sacred).
Do not touch or move carvings, stones, or natural markers, as they may hold spiritual significance.
Ask before photographing people or cultural sites, especially near marae (Māori meeting grounds).
Learn basic greetings like “Kia ora” and show appreciation for local stories and traditions.
2. Being Mindful With Pets
There are designated on-leash and off-leash areas on the Great Barrier Island, New Zealand. Furthermore, walking with the pets through the bird nesting areas, especially in the breeding season, is an absolute No-No.
Furthermore, after hiking, you have to clean your pet to stop soil transfer and prevent the resurgence of the Kauri Dieback disease. Proper disposal of the pets is also very important.
Moreover, you must be aware of the conservation and pet policies of the ferries and accommodations before taking them as your companions.
3. Leaving No Trace
The Great Barrier Island does not have strategically placed dustbins. So, you will have to pack and carry all the biodegradable items, food scraps, and rubbish, especially when you are hiking and camping.
There is a dumping ground at Claris Landfill PDS at 70 Gray Road for cleaning the campervans and caravans. In addition, you cannot use detergent or soap when swimming on the beaches, as the practice can impact the marine life.
Moreover, staying on the marked trails while hiking is necessary to ensure protection of the flora and fauna from the Kauri Dieback Disease.
4. Respecting The Peace And Privacy
If you are staying in eco lodges or near the residential areas, you have to keep your noise level in check, and you cannot play loud music. You have to be more mindful, especially when camping on the beaches.
In addition, be careful when using drones near the sacred sites and wildlife of the Great Barrier Island. You may need permission from local authorities for the same.
5. Being Safe During Swimming And Other Water Activities
We could rarely find a lifeguard on the beaches of Aotea. Still, the western beaches of the Great Barrier Island are calmer and suitable for swimming. Also, you have to ensure that you are not blocking the surfing zones.
Stingrays and Jellyfish are common in the shallow waters of the Tryphena Harbour. So, be careful when swimming.
6. Supporting Local Sustainability Efforts
We can support the local economy of the Great Barrier Island by shopping at the shops and businesses owned by the Island. Furthermore, you can protect marine life by wearing a reef-safe sunscreen.
Also, participate in beach cleanups and local cleanup activities. In addition, stick to the water conservation rules of the Great Barrier Island, as the supply of fresh drinking water is limited on the island.
7. Ask, Listen, And Learn
You cannot know the Great Barrier Island unless you are talking to the locals. The island is the cradle of the incredible Maori heritage, and it is them who told us about Kupe, the mythical navigator and one of the first people to arrive on the Great Barrier Island.
The Okupu settlement or Ō-Kupe-Mai-Tawhiti is named after him.
8. Transport Tips
Take a Barrier Air flight from Auckland to reach the Great Barrier Island in New Zealand. You can even take a SeaLink ferry and reach the Great Barrier Island from Auckland in 4.5 hours.
Also, once you reach the Great Barrier Island, you will have to rent a car, e-bike, or scooter to move across the rugged landscape of the island.
9. Embracing Local Culture
Off-the-grid living is the essence of the Aotea Great Barrier Island, New Zealand. So, you will not find any banks or ATMs on the island.
You will have to pay by EFTPOS or credit card. However, sometimes the local businesses may refuse to take cards. So, carry enough cash to support your stay and other expenses on the Great Barrier Island.
Why The Beaches Of The Great Barrier Island Will Be On Your Bucket List?
Are you chasing waves, or are you seeking solitude and moments of introspection by the waters? The beaches of Great Barrier Island are ideal for both types of experiences. Add to that the rugged landscape and rich flora and fauna of the Great Barrier Island.
Before you plan your trip, you can read this Great Barrier Island beach guide to experience the magic of Aotea.


