Related
What Are The Best Things To Do In Rome? Here Are The Things I Loved
BY Sibashree Dec 27, 2023
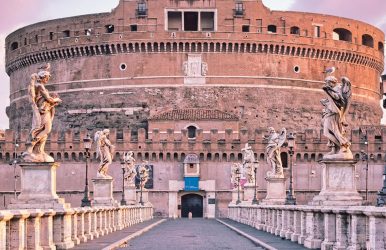
Rome is unlike any other place. Here are some of the best things to do in Rome, as recommended by locals, whether this is your first or 20th visit. This is a city where narrow streets lead to stunning temples, the mound serves pasta, and there are endless opportunities to people-watch. There's a reason it's one of the most well-known cities in the world, but you can only truly appreciate its allure if you visit. Things To Do In Rome It’s important to have a plan because Rome is much larger than you may have imagined. Archaeological finds, famous art collections, and an abundance of culture make Rome special. But don't worry, you still have plenty of time to enjoy an aperitif outside in the warm sunshine and digest your lunchtime pasta. Vatican Museums And Sistine Chapel Across 54 galleries, courtyards, and hallways, the Vatican Museums, established by Pope Julius II in the sixteenth century, are home to one of the greatest and most significant art collections in the world. The Sistine Chapel is home to thousands of prehistoric sculptures, Raphael pieces, and, of course, Michelangelo's frescoes. Get tickets to explore the Vatican Gardens, which are home to fountains, plants, and a recreation of the Our Lady of Lourdes Grotto, as well as the Vatican Necropolis, which is beneath St. Peter's Basilica, if you have the time and can arrange well in advance. The Colosseum The Colosseum is a must-see when visiting Rome, of course. Rome's crown jewel is this magnificent building—you know, the kind of thing you see on postcards—and it's even more amazing in person than you could have imagined. It is the world's largest amphitheater, with a capacity of 80,000 people, and was constructed between 72 and 80 AD. This used to be much more peaceful, with local Romans coming to watch animal hunts or bloody gladiator fights. Because of the sometimes insane lines, we advise purchasing tickets in advance. However, the 360-degree view over the theater on the fifth level makes it well worth the climb. Castel Sant’Angelo Hadrian, the Roman Emperor, constructed the striking cylindrical fortification known as Castel Sant’Angelo, or “The Castle of Angels.” It is on the banks of the Tiber River. The popes used it as a castle and fortress after it was first inaugurated as a mausoleum for Hadrian and his family. It even has a hidden escape route connecting the building to Vatican City. These days, it’s a museum featuring rooms with frescoes, a display of medieval weapons, and expansive views of Rome and the neighboring St. Peter’s Basilica. Inside is a small cafe where you can have a drink or some snacks while taking in views of the Vatican. The Pantheon One of the best-preserved ancient structures is the Pantheon, which was constructed by Emperor Hadrian in 125 AD. With a diameter of 142 feet, its dome is the biggest in the entire globe. This is a must-see in Rome, and if you're visiting the city over Pentecost weekend, you're in for a treat. This tops every tourist's list of things to do in Rome. To commemorate the occasion, tons of rose petals are dropped from the oculus during Sunday Mass. It's quite a sight. The Pantheon is free to enter as of the time of publishing (May 2023), but there are plans to charge visitors an admission fee of €5. Galleria Borghese Cardinal Scipione Borghese showcased his extensive art collection under its roof. Built in the 16th century, it is still one of the top museums in Rome. The Cardinal was an ardent art collector. He was also a big fan of Caravaggio’s works and an early patron of Gian Lorenzo Bernini. Highlights of the museum include Caravaggio’s Boy with a Basket of Fruit, Canova’s Paolina Bonaparte, and Bernini’s Apollo and Daphne. Take a stroll through the park after your visit to the “pleasure palace.” It was once a suburban villa submerged in the vast gardens of Villa Borghese. Domus Aurea The opulent Domus Aurea (Golden House) of Emperor Nero is a rare window into Rome’s underground world. Also, it is one of the most magnificent homes of its era. It was earlier an opulent amusement venue close to the Colosseum between 64 and 68 AD, covering numerous historic hills in Rome. It was then devastated by the city’s destructive fire in 64 AD. Every Friday, Saturday, and Sunday, guests can participate in guided tours. A virtual reality tour is also available, which helps recreate the villa’s former splendor. Read Also: Eternal Elegance: A Guide To The Best Hotels In Rome Capitoline Museums The Capitoline Museums are in three buildings on the trapezoidal Piazza del Campidoglio, which Michelangelo created in the sixteenth century. Known as the world’s first public museums, they hold Renaissance marble statues and Roman bronzes, including the Capitoline Wolf, a symbol of Rome’s founding, and the Equestrian statue of Marcus Aurelius. An underground tunnel through the Galleria Lapidaria connects the two buildings of the museum. Visitors can also enjoy a superb view of the Roman Forum. Make time to spend a few hours perusing the collection. Also, don’t forget to pay a visit to Piazzale Caffarelli’s hidden garden, right behind the square. Gianicolo Rome, sometimes referred to as the “city of seven hills,” is renowned for its picturesque viewpoints and abundance of terraces that provide breathtaking views of the cityscape. Gianicolo is the highest point in Rome with a panoramic view over the Eternal City. It is worth the trek even though it isn’t technically one of the fabled hills. It is above the Trastevere neighborhood. Nearby is the magnificent Fontana dell’Acqua Paola. It featured in La Grande Bellezza’s opening scene. Its majesty will astound you. Testaccio Market The Testaccio neighborhood is the epicenter of Rome’s culinary traditions. So, it is a must-visit destination for foodies and daring diners alike. The region was once home to the biggest slaughterhouse in Europe. Workers there typically got compensation for the leftover animal parts. They called it the “quinto quarto,” or fifth quarter. The Testaccio Market, a bright and modern structure, is full of enticing stalls. It serves everything from freshly made pasta and craft beers to tripe stews and artichoke sandwiches. Trastevere: The Heart Of Roman Nightlife While Testaccio owns the culinary history, Trastevere owns the evening. This medieval neighborhood, located just across the Tiber, is a labyrinth of ivy-clad lanes and cobblestones. Start at the Piazza di Santa Maria, home to one of Rome's oldest churches, and let the sounds of street performers lead you into the backstreets. Local favorites like Freni e Frizioni offer a vibrant aperitivo scene, while hole-in-the-wall spots serve supplì (fried rice balls) that define Roman comfort food. The Appian Way And Catacombs For those who want to escape the city bustle, the Via Appia Antica offers a hauntingly beautiful walk through history. Known as the "Queen of Roads," this ancient highway is lined with towering pine trees and the ruins of Roman tombs. Beneath the surface lie the Catacombs of San Callisto, a vast underground cemetery where early Christians were buried. Cycling down the original Roman basalt stones on a Sunday, when the road is closed to traffic, is perhaps the most serene experience the city offers. Rome In 2026: The Jubilee Transformation If you are visiting now, you will notice the city is glowing with a renewed energy. Rome has recently undergone massive renovations for the 2025-2026 Jubilee, resulting in cleaned monuments and improved pedestrian zones. A highlight is the newly accessible Largo di Torre Argentina, where you can walk among the ruins of the temples where Julius Caesar was assassinated. It is now home to Rome’s most famous cat sanctuary. This blend of high-stakes history and quirky modern life is precisely why Rome remains eternal. Read Also: What Is The Rome To Amalfi Coast Distance? How To Reach Amalfi Coast From Rome? Gladiators In Ancient Rome: Blood, Glory, And The Legacy You Can Still Feel Today Summer In Rome: Sleep, Do, See